Table of Contents
Overview
This lab will show you how to compile and run a simple program on the Zybo board (or using the Zybo board emulator).
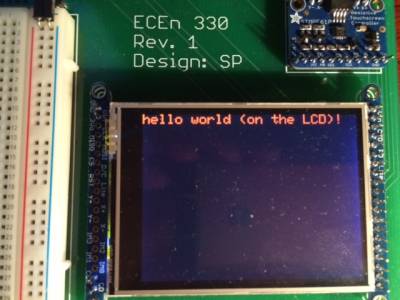
You will be given a program that prints “Hello World” to the console, as well as on the LCD screen as shown below:
You will then modify the program to draw some graphics on the LCD screen as shown here:

Objectives
- Learn how to compile and run programs on the 330 board.
- Introduce the CMake build system, and the Visual Studio Code editor.
- Become familiar with the graphics routines that are available for use with the LCD display.
- Learn how to print to the terminal using
printf().
Preliminary
- Computer setup:
- Complete Setup Step #1
- Complete Setup Step #2.
This will take some time, so start early. Follow all steps carefully. Make sure everything is working before proceeding. If you get stuck during a setup step, DO NOT SKIP IT. Ask for help on Piazza.
- Compile and run the Lab 1 code:
- Carefully read the entire page on Compiling Code.
- Follow the steps to compile the Lab1 code and run it on the board or emulator.
- Required reading:
Implementation
Requirements
- Experiment using
printf.- When you provide characters to the printf function, the characters are temporarily stored in a buffer, and then output to the terminal (also called flushed) in groups. Normally the buffer is flushed at every new line character, but also when the program ends.
- Modify the first hello world program and remove the
\nfrom the string used in the printf function and recompile and execute the program. What happens? Does hello world! still appear in the console? - Now add a
while (1);statement after the printf so that your program never ends. Recompile and execute. Does hello world! still appear in the console?
This is just for your own experimentation. You can remove these changes now.
- Modify main.c so that it shows the graphics from the picture above (two green lines, two red circles, two yellow triangles). The sizes and locations of the shapes do no not need to match the picture above exactly, but it should be reasonably close.
Files
- main.c: All code should be completed in this file.
Submission
For every lab you will follow the same submission instructions, provided at the Submitting Source Code page.
Grade Breakdown
- 80% Functionality. Your code demonstrates correct functionality.
- 20% Coding standard. You are allowed 20 freebies for this lab.
- Read over the coding standard, including the section at the bottom that discusses how your code is graded against the coding standard.
Suggestions
- Carefully read every word of the lab description. These lab descriptions have been refined over many years based upon student feedback. In most cases, the answers to your questions are usually present in the lab description. It is good practice to become very skilled at reading documentation as you will find that there are no TAs in industry. In general, students who read the lab description very carefully before coding anything complete the lab much more quickly than those who tend to scan the description and jump directly to coding. That said, if something is still unclear after you carefully read the lab description, let me know and I will try to fix it. I value student feedback.
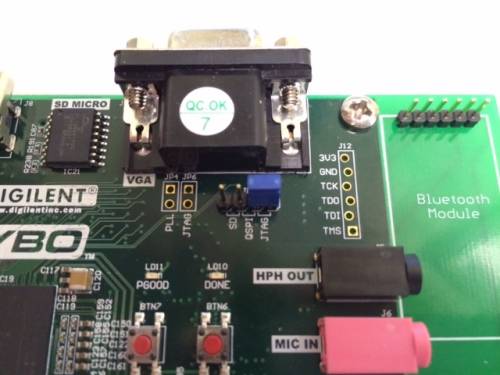
- If you are having problems programming the board, ensure that the programming jumper is set correctly. I went through all of the boards in the shop and I think that I set all of them, but double-check this if you are having problems programming the board. The jumper needs to be placed over the rightmost two pins as shown in the picture below.