Table of Contents
Overview
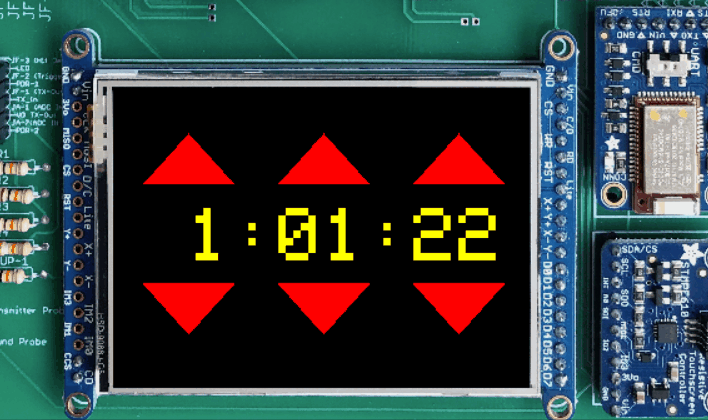
In this lab you will use your touchscreen driver and interrupt driver to implement a clock, shown in the video below:
You are provided with a clockDisplay module that handles all of the graphics, so you only need to design a state machine that controls the clock. One interval timer will generate an interrupt at 1Hz, in order to run the clock, and another interval timer will generate interrupts more frequently to tick your control state machine and the touchscreen driver state machine.
The arrows above and below the clock allow you to set the time. They can be pressed to increment or decrement the hours, minutes, or seconds by one. Alternatively, if you hold down the arrows for over 0.5 seconds, the clock will enter a fast-update mode, and increment or decrement 10 times per second. You have probably seen similar functionality in the clocks that you have used.
Objectives
- Handle specific application timing requirements by designing and implementing your own state machine.
- Create a system with split control and display code (a common design pattern for embedded systems).
- Leverage multiple interrupts to meet various timing constraints.
Preliminary
-
Display vs. Control: This lab is designed such that code is separated into two major coding sections: display and control. This design pattern works well for applications with graphics, and allows for separation of concerns.
- Display: The display code is provided to you in clockDisplay.h and clockDisplay.c. Review these files.
- The display code is responsible for storing the current clock value (hours, minutes, seconds). It also is responsible for rendering the current time, as well as the triangle buttons, on the display.
- Functions are provided to indicate the display has been touched as a specific location (which causes the time to be updated accordingly), and to advance the time one second.
- The display code has no sense of time, and only changes the time when instructed by the control code. Thus, detecting long vs short presses of the buttons needs to be handled by the control code.
- Control:
- The control code is responsible for knowing when the current time needs to change. The control code has no “sense” of how the display is updated, it just controls when these updates occur.
- The control code uses a state machine to detect when the touchscreen changes state, and how long the user has pressed the touchscreen, and uses this information to instruct the display to update the current time.
- Display: The display code is provided to you in clockDisplay.h and clockDisplay.c. Review these files.
- Review Code: Review the provided:
-
State Machine Class Notes. We will discuss the touchscreen driver state machine in class using these slides.
-
Compiling Your Code: All of your code for this lab will be written in the lab6_clock directory. You will need to create a CMakeLists.txt file in this directory to build the clock application (remember to compile all of the .c files) and link it to any necessary libraries.
Modify the top-level CMakeLists.txt file to include your lab6_clock folder.
Implementation
Requirements
- Implement the functions for clockControl.h. You must use a state machine.
- You must use the coding strategy/standard for state machines, including writing a debugStatePrint() function, which must be enabled in your submitted code.
- Follow the video behavior and description at the top of the page. In particular:
- Wait for the user to hold down the button for 0.5s before starting the fast update rate.
- During the fast update mode, update the values at a rate of 10Hz.
- In the video above, the clock does not increment each second while in fast update mode. However, this behavior is optional. It’s fine if the clock continues to advance each second in fast update mode.
Files
- Submitted files: clockControl.c. You must create and implement all of your code there.
- Do not change main.c, clockDisplay.c/.h, or any other provided files.
- Do not create other files.
Submission
Follow the instructions on submitting source code to submit your code.
Grade Breakdown
- 80%: Correct functionality
- -10% overall, if your code does not print the debug state messages when run.
- 20%: Code quality (adherence to coding standard).