Table of Contents
Managing and Maintaining Python Virtual Environments
Conda is a great tool for organizing your space. Every python project you have can include a wide variety of downloaded packages, and conda can help you to keep them from interfering with each other. It also helps you to keep track of exactly which packages are required for a project to work.
It also makes it easy to share environments for your projects with others.
With conda, you can create environments w/ packages for each of your projects, keeping things simple and easy to follow.
Anaconda is the full name, and miniconda is the same thing, but without a gui option. However, it has all of the same functionality available through the command line. Miniconda is also a smaller download as anaconda comes with lots of packages, whereas miniconda only downloads necessary packages, and then you can download any further packages on your own.


This image comes from a video by Academind. It is one of many tutorials covering conda. This image may help you understand the benefits of conda. You can achieve essentially the same things with virtualenv and pip, but conda has proven for me to be much easier to understand and navigate.
According to the video, conda makes data analysis easier, and also makes it easier for those who are new to python to get started.
Installing Miniconda
The following are the steps to installing miniconda
1.
wget from the command line.
For Linux:
cd
wget --no-verbose --continue https://repo.continuum.io/miniconda/Miniconda3-latest-Linux-x86_64.sh
## or ##
cd
wget --no-verbose --continue https://repo.continuum.io/miniconda/Miniconda3-latest-MacOSX-x86_64.sh
2.
Run these:
export CONDA_DIR=$(pwd)/env/conda
export PATH=$CONDA_DIR/bin:${PATH}
3.
Now that you have the installer downloaded, change the permissions and then run it:
chmod a+x Miniconda3-latest-Linux-x86_64.sh
./Miniconda3-latest-Linux-x86_64.sh -p $CONDA_DIR -b -f
## or ##
chmod a+x Miniconda3-latest-MacOSX-x86_64.sh
./Miniconda3-latest-MacOSX-x86_64.sh -p $CONDA_DIR -b -f
4.
Finally restart your terminal (or source ~/.bashrc in Linux) and you are all set.
Alternatively, you can go to https://docs.conda.io/en/latest/miniconda.html, where you will find an installer and instructions.
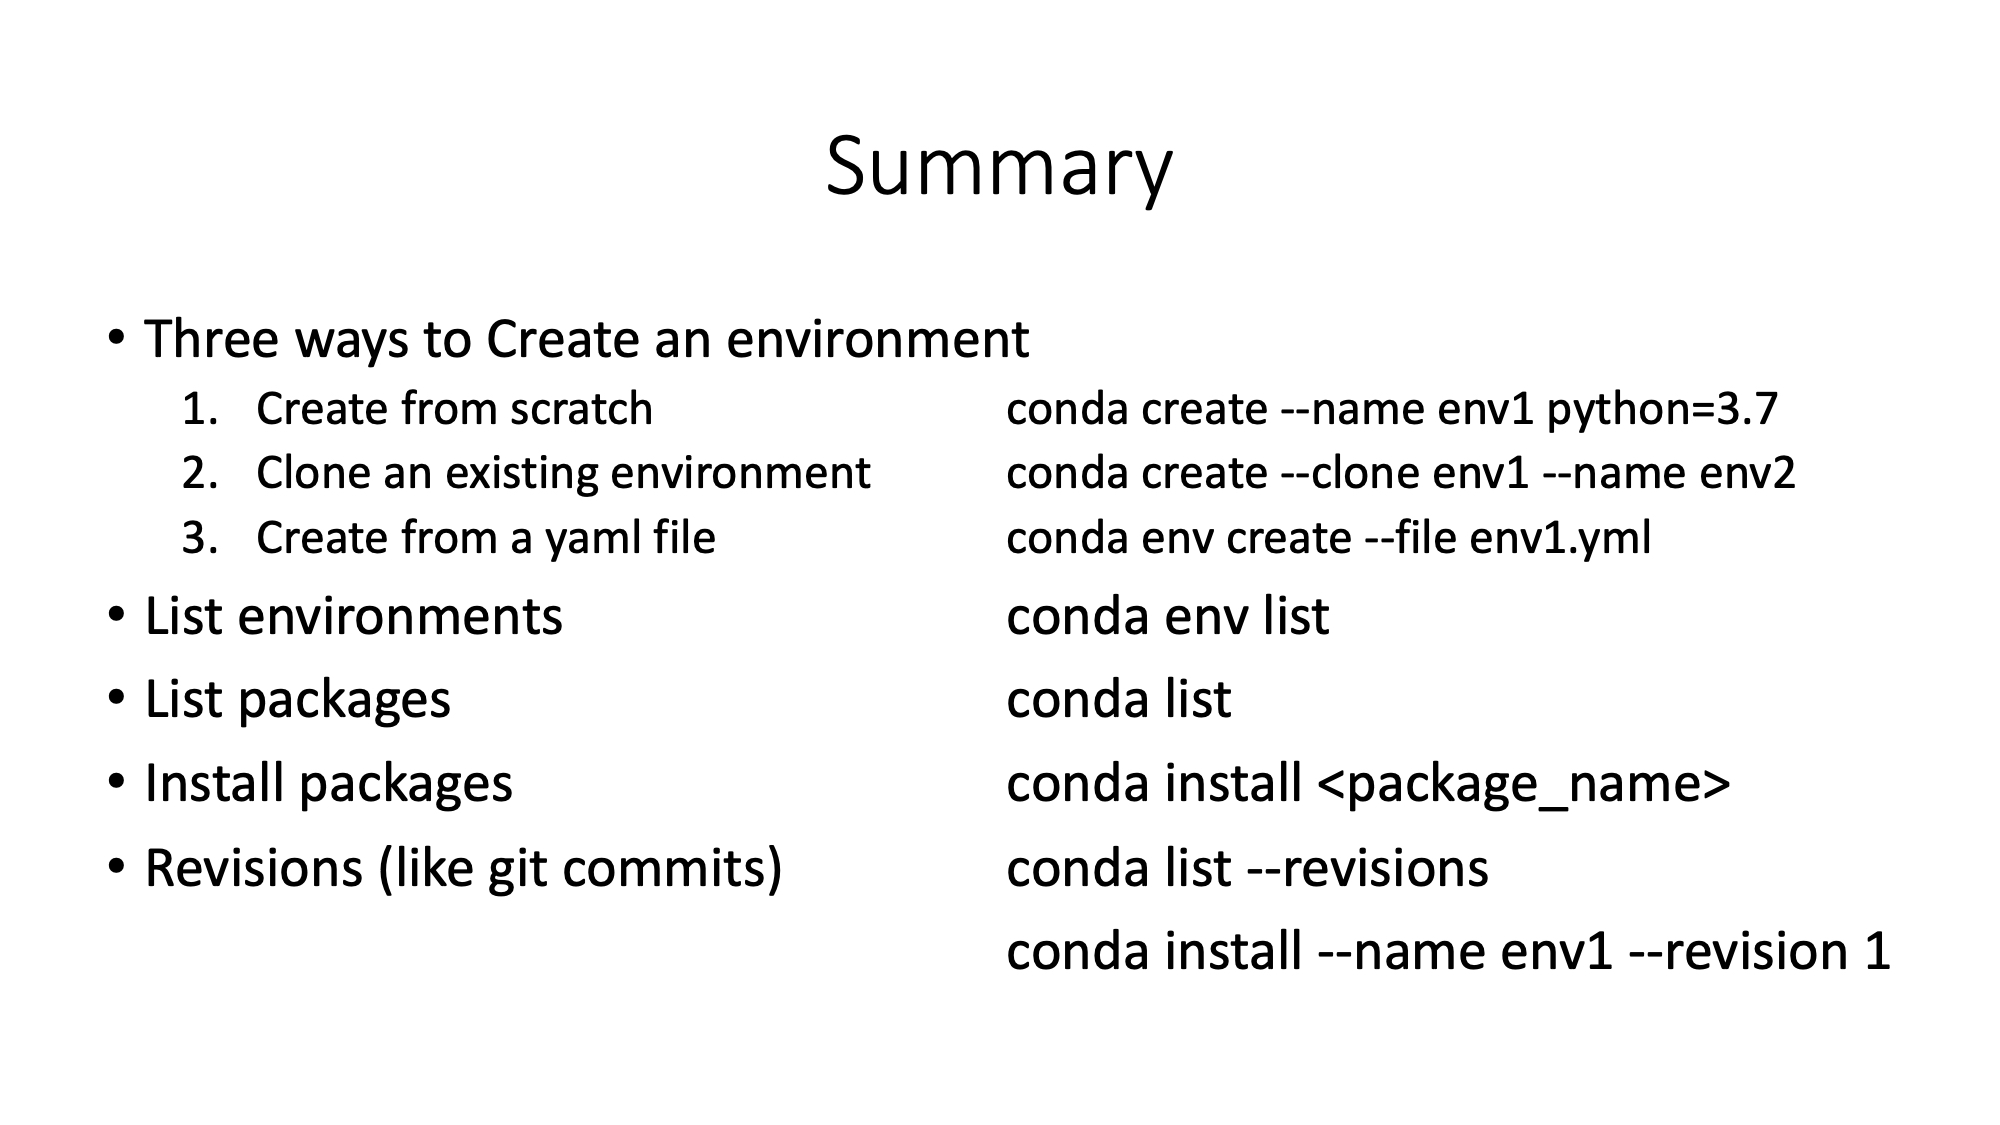
Primary Conda Commands
These are the commands you will likely use often. Notice that in each example, I have run the command from my home directory. It doesn’t matter where you run the command as long as it starts with conda, it knows what to do with the command. Run these, and then you’ll be ready to do just about anything you could need:
1) conda create --name <name> python=<version_number> - Creates a new environment, setting its name and which version of python it will operate under. (3.7 or 3.8 are the most recent versions).
Ryans-MacBook-Air-2:~ ryanjohnson$ conda create --name new python=3.7
Collecting package metadata (current_repodata.json): done
Solving environment: done

## Package Plan ##

  environment location: /Users/ryanjohnson/env/conda/envs/new

  added / updated specs:
    - python=3.7

The following NEW packages will be INSTALLED:
...

Preparing transaction: done
Verifying transaction: done
Executing transaction: done
2) conda activate <name> - Activates the specified environment.
Ryans-MacBook-Air-2:~ ryanjohnson$ conda activate new
3) conda env list - Lists all of the environments and prints an asterisk next to the currently open environment. Very useful!
Ryans-MacBook-Air-2:~ ryanjohnson$ conda env list
# conda environments:
#
base                     /Users/ryanjohnson/env/conda
myenv                    /Users/ryanjohnson/env/conda/envs/myenv
new                   *  /Users/ryanjohnson/env/conda/envs/new
One thing to recognize about this is that there is an environment called base, and if you are not in one of your other environments, you are in that one. For example, if you run conda deactivate, and then conda env list, it will have an asterisk next to base.
4) conda install <package_name> - Installs the named package within the currently open environment.
Ryans-MacBook-Air-2:~ ryanjohnson$ conda install pandas
Collecting package metadata (current_repodata.json): done
Solving environment: done

## Package Plan ##

  environment location: /Users/ryanjohnson/env/conda/envs/new

  added / updated specs:
    - pandas

The following packages will be downloaded:
...

The following NEW packages will be INSTALLED:
...

The following packages will be UPDATED:
...

Downloading and Extracting Packages
...

Preparing transaction: done
Verifying transaction: done
Executing transaction: done
5) conda list - Lists all of the packages in the open environment. Also very useful!
Ryans-MacBook-Air-2:~ ryanjohnson$ conda list
# packages in environment at /Users/ryanjohnson/env/conda/envs/new:
#
# Name                    Version                   Build  Channel
blas                      1.0                         mkl
ca-certificates           2020.1.1                      0
certifi                   2019.11.28               py27_0
intel-openmp              2019.4                      233
libcxx                    10.0.0                        1
libedit                   3.1.20181209         hb402a30_0
libffi                    3.3                  h0a44026_1
libgfortran               3.0.1                h93005f0_2
mkl                       2019.4                      233
mkl-service               2.3.0            py27hfbe908c_0
mkl_fft                   1.0.15           py27h5e564d8_0
mkl_random                1.1.0            py27ha771720_0
ncurses                   6.2                  h0a44026_1
numpy                     1.16.6           py27h81c90fd_0
numpy-base                1.16.6           py27h6575580_0
pandas                    0.24.2           py27h0a44026_0
pip                       19.3.1                   py27_0
python                    2.7.18               h47d645e_1
python-dateutil           2.8.1                      py_0
pytz                      2020.1                     py_0
readline                  8.0                  h1de35cc_0
setuptools                44.0.0                   py27_0
six                       1.15.0                     py_0
sqlite                    3.31.1               h5c1f38d_1
tk                        8.6.8                ha441bb4_0
wheel                     0.33.6                   py27_0
zlib                      1.2.11               h1de35cc_3
6) conda deactivate - Deactivates the current environment.
Ryans-MacBook-Air-2:~ ryanjohnson$ conda deactivate
Cloning and Removing Environments
conda create --clone <env_name> --name <new_name>- Clones an environment with the new name specified.
Ryans-MacBook-Air-2:~ ryanjohnson$ conda create --clone new --name newer
Source:      /Users/ryanjohnson/env/conda/envs/new
Destination: /Users/ryanjohnson/env/conda/envs/newer
Packages: 29
Files: 0
Preparing transaction: done
Verifying transaction: done
Executing transaction: done

Ryans-MacBook-Air-2:~ ryanjohnson$ conda env list
# conda environments:
#
base                  *  /Users/ryanjohnson/env/conda
myenv                    /Users/ryanjohnson/env/conda/envs/myenv
new                      /Users/ryanjohnson/env/conda/envs/new
newer                    /Users/ryanjohnson/env/conda/envs/newer
conda remove --name ENVNAME --all- Deletes an entire environment
Ryans-MacBook-Air-2:~ ryanjohnson$ conda remove --name newer --all

Remove all packages in environment /Users/ryanjohnson/env/conda/envs/newer:

## Package Plan ##

  environment location: /Users/ryanjohnson/env/conda/envs/newer

The following packages will be REMOVED:
...

Preparing transaction: done
Verifying transaction: done
Executing transaction: done

Ryans-MacBook-Air-2:~ ryanjohnson$ conda env list
# conda environments:
#
base                  *  /Users/ryanjohnson/env/conda
myenv                    /Users/ryanjohnson/env/conda/envs/myenv
new                      /Users/ryanjohnson/env/conda/envs/new
Revisions
conda list --revisions- Lists changes that have been made to your code. This is how you can see what packages you have added and when.
Ryans-MacBook-Air-2:~ ryanjohnson$ conda list --revisions
2020-06-16 08:53:04  (rev 0)
    +ca-certificates-2020.1.1 (defaults/osx-64)
    +certifi-2020.4.5.1 (defaults/osx-64)
    +libcxx-10.0.0 (defaults/osx-64)
    +libedit-3.1.20181209 (defaults/osx-64)
    +libffi-3.3 (defaults/osx-64)
    +ncurses-6.2 (defaults/osx-64)
    +openssl-1.1.1g (defaults/osx-64)
    +pip-20.0.2 (defaults/osx-64)
    +python-3.7.7 (defaults/osx-64)
    +readline-8.0 (defaults/osx-64)
    +setuptools-47.1.1 (defaults/osx-64)
    +sqlite-3.31.1 (defaults/osx-64)
    +tk-8.6.8 (defaults/osx-64)
    +wheel-0.34.2 (defaults/osx-64)
    +xz-5.2.5 (defaults/osx-64)
    +zlib-1.2.11 (defaults/osx-64)

2020-06-16 09:09:02  (rev 1)
     certifi  {2020.4.5.1 (defaults/osx-64) -> 2020.4.5.2 (defaults/osx-64)}
    +blas-1.0 (defaults/osx-64)
    +intel-openmp-2019.4 (defaults/osx-64)
    +libgfortran-3.0.1 (defaults/osx-64)
    +mkl-2019.4 (defaults/osx-64)
    +mkl-service-2.3.0 (defaults/osx-64)
    +mkl_fft-1.0.15 (defaults/osx-64)
    +mkl_random-1.1.1 (defaults/osx-64)
    +numpy-1.18.1 (defaults/osx-64)
    +numpy-base-1.18.1 (defaults/osx-64)
    +pandas-1.0.3 (defaults/osx-64)
    +python-dateutil-2.8.1 (defaults/noarch)
    +pytz-2020.1 (defaults/noarch)
    +six-1.15.0 (defaults/noarch)
conda install --name <env_name> --revision <rev_number>- Restore the environment to a previous revision
Ryans-MacBook-Air-2:~ ryanjohnson$ conda install --name new --revision 0

## Package Plan ##

  environment location: /Users/ryanjohnson/env/conda/envs/new

  added / updated specs:
    - pandas
    - python=3.7


The following packages will be REMOVED:

  blas-1.0-mkl
  intel-openmp-2019.4-233
  libgfortran-3.0.1-h93005f0_2
  mkl-2019.4-233
  mkl-service-2.3.0-py37hfbe908c_0
  mkl_fft-1.0.15-py37h5e564d8_0
  mkl_random-1.1.1-py37h959d312_0
  numpy-1.18.1-py37h7241aed_0
  numpy-base-1.18.1-py37h3304bdc_1
  pandas-1.0.3-py37h6c726b0_0
  python-dateutil-2.8.1-py_0
  pytz-2020.1-py_0
  six-1.15.0-py_0

The following packages will be DOWNGRADED:

  certifi                                 2020.4.5.2-py37_0 --> 2020.4.5.1-py37_0


Preparing transaction: done
Verifying transaction: done
Executing transaction: done
Sharing Environments
conda env export --name <env_name> > envname.yml- Export an environment to ayamlfile, that can be shared with other systems.
The YAML file created when running this command on the environment titled new looks like this:
name: new
channels:
  - defaults
dependencies:
  - ca-certificates=2020.1.1=0
  - openssl=1.1.1g=h1de35cc_0
prefix: /Users/ryanjohnson/env/conda/envs/new
It is a very simple file, that shows conda everything it needs to know to recreate the environment. Many got repositories recreate the environment they need by referencing a yaml file like this one. These files make it extremely easy for a group project to function, as everyone makes the exact same environment from the file, and thus can focus their debugging on their own work, instead of the install process.
conda env create --file envname.yml- Create an environment from ayamlfile.
Channels
When you run conda install, it looks through the default channels to find it, and if it isn’t there, it doesn’t download. In this case, you need to specify the channel under which it can be found (conda-forge or symbiflow for example). You can search for specific packages on https://anaconda.org/ and find the channel for a certain package.
Below is the command you will need to install a package from a different channel
conda install -c <channel_name> <package_name>
You can also add a channel to your list, so that it is checked when looking for the package. This is the command you would use to add a channel to your list:
conda config --add channels <channel_name>
This next command is how you see which channels are added to your
conda config --show channels
There is one thing to keep in mind. Whenever there is a conflict between channels (i.e. the package you are looking for is found in multiple channels), then the channel with the highest priority is chosen first. If you –add a channel, it becomes the new highest priority. If you would like the default channel to retain highest priority, then use –append instead.
conda config --append channels <channel_name>
Also, to remove a channel from your default list, run:
conda config --remove channels <channel_name>
Pip
Anaconda has published a page on Understanding Conda and Pip, which is informative regarding the differences between conda and pip, as well as conda’s functionality, and the ability to use both together:
“Conda and pip are often considered as being nearly identical. Although some of the functionality of these two tools overlap, they were designed and should be used for different purposes. Pip is the Python Packaging Authority’s recommended tool for installing packages from the Python Package Index, PyPI. Pip installs Python software packaged as wheels or source distributions. The latter may require that the system have compatible compilers, and possibly libraries, installed before invoking pip to succeed.
“Conda is a cross platform package and environment manager that installs and manages conda packages from the Anaconda repository as well as from the Anaconda Cloud. Conda packages are binaries. There is never a need to have compilers available to install them. Additionally conda packages are not limited to Python software. They may also contain C or C++ libraries, R packages or any other software.
…
“Another key difference between the two tools is that conda has the ability to create isolated environments that can contain different versions of Python and/or the packages installed in them. This can be extremely useful when working with data science tools as different tools may contain conflicting requirements which could prevent them all being installed into a single environment. Pip has no built in support for environments but rather depends on other tools like virtualenv or venv to create isolated environments. Tools such as pipenv, poetry, and hatch wrap pip and virtualenv to provide a unified method for working with these environments.
…
“A major reason for combining pip with conda is when one or more packages are only available to install via pip. Over 1,500 packages are available in the Anaconda repository, including the most popular data science, machine learning, and AI frameworks. These, along with thousands of additional packages available on Anaconda cloud from channeling including conda-forge and bioconda, can be installed using conda. Despite this large collection of packages, it is still small compared to the over 150,000 packages available on PyPI. Occasionally a package is needed which is not available as a conda package but is available on PyPI and can be installed with pip. In these cases, it makes sense to try to use both conda and pip.”
To use pip within a conda environment, you need to install it:
conda install pip
Then you can use pip install to install any packages not available in conda. Essentially, it’s not wrong to use pip inside of conda. It’s better to install using conda, but for any packages that don’t have a conda build, it’s perfectly acceptable to use pip.
How fpga-tool-perf uses conda
I learned how conda works in part by studying Symbiflow’s fpga-tool-perf repository. The following notes describe how a github repository/project can use conda, following the steps used by fpga-tool-perf.
After you clone fpga-tool-perf, the first thing you do is run make conda. These are the commands run to make the conda environment for fpga-tool-perf.
In the Makefile:
mkdir -p env
source utils/conda.sh
In conda.sh:
export CONDA_DIR=$(pwd)/env/conda
export PATH=$CONDA_DIR/bin:${PATH}
(
    if [[ ! -e ${CONDA_DIR}/bin/conda ]]; then
        cd env && \
        wget --no-verbose --continue https://repo.continuum.io/miniconda/Miniconda3-latest-Linux-x86_64.sh && \
        chmod a+x Miniconda3-latest-Linux-x86_64.sh
        (
            export HOME=$CONDA_DIR
            ./Miniconda3-latest-Linux-x86_64.sh -p $CONDA_DIR -b -f || exit 1
        )

        conda config --system --add envs_dirs $CONDA_DIR/envs
        conda config --system --add pkgs_dirs $CONDA_DIR/pkgs
    fi
    conda config --system --set always_yes yes
    conda config --system --set changeps1 no
    conda update -q conda

    conda env create --file ../conf/environment.yml
    conda init bash
    source ~/.bashrc

    conda info -a
)
fpga-tool-perfuses the wget method to install miniconda.- It changes a few configuration settings to suit its needs
- Finally, it creates an environment called fpga-tool-perf-env from a
YAMLfile:environment.yml, whose contents are displayed below:
name: fpga-tool-perf-env
channels:
  - conda-forge
  - symbiflow
dependencies:
  - yosys
  - yosys-plugins
  - vtr=8.0.0.rc2_3935_g7d6424bb0
  - nextpnr-xilinx
  - nextpnr-ice40
  - prjxray
  - pip
  - pip:                          # Packages installed from PyPI
    - -r file:requirements.txt
The file above does the following: gives a name for the environment, lists channels from which to access the dependencies, and gives some more packages to install through the file requirements.txt, shown below:
terminaltables
asciitable
simplejson
tqdm
colorclass
lxml
python-constraint
intervaltree
jinja2
pytest
pandas
git+https://github.com/SymbiFlow/fasm.git#egg=fasm
git+https://github.com/SymbiFlow/prjxray.git#egg=prjxray
git+https://github.com/SymbiFlow/edalize.git@symbiflow#egg=edalize
git+https://github.com/SymbiFlow/symbiflow-xc-fasm2bels.git#egg=symbiflow-xc-fasm2bels
Other Sources & Tutorials:
User Guide: https://docs.conda.io/projects/conda/en/latest/user-guide/index.html
Cheatsheet: https://docs.conda.io/projects/conda/en/latest/user-guide/cheatsheet.html
26-Minute Tutorial from Academind: https://www.youtube.com/watch?v=23aQdrS58e0
Here is an excellent written tutorial on Miniconda: https://protostar.space/why-you-need-python-environments-and-how-to-manage-them-with-conda
My 2-Slide Powerpoint Presentation: