To make sure that your AXI module works correctly, you must simulate it. As you know, the AXI bus is complicated, with many different signals and specific protocols. Writing a test bench to correctly set these signals would be a lot of work, so Xilinx provides an IP that contains a set of test bench functions to simulate transactions on the AXI bus. This IP is called the <AXI Verification IP (VIP)>
Creating a VIP Project
You will need to create a new Vivado project.
- Create the project as a subdirectory of your hw directory.
- Add your IP RTL files to the project (pit.v and pit.sv). Make sure you DO NOT select the box Copy sources into project.
- You don’t need any constraint files for a simulation project.
- Use FPGA part #: xc7z020clg400-1
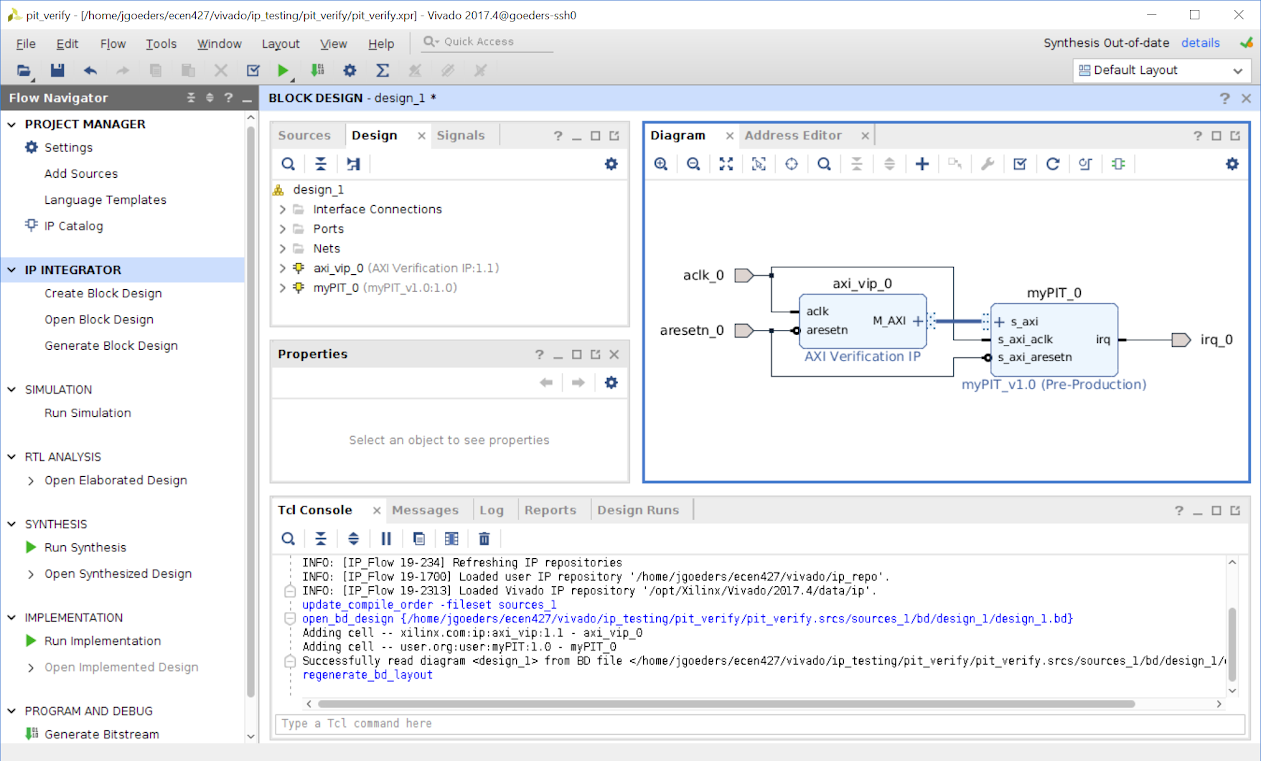
Create Block design
- Click Create Block Design in the left-hand pane, and choose a name for your block design.
- This block design should have your VIP module and your PIT IP.
- Add the AXI Verification IP (VIP) by right-clicking in the block design and selecting Add IP….
- Double-click to configure the VIP
- The VIP should be configured with INTERFACE MODE = MASTER and PROTOCOL = AXI4LITE. You may need to first select INTERFACE MODE = MASTER, then click OK to close the configuration window, then re-open the configuration window to set PROTOCOL = AXI4LITE.
- Add your IP to the block design by right-clicking in the block design and selecting Add Module…. You can then select your IP from the list of available modules.
- Create external ports for your input and output signals.
- Remember to set the address of your PIT in the Address Editor (the actual address doesn’t matter, you can just right-click and select Assign).
- Use the small checkbox icon at the top of the block design to Validate Design. You should not have any errors or warnings.
Create a Test Bench
Create a new SystemVerilog file to use as a test bench. Create this file somewhere in your repository (such as your pit directory), but do not create it inside your Vivado project. You should treat your Vivado project as temporary files that will NEVER be committed to your repository. You can start with the HDL provided below.
Add this test bench to your project:
- Right-click in the Sources pane and select Add Sources…. In the popup, select Add or create simulation sources, Add file, then browse to your newly created SystemVerilog test bench file.
- Make this test-bench the top-level simulation source. Go to Sources, Hierarchy, Simulation Sources and right-click on your test bench file and choose Set as Top.
A simple starting test bench is included below. It was created based on a tutorial here: http://www.wiki.xilinx.com/Using+the+AXI4+VIP+as+a+master+to+read+and+write+to+an+AXI4-Lite+slave+interface.
It should work for you with a few minor modifications. The test bench performs two writes to registers in the PIT IP. You will need to perform more reads and writes to the PIT to make sure it is designed to specification correctly, and meet the simulation requirements for Lab 5. Some notes
- The
import design_1_axi_vip_0_0_pkg::*;assumes your VIP simulation package is nameddesign_1_axi_vip_0_0. Depending on how you chose to name things, yours could have a different name. You can expand and check Sources, IP Sources, Simulation for the name of the VIP simulation package in your project. Note that Vivado may underline these lines in red (indicating an error) even if they are written correctly. - The datatype of
master_agentwill be <package_name>_mst_t. - The instantiation of the block design might be a bit different depending on how you named your block design file and the external ports.
- Change the addresses (
32'h44A0_0000and32'h44A0_0004) to appropriate addresses for the PIT in your design.
`timescale 1ns / 1ps

import axi_vip_pkg::*;
import design_1_axi_vip_0_0_pkg::*;

module tb(
  );

  bit                                     clock;
  bit                                     reset_n;
  bit                                     irq;

  design_1_axi_vip_0_0_mst_t              master_agent;

  xil_axi_ulong addrCtrl = 32'h44A0_0000;
  xil_axi_ulong addrPeriod = 32'h44A0_0004;
  xil_axi_prot_t prot = 0;
  xil_axi_resp_t resp;
  bit[31:0] data;

  // instantiate block diagram design
  design_1 design_1_i
       (.aclk_0(clock),
        .aresetn_0(reset_n),
        .irq_0(irq));


  always #5ns clock <= ~clock;

  initial begin
    master_agent = new("master vip agent",design_1_i.axi_vip_0.inst.IF);

    //Start the agent
    master_agent.start_master();

    #50ns
    reset_n = 1'b1;

    #50ns
    data = 32'd5;
    master_agent.AXI4LITE_WRITE_BURST(addrPeriod, prot, data, resp);

    #50ns
    data = 32'h00000007;
    master_agent.AXI4LITE_WRITE_BURST(addrCtrl, prot, data, resp);

    $finish;

  end

endmodule
Run the Simulation
- In the left-hand pane, click SIMULATION->Run Simulation->Run Behavioral Simulation
- If the simulation runs without error you will be presented with a waveform of the results.
- You can drag internal signals from your PIT module to the waveform, and save the waveform. Next time you re-run the simulation, you will see simulation data for these signals.
Simulation Run Time
By default, Vivado will only run your simulation for 1000ns (1us). This may not be long enough for your testbench to complete. While you can manually run for longer, this won’t be saved to your project, and you will need to do this manually each time you run simulation. To permanently change the simulation run time in your project:
- Right-Click on Simulation in the Flow Navigator on the left, and select Simulation Settings.
- Click the Simulation tab.
- Update the xsim.simulate.runtime value to something longer (eg. 10000ns). You can make this quite large, and as long as you include a
$finishstatement in your test bench, the simulation will stop when it reaches the end of the test bench.
Save Your Waveform
-
You can save your waveform by clicking File->Simulation Waveform->Save As…. You can save the waveform as a .wcfg file. Once again, choose a location that is part of your repo, but not part of your Vivado project. Nothing in the Vivado project directory should be committed to your repository.
-
When you Save As the waveform, you will be asked if you automatically want this waveform added to your project. Make sure to select Yes. As you add more signals to your waveform, you can save the waveform again, and it will automatically be updated in your project. When you run simulation in the future, this waveform layout will automatically be loaded.
-
Make sure an commit the waveform configuration file to your repository.
AXI Messages
The VIP will warn you if your AXI module behaves incorrectly, so make sure to look at the log messages when you run the simulation. As an example, if you forgot to provide a write response, you may see a message like this:
Warning: XILINX_RECS_WLCMD_TO_BVALID_MAX_WAIT: BVALID should be asserted within MAXWAITS cycles when there are outstanding AW Commands and WLast's finished.
If your module produces AXI protocol warnings during simulation, the TAs will deduct points from your lab.
Commit Your Vivado Project to Git
See the Vivado documentation for instructions on how to commit your Vivado project to Git. You should commit all files needed to re-run your simulation (project creation Tcl file, testbench, waveform configuration, etc.), but not the actual project files.
Make sure you note that for the PIT hardware lab, you must save your project Tcl file at a specific location. See the lab description for details.