Table of Contents
Objectives
- Gain experience with manipulating bytes in C by modifying image files
- Learn how to use
enumvalues - Learn the structure of a multi-file C program (.h and .c files)
- Get more practice with compilation of a program by using
gcc
Getting Started
Use the GitHub Classroom link posted in the Learning Suite for the lab to accept the assignment. Next, ssh into your Raspberry Pi using VSCode and clone the repository in your home directory. This lab should be done in VSCode on your Raspberry Pi.
Overview

In this lab we will be exploring the utility of data manipulation in a practical application by editing an image in C. This lab will be programming heavy and a little more involved than previous labs. Make sure you allow yourself enough time to complete this lab.
Bitmap Struct
Unlike other programming languages that you may be familiar with, the C programming language is not an object oriented programming language. This means that there are no class objects that allow you to associate groups of data together.
To accomplish this, C uses a struct data structure, which is actually a predecessor to the class object we see in C++ programs. Below is the struct included in the image.h library in the code for this lab:
typedef struct
{
    FILE * img;
    uint8_t file_header[BMP_FILE_HEADER_SIZE];  // 14 bytes
    uint8_t * dib_header;                       // Variable
    uint8_t * pxl_data;                         // Pixel data for image
    uint8_t * pxl_data_cpy;                     // Copy of pixel data
    uint8_t pxl_data_offset;                    // Location of pxl data in img
    uint32_t img_width;                         // Image width
    uint32_t img_height;                        // Image height
    uint32_t file_size;                         // Size of the file
    uint32_t pxl_data_size;                     // Size of pixel data array
} Bitmap;
Much like a class, a struct is a collection of different variable values all associated together. In the Bitmap struct we see many properties associated with the file, including:
-
pxl_data: This is a pointer to a one dimensional list ofuint8_tvalues that represent pixel values in the image. -
pxl_data_cpy: This is a pointer to a copy of the list ofuint8_tvalues that represent pixel values in the image. This will be helpful with some of the algorithms later on in the lab. -
img_width: Number of pixels in each row in the image. -
img_height: Number of rows of pixels in the image. -
pxl_data_size: Size (in bytes) ofpxl_data.
To access members of the struct, you use the dot operator or the arrow operator, depending on if the struct is a pointer or not. For example:
Bitmap image;
printf("width: %u, height: %u\n", image.image_width, image.image_height);

Bitmap* image;
printf("width: %u, height: %u\n", image->image_width, image->image_height);
In this example, to access the width and height of a struct, we used the dot symbol. However, if we have pointer to a struct, we must dereference the pointer first before accessing the member. This can be done using (*image).image_width, but this is such a common operation to do that C added special syntax for it, the arrow operator, ->.
Bitmasking
Bitmasking is a method that allows us to manipulate certain bits of data (e.g., set a bit to 1 or 0). This is done general by making use of bitwise ORs, ANDs, and XORs.
For example if we wanted to select nothing but the last two bits of the byte (in binary) 11101011 we would AND that byte with a mask consisting of 0s on all the values we don’t want and 1s on all the values we do want in our selection:
     11101011
AND  00000011   <--- This value is known as the 'mask'
-------------
     00000011   <--- The masked value
Although this is most obvious when representing the numbers as binary, the masking principles work for any representation of numbers (because everything is just stored as bits!).
If we wanted to recreate the following operation in C with hexademical numbers, it would be the following:
uint8_t number = 0xEB;
uint8_t mask   = 0x03;

// Mask the numbers
number = number & mask; // number = 0x03
Pixel Values in BMP file
Images are made out of many different colored points, called pixels, all put together in a two dimensional grid. Pixels are just one color and typically really small. To demonstrate the idea, I have broken the picture into a grid. While they are not the actual pixels of the image (the grid cells in my image below are much bigger than the pixels really are), hopefully it gets the idea across.
A computer doesn’t necessarily store the image data in a two dimensional grid. It often stores it as a long list (called an array), where each row is concatenated with the previous row.

Within each pixel, the computer actually stores three values for each pixel: a red color, a blue color, and a green color. Different values of each color channels will provide different hues and shades of a pixel. If that isn’t making too much sense, there is a wonderful visualization of how different color channels create different pixel colors here. In our example, each color for each pixel is represented by a binary number that is exactly 8 bits long (or one byte). In BMP files, the pixels are typically stored bottom-up, starting in the bottom left corner, moving left to right. This is helpful to know when you debug your program.
Look at the pxl_data field in the Bitmap struct shown above. What type does it use? (The star means its a pointer to objects of the type uint8_t). Also remember that pointers can be used like arrays! While creating the algorithms below, keep in mind that the values are stored as colors and NOT pixels. This means that pxl_data will be 3 times longer than the image size (as determined by multiplying the width and height of the image). There are many ways of accessing the individual colors of a pixel, but one way is to navigate to a specific pixel, and then access the individual color by adding an offset:
uint8_t x = 10; // Randomly selected pixel number

uint8_t blue = pxl_data[x * 3];
uint8_t green = pxl_data[x * 3 + 1];
uint8_t red = pxl_data[x * 3 + 2];
If you want to access adjacent pixels, for example accessing the blue color, you will have to jump by three integer values:
uint8_t x = 5; // Randomly selected pixel number

uint8_t blue = pxl_data[x * 3]; // Multiply by 3 because each pixel consists of BGR
uint8_t next_blue = pxl_data[(x + 1) * 3]; // Get the blue color for the next pixel
Note: In BMPs, the width of the image must be a multiple of 4 bytes. This means if the image has a width that is not a multiple of 4, the BMP file employs padding to fulfill that requirement. We have ensured that the picture you are working with is a multiple of 4 and you do not need to worry about dealing with padding for this lab. However, if you use your lab to read in different bmp files, it might not work.
Requirements
In the code provided in this lab, you will be expected to edit the original image listed at the top of this page to provide some fun visual effects!
Much of the code has been given for you, but you are expected to follow the comments in the files and fill in logic for the following four functions:
remove_color_channel()grayscale()or_filter()
Remove Color Channel
In this function, you are expected to create logic that will allow a user to specify a color channel and have that color removed completely from the image. As you can see in the figures below, each image has either the red, green, or blue values set to 0.
These images are the answer to your function! If you have done it correctly, your output should look exactly like whats above.
Grayscale
In this function, you will be turning your image from full color into a grayscaled image. To make an pixel gray, the red, green, and blue values must be combined or made to all be the same. To turn the image grayscale, for each pixel use the following equation:
Y = 0.299 R + 0.587 G + 0.114 B
In the equation above, R is the red pixel value, G is the green pixel value, and B is the blue pixel value. Y is the result. After finding Y you want to set all of the values of R, G, and B to be equal to Y. For example, if a pixel was RGB(0, 46, 93), the new pixel value would be calculated as
Y = 0.299 * 0 + 0.587 * 46 + 0.114 * 93 = 37.604 = 37
And the new RGB value would become RGB(37, 37, 37). Even though Y is a float, you can truncate its value.
After applying the grayscale to the image, it should look like this:
OR Filter
This function will be the culmination of your data manipulation knowledge that you have learned up until now. In this function you will take each color value of a pixel and bitwise OR it with the pixel color value directly above and below it. For example, if you are working on pixel x, you would OR the blue color with the blue color of the pixel above (top) and the pixel below (bottom). You would repeat this for the green and red colors. You would then move to the next pixel in your image.
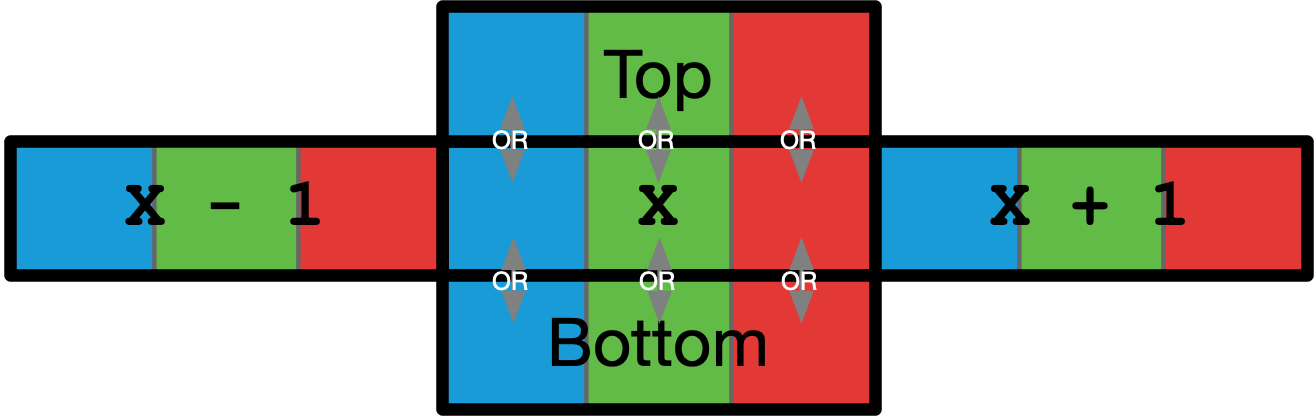
Remember, while visually the pixels are above and below each other, they are actually stored in a long array. As part of this lab, you must figure out how to access the vertically adjacent pixels in the one dimensional array. You will also have to deal with two special cases: when you are on the top row and the bottom row. In those two conditions, you won’t be able to or filter like normal because you are missing an expected row.
Make sure to use the pxl_data_cpy array as your reference data for your calculations, then update pxl_data. If you use the pxl_data as your reference data, you will have compounding effects that will cause the image to be indistinguishable. This is not correct.
Submission
-
Answer the questions in the
README.md. -
To pass off to a TA, you must show your “or filtered” image (or_filter.bmp) and explain what is causing the image’s visual behavior.
-
To successfully submit your lab, you will need to follow the instructions in the Lab Setup page, especially the Committing and Pushing Files section.