Table of Contents
Objectives
- Become familiar with the LCD and button shield for the Pi Z2W.
- Learn to use a “vendor” library to control different hardware accessories.
- Associate graphical events with specific inputs.
- Get experience using a Makefile
Getting Started
Use the GitHub Classroom link posted in the Learning Suite for the lab to accept the assignment. Next, ssh into your Raspberry Pi using VSCode and clone the repository in your home directory. This lab should be done in VSCode on your Raspberry Pi. Make sure the lab is top level folder of your VSCode editor.
Overview

One of the remarkable features of single board computers like the Pi Z2W is its extensibility through hardware add-ons in the form of HATs (short for Hardware Attached on Top) or “shields” (a term that describes the same idea in the Arduino community). These useful extensions take advantage of the most attractive feature of most single board computers: the GPIO pins.
GPIO (General Purpose Input/Output) pins are the main mode to connect novel hardware peripherals to a single board computer. A peripheral is a device that is connected to a computer to enhance its functionality (i.e a mouse, keyboard, monitor, printer, etc). The Pi Z2W GPIO pins allows for potentially many peripherals such as sensors, motors, etc. to be connected all at once. This makes it a very approachable computer to use in custom systems that interface with specialty hardware.
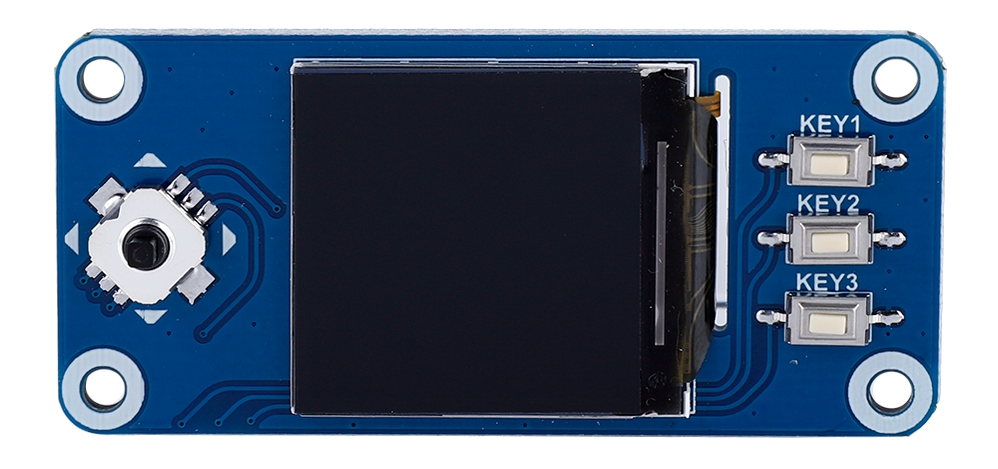
In this lab we will use the Waveshare 1.44” HAT which connects to all of the GPIO pins on the Pi Z2W. In return, the HAT provides a small Liquid Crystal Display (LCD) screen, a directional button pad (d-pad), and a set of action keys.
BCM2835 Library
Installation
In order to interface with the GPIO of the Pi Z2W, we need to install a library.
-
First make sure that you are in your home directory on the Pi Z2W:
cd ~ -
Then use
wgetto download the compressed archive with the library from the developer’s website:wget http://www.airspayce.com/mikem/bcm2835/bcm2835-1.71.tar.gz -
Once the file has downloaded, uncompress the archive using the
tarutility:tar xvfz bcm2835-1.71.tar.gz -
Go into the uncompressed directory:
cd bcm2835-1.71 -
Run the
configurescript. This will provide operating system information to the library so it knows how to configure itself to work specifically on the Pi Z2W architecture:./configure -
Once the
configurescript has prepared the necessary modifications, run themakecommand to compile library’s source files (i.e all its.cfiles)make -
Finally, move the compiled binaries to the folder in the operating system where your
gcccompiler looks for system libraries:sudo make install
Compiling into a Project
Now that the bcm2835 library is installed, we can use it in any C program that we like! This comes especially in handy for our new LCD and button HAT. However, since this is an installed library and not a default one, we have to let gcc know that we are trying to include it in the compilation process. This is done by adding the -lbcm2835 flag to our normal gcc compilation command. The -l lets gcc know we are including a custom system library, while the bcm2835 part is just the name of the library itself.
Executing
Accessing the HAT hardware requires special permissions. After compiling your project, you will need to run it with sudo (e.g., sudo ./main) otherwise you will likely see a segmentation fault.
Drawing to the Screen
In this lab you will be responsible for writing a main.c file that will draw shapes and images to the LCD screen. The library responsible for this is found in the lib/display.h library file. There are many functions that can accomplish various techniques such as drawing shapes or writing text. Become familiar with the display.h and read their corresponding comments.
Orientation and Dimensions
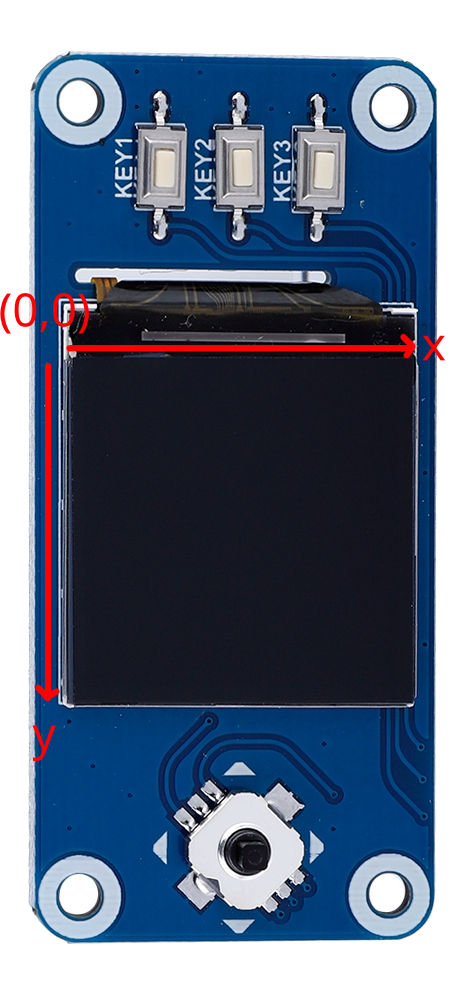
When drawing on the screen, it is important to have a good mental model of what the coordinate system of the screen is like. For this particular LCD module, we have set up the axes like so:

The height and width of the screen are #defined in the display.h file as DISPLAY_WIDTH and DISPLAY_HEIGHT. These values can be useful if you are trying to define coordinates for shapes relative to those points.
Colors
Most of the display functions take in a color parameter to give color to the shapes you are drawing or the text that you are writing. These colors are #defined in the lib/colors.h file.
Example:
display_draw_rectangle(0, 5, 128, 15, BYU_ORANGE, true, 1);
where BYU_ORANGE is #defined in colors.h.
Fonts
Part of the display library allows you to draw strings on the screen. One of the parameters for drawing the string to the screen is selecting a font. These fonts are all located in the fonts folder and are accessible through the fonts.h library. Each font represents different font sizes. To use the fonts in the display_draw_string() function, you will need to pass the address of the font you desire:
display_draw_string(10, 10, "Hello, World!", &Font8, WHITE, BLACK);
The following fonts are available:
- Font8
- Font12
- Font16
- Font20
- Font24
Before the LCD can be used, you will need to call the display_init() function once in your code at the beginning.
Interacting with Buttons
To read the state of the d-pad you will be using the functions found defined in the buttons.h library interface. When a button is actively being pressed, the function to read it will return a 0, else if it unpressed, it will return a 1.
Example:
if (button_up() == 0) {
    // Do something upon detecting button press

    while (button_up() == 0) {
        // Do something while the button is pressed
        delay_ms(1);
    }
}
else {
    // Do something while the button is not pressed
}
Before the buttons can be used, you will need to call the buttons_init() function once in your code at the beginning. If you don’t call buttons_init() before you start using the buttons, weird things can happen! You’re code might work, but then when you reboot or rerun your code, it might not!
Note that you must call display_init() before you call buttons_init() or you will get a segmentation fault.
Device delay
You will see in your main.c function that your code will loop infinitely. This means that anything inside the while(true) loop will repeat over and over until the program is terminated by the user through the shell. Running a while(true) loop without any sort of control can cause system resources to be eaten up and cause your program to be run inefficiently. For this, we have provided the delay_ms() inside the device.h library. This will allow you to essentially create a wait time in the execution of your loop. This is handy if you want to draw something to the screen and have it only appear for a certain amount of time before the logic in your program goes on.
Logging
We also give you log.h and log.c files that you can find under the /lib folder. The functions in these files (log_info() or log_debug() for example) can be used like printfs to output data to the terminal (or optionally a log file). However, these only print to the terminal if the current log level is equal to or lower than the log command. For example, if the log level is set to LOG_INFO, then log_debug() messages won’t show, but log_info() through log_fatal() messages will. You can change the current log level with the log_set_level() function. These tools can be used to have printfs that you don’t need to remove, but that can be turned on/off when you are debugging.
Requirements
You must demonstrate your understanding of the display and buttons libraries and how to use them by accomplishing the following:
-
If no button is pressed nothing should change on your display.
- When the up button is pressed:
- Clear the screen to white.
- Draw filled in green rectangle that covers the first 20 rows of pixels at the top of the screen.
- Draw filled in red rectangle that covers the last 20 rows of pixels at the bottom of the screen.
- In the center of the screen, draw a pound-sign (bang/hash/etc.) that is exactly centered using a black color and a 3 px line weight. Its dimensions should 50x50px.
- The previous hash should be inside and centered in a yellow circle with a 3 px line width and a 30 px radius.
- The rest of the screen should be white.
- When the down button is pressed:
- Clear the screen to white.
- When the right button is pressed:
- Clear the screen to white.
- Draw “Hello world!” centered vertically and horizontally repeating 5 times in Font8 in different colors.
- When the left button is pressed:
- Clear the screen to white.
- Experiment with drawing different numbers and characters of different sizes and colors.
- The screen should have at least 10 digits and 10 characters.
- When the center button is pressed:
- Clear the screen to white
- Display the
byu_og.bmpimage from thepicdirectory.
Submission
-
Answer the questions in the
README.md. -
To pass off to a TA, demonstrate your doorbell running your program that fulfills all of the requirements outlined above.
-
To successfully submit your lab, you will need to follow the instructions in the Lab Setup page, especially the Committing and Pushing Files section.