 ECEn 224/225
Table of Contents
Objectives
- Become familiar with the LCD and button module.
- Learn to use a “vendor” library to control different hardware accessories.
- Associate graphical events with specific inputs.
- Get experience using a Makefile
Introduction
- If you haven’t completed the Doorbell Setup, please take time to do so now.
Single board computers (SBCs) like the Raspberry Pi Zero 2 W (Pi Z2W) are remarkable partly for their ability to add on hardware in the form of HATs (Hardware Attached on Top; sometimes called “shields” in the Arduino community). These useful devices use the GPIO pins, one of the most attractive features of an SBC, to extend the feature set dramatically.
GPIO (General Purpose Input/Output) pins are the main method of connecting new peripherals to an SBC. A peripheral is any device that is connected to a computer to enhance its functionality (e.g., keyboard, mouse, monitor, printer, sensor, motor, etc). The Pi Z2W GPIO pins allow for many peripherals to be connected all at once. This makes it a great choice in systems that interface with specialized or custom hardware.
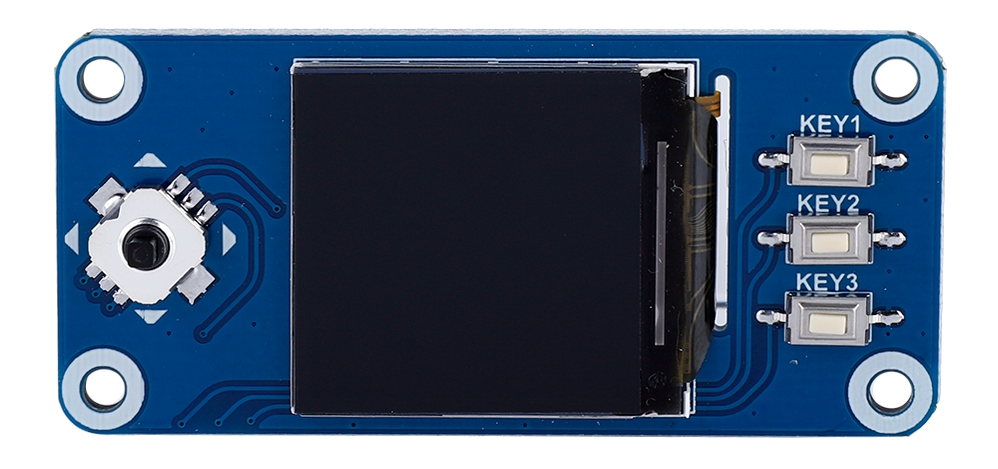
In this lab we will use the Waveshare 1.44” HAT, which uses all 40 of the GPIO pins on the Pi Z2W. In return, the HAT provides a small Liquid Crystal Display (LCD) screen, a directional button pad (d-pad), and a set of action keys.
Drawing to the Screen
In this lab you will be responsible for writing a test.c file that will draw shapes and images to the LCD screen. The functions needed to do this are found in the lib/display.h header file in the doorbell repository. The display library is a wrapper file that interacts with the bcm2835 library previously installed. This library has many functions that can draw shapes or write text. Become familiar with the display.h header file and read the corresponding comments.
Before the LCD can be used, you will need to call the display_init() function once in your code at the beginning of main.
Orientation and Dimensions
When drawing on the screen, it is important to have a good mental model of what the coordinate system of the screen is like. For this particular LCD module, we have set up the axes like so:
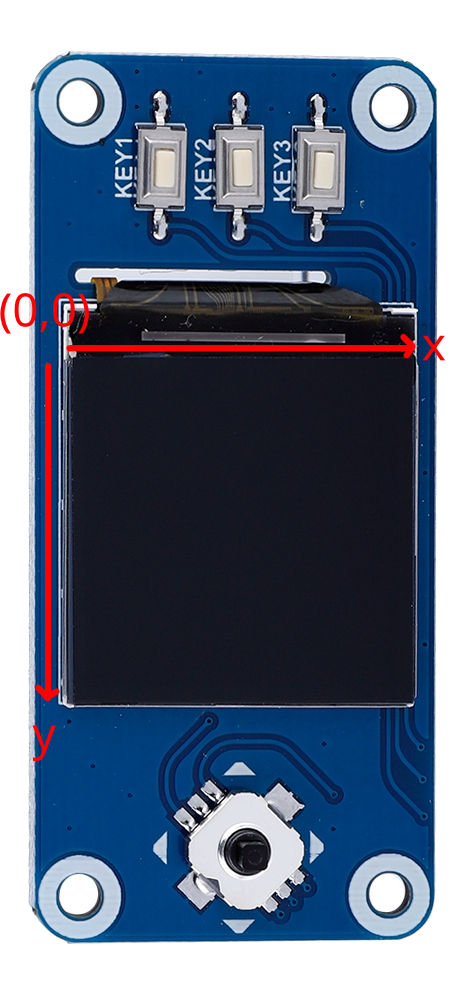
The height and width of the screen are #defined in the display.h file as DISPLAY_WIDTH and DISPLAY_HEIGHT. These values can be useful if you are trying to define coordinates for shapes relative to those points.
Colors
Most of the display functions take in a color parameter to give color to the shapes you are drawing or the text that you are writing. These colors are #defined in the lib/colors.h file.
Example:
display_draw_rectangle(0, 5, 128, 15, BYU_ORANGE, true, 1);
where BYU_ORANGE is #defined in colors.h.
Fonts
Part of the display library allows you to draw strings on the screen. One of the parameters for drawing the string to the screen is selecting a font. These fonts are all located in the fonts folder and are accessible through the fonts.h library. Each font represents different font sizes. To use the fonts in the display_draw_string() function, you will need to pass the address of the font you desire:
display_draw_string(10, 10, "Hello, World!", &Font8, WHITE, BLACK);
The following fonts are available:
- Font8
- Font12
- Font16
- Font20
- Font24
Interacting with Buttons
To read the state of the d-pad, you will be using the functions defined in the buttons.h library interface. When a button is actively being pressed, the function to read it will return a 0, else if it is unpressed, it will return a 1.
Example:
if (button_up() == 0) {
    // Do something upon detecting button press

    while (button_up() == 0) {
        // Do something while the button is pressed
        delay_ms(1);
    }
}
else {
    // Do something while the button is not pressed
}
Before the buttons can be used, you will need to call the buttons_init() function once in your code at the beginning. If you forget this, the buttons may work temporarily, but they will be unpredictable and will often cause segmentation faults.
Note that you must call display_init() before you call buttons_init() or you will get a segmentation fault.
Device delay
You will see in your test.c function that your code will loop infinitely. This means that anything inside the while (true) loop will repeat over and over until the program is terminated by the user through the shell. Running a while (true) loop without any sort of control can cause system resources to be eaten up and cause your program to be run inefficiently. For this, we have provided the delay_ms() inside the device.h library. This will allow you to essentially create a wait time in the execution of your loop. This is handy if you want to draw something to the screen and have it only appear for a certain amount of time before the logic in your program goes on.
Logging
We also give you log.h and log.c files that you can find under the /lib folder. The functions in these files (log_info() or log_debug() for example) can be used like printfs to output data to the terminal (or optionally a log file). However, these only print to the terminal if the current log level is equal to or lower than the log command. For example, if the log level is set to LOG_INFO, then log_debug() messages won’t show, but log_info() through log_fatal() messages will. You can change the current log level with the log_set_level() function. These tools can be used to have printfs that you don’t need to remove, but can be turned on/off when you are debugging.
Compiling with Make
By this point, you may realize that compiling a large project by hand is unwieldy to type. This lab, for example, contains eleven .c files. To compile it yourself, you would have to enumerate each file in the command line:
gcc -o test -l bcm2835 main.c buttons.c device.c display.c lcd.c log.c font8.c font12.c font16.c font20.c font24.c
Compiling like this will work, but has a couple of problems:
- You are recompiling each file each time. If you make a single change to your
test.cfile, each other file would also be recompiled. For large projects, this can take a lot of time. - Any typo in your command would halt the compilation. Repeatedly typing in this command (or even copy/pasting it) could propogate errors and waste a lot of time.
Early C programmers recognized these issues. So, just four years after C was released, the Make software was created. Make revolves around a single file called the Makefile. The inside of a Makefile looks a lot like bash scripts (which you made in Lab 2); you can create “rules” that perform a set of command line operations that generate files. So, instead of typing a long gcc command, you can run one simple command:
make test
And everything will be done for you.
Using Make speeds up the compilation process by reducing redundant steps. Intermediate steps are saved and only repeated when necessary. Make generates a .o for each source file on its first run. Recall that .o files are compiled and assembled, but not yet linked together. For subsequent recompiles, Make is smart enough to only recreate .o files if their corresponding .c file has been updated. It then links the new .o to all the old, unchanged ones to generate the executable.
In this lab going forward, to compile your code, you should use make instead of gcc. The Makefiles are provided in your starting code, so you don’t need to entirely understand how they work right now. However, you will see them in future classes, so it may be worth taking a look at them.
Executing
Compiling with the provided Makefile generates an executable called test. You run this executable the same way you run any other, using ./test, with one exception. Accessing the HAT hardware requires special permissions, so you will need to run the exeutable with sudo (e.g., sudo ./main), otherwise you will likely see a segmentation fault.
Procedure
-
Make sure the Rsync extension in VS Code is working so that your doorbell repository on a lab machine is synchronized over to your doorbell unit. Refer to the Doorbell Setup or to a TA if needed.
-
Log into your doorbell unit via SSH to compile and execute your code from the doorbell directory.
Creating Test Code
There are two files in the doorbell repository that have a main() function: test.c and main.c. Having two main() files allows you to develop two separate programs at once.
In this lab, you will start by implementing test functions for your screen. All your code for this lab goes into the test.c file. To tell make to compile your test code, simply type make test. If you don’t specify an executable target, Make defaults to compiling both main.c and test.c. The Makefile instructs Make to compile main.c into an executable called main, and to compile test.c into test.
You will use this code later to create your main.c code, and you can keep it as a reference if you have hardware issues in later labs.
Requirements
You will demonstrate your understanding of the display and buttons libraries and how to use them by accomplishing the tasks listed below:
-
Implement each of the following functions:
a. clearScreen: Clear the screen to white
b. drawHelloWorld: Draw “hello world” on the screen 10 times in different colors
c. drawChars: Draw 10 chars of various values, sizes, colors, and locations onto the screen
d. drawStars: Draw at least 20 stars onto the screen
e. drawFlag: Use at least 5 functions from
display.hto draw any flag you wish. 3 of thedisplay_draw_###functions must be unique.Make and test each of these functions before you create the menu. You can test functions by calling them in your
while (true)loop inmain(). -
Implement the
drawMenufunction. It should be called frommain. Your menu should have the following functionality:a. The menu draws the strings contained in the “entries” array. Use an 8 or 12 point font.
b. When no button is pressed, nothing happens.
c. One entry is selected at a time by highlighting it in a different color.
d. Pressing the up or down button will change the selected entry.
e. Pressing the right button on the selected entry will run the function with the associated name. For example, pressing the right button when the “Flag” entry is selected will cause the
drawFlagfunction to run.f. After a right button press, the code should display the results of the selected function, wait 2 seconds, then redraw the menu.
g. The selection should “wrap” from top to bottom. In other words, if you press the down button when the bottom entry is selected, the selection should move to the top entry. If you press the up button when the top entry is selected, the selection should jump to the bottom.
Here is a demo of the completed lab:
Lab Submission
- Your program must compile without warnings or errors. Your
Makefilehas the-Werrorflag to ensure that it doesn’t have errors. - Pass off with a TA by demonstrating that your test program fulfills all the requirements outlined above.
- Take the Pass off Quiz on Learning Suite.
- Follow the instructions in the
README.mdfile in the repository. Add the requested detail about features and usage to this file. - Make sure to push your changes back to your Git remote repository. Follow the instructions on the Lab Setup page.