Table of Contents
This tutorial provides an overview of the RARS Java RISC-V simulator.
This Java JAR file has been included in the lab starter code at resources/rars1_6.jar.
The documentation for RARS is found on the RARS wiki.
GUI Mode
You can execute the simulator from the lab04/ directory by executing the following command:
java -jar ../resources/rars1_6.jar
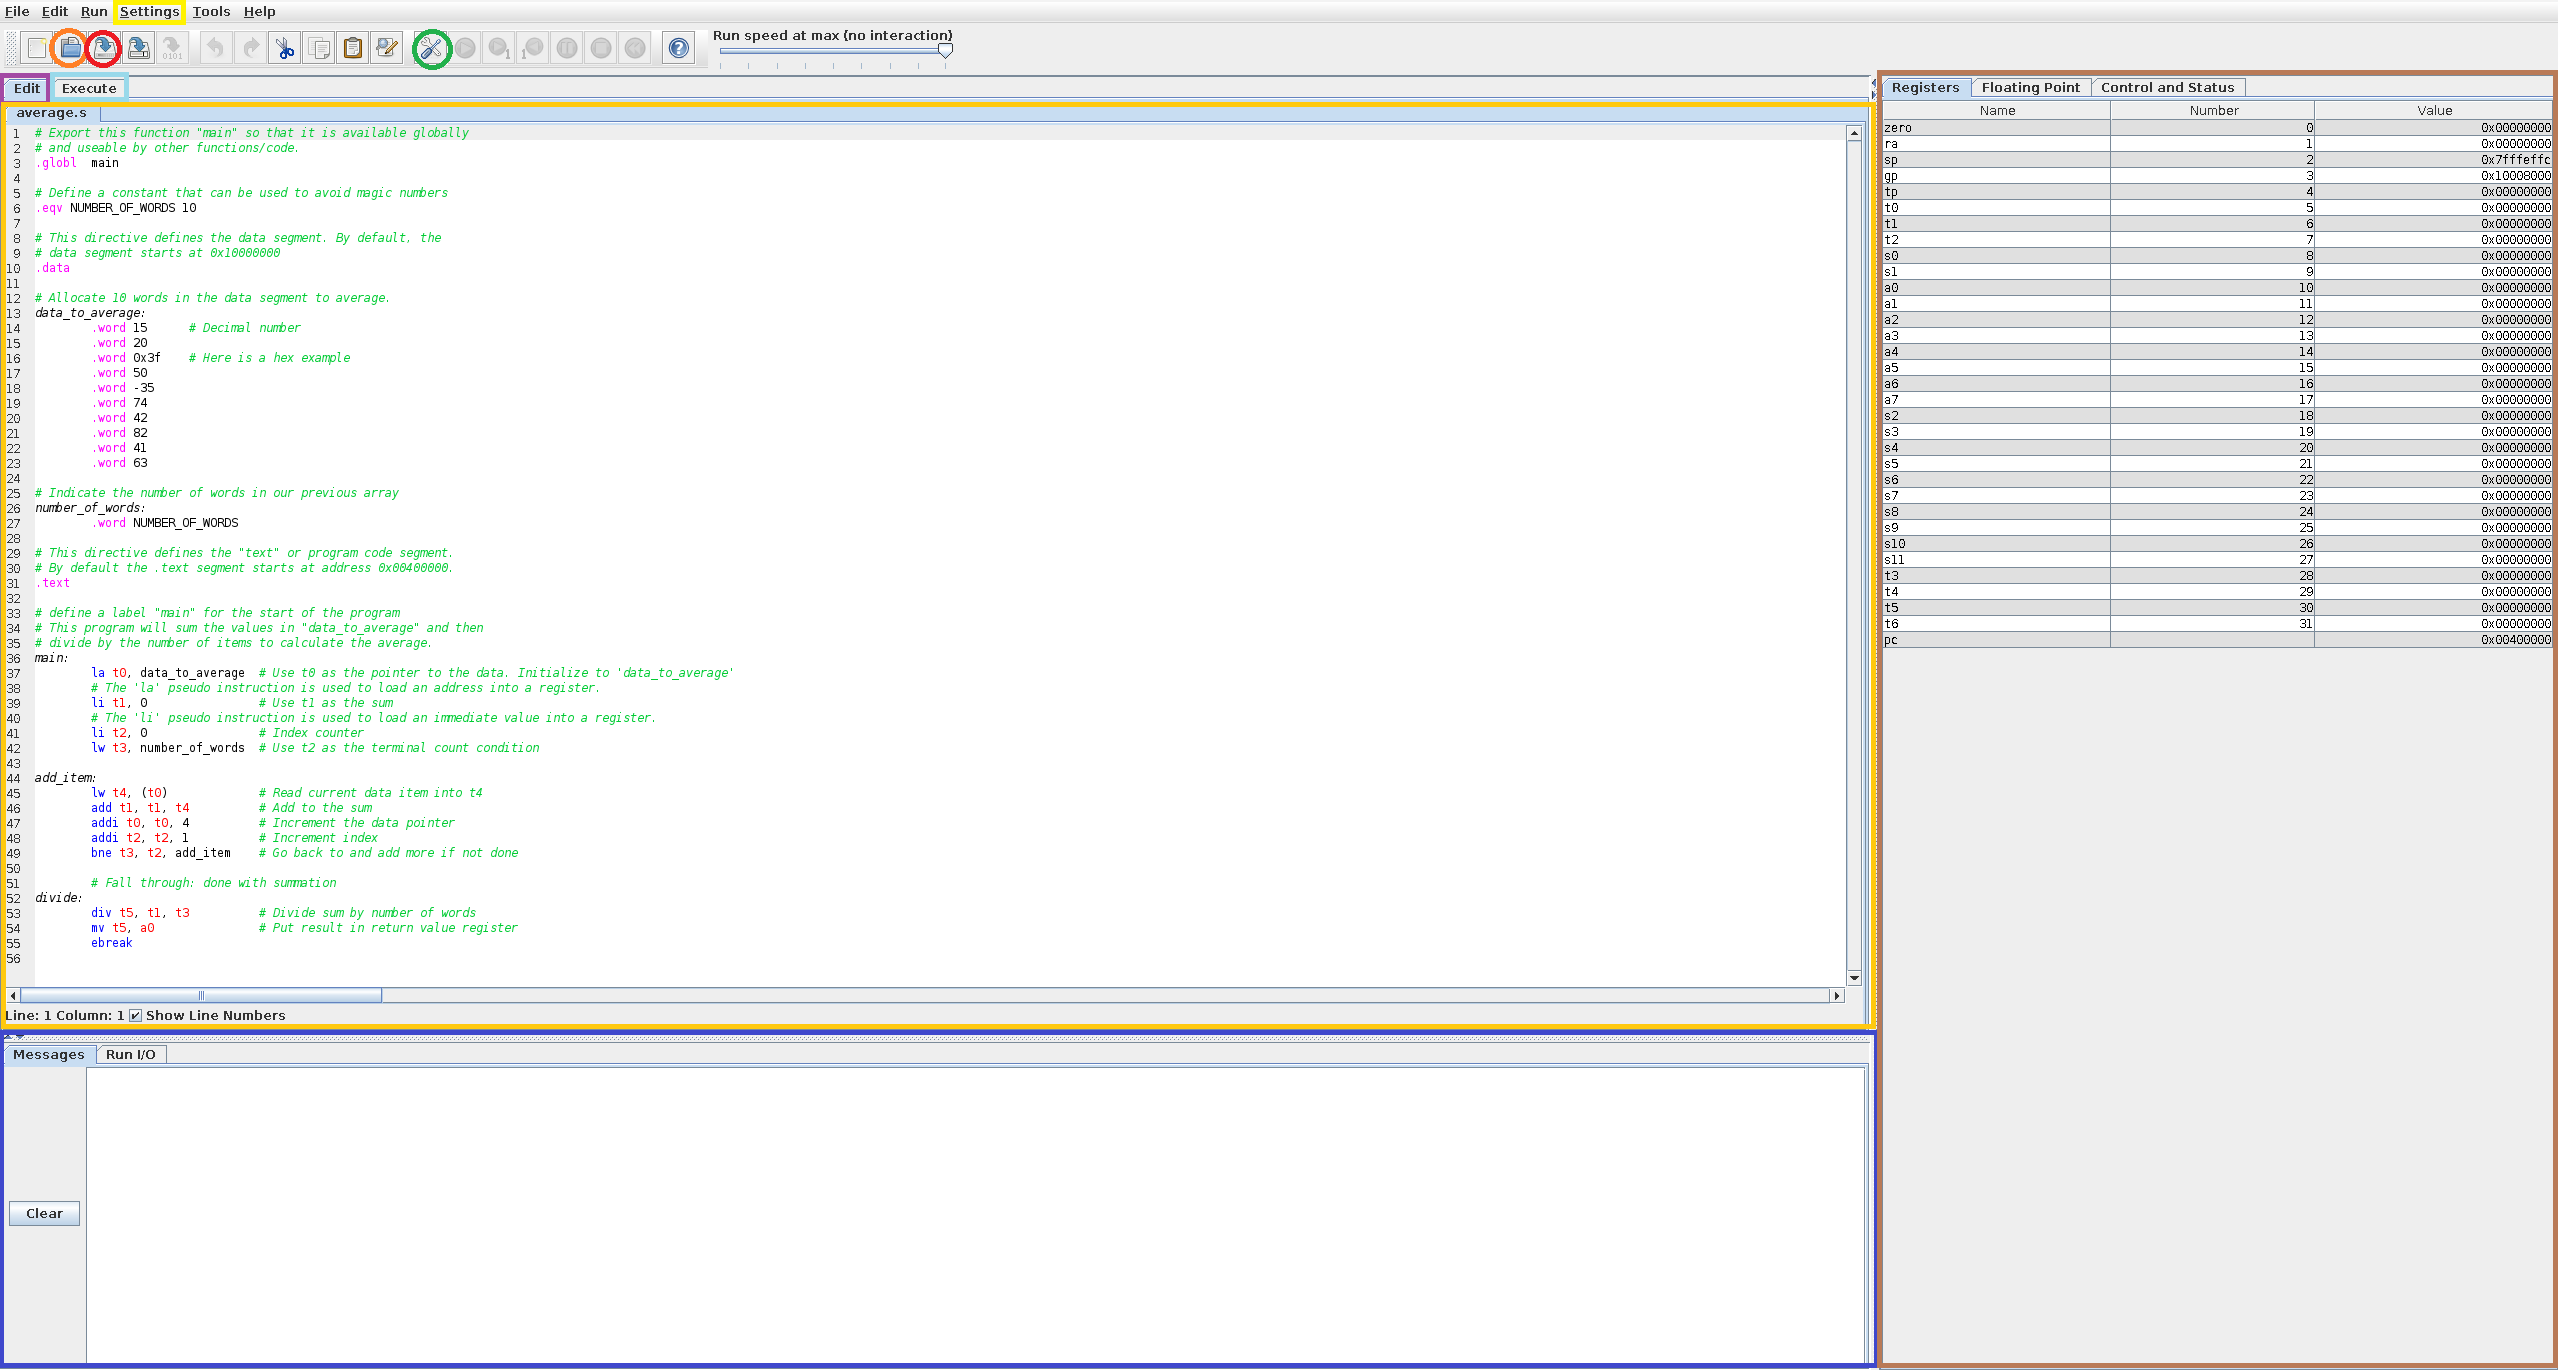
An annotated image of the RARS GUI is shown below that highlights features required to complete this lab. When launching RARS, the RARS GUI will display a light blue background since no RISC-V assembly source code has been opened yet. A file containing RISC-V assembly source code can be opened by clicking the button circled in orange. After opening a file, the file’s content will display in the Editor window which is the highlighted gold box. Here, RISC-V assembly instructions can be added to create RISC-V assembly source code. A file that is currently opened in the Editor window can be saved by clicking the button circled in red.
Once the assembly source code is finished, the assembly source code must be translated into machine code for the RISC-V simulator to run the assembly program. This can be done by clicking the button circled in green. If the assembler runs successfully, the RARS GUI will switch automatically to the Execute window which will be discussed later. To switch back to the Editor window, click the tab highlighted in purple. In the Editor window, the highlighted blue box displays any info or error messages that may occur when assembling the RISC-V assembly source code. The highlighted brown box will display the current value of the registers (for this lab, we are only concerned with the Registers tab and not the Floating Point tab but will use the control and status tab for the cycle register). Finally, the Settings menu highlighted in yellow will be used to view the memory layout of the simulator/program using the “Memory Configuration…” option within the Settings drop down menu.
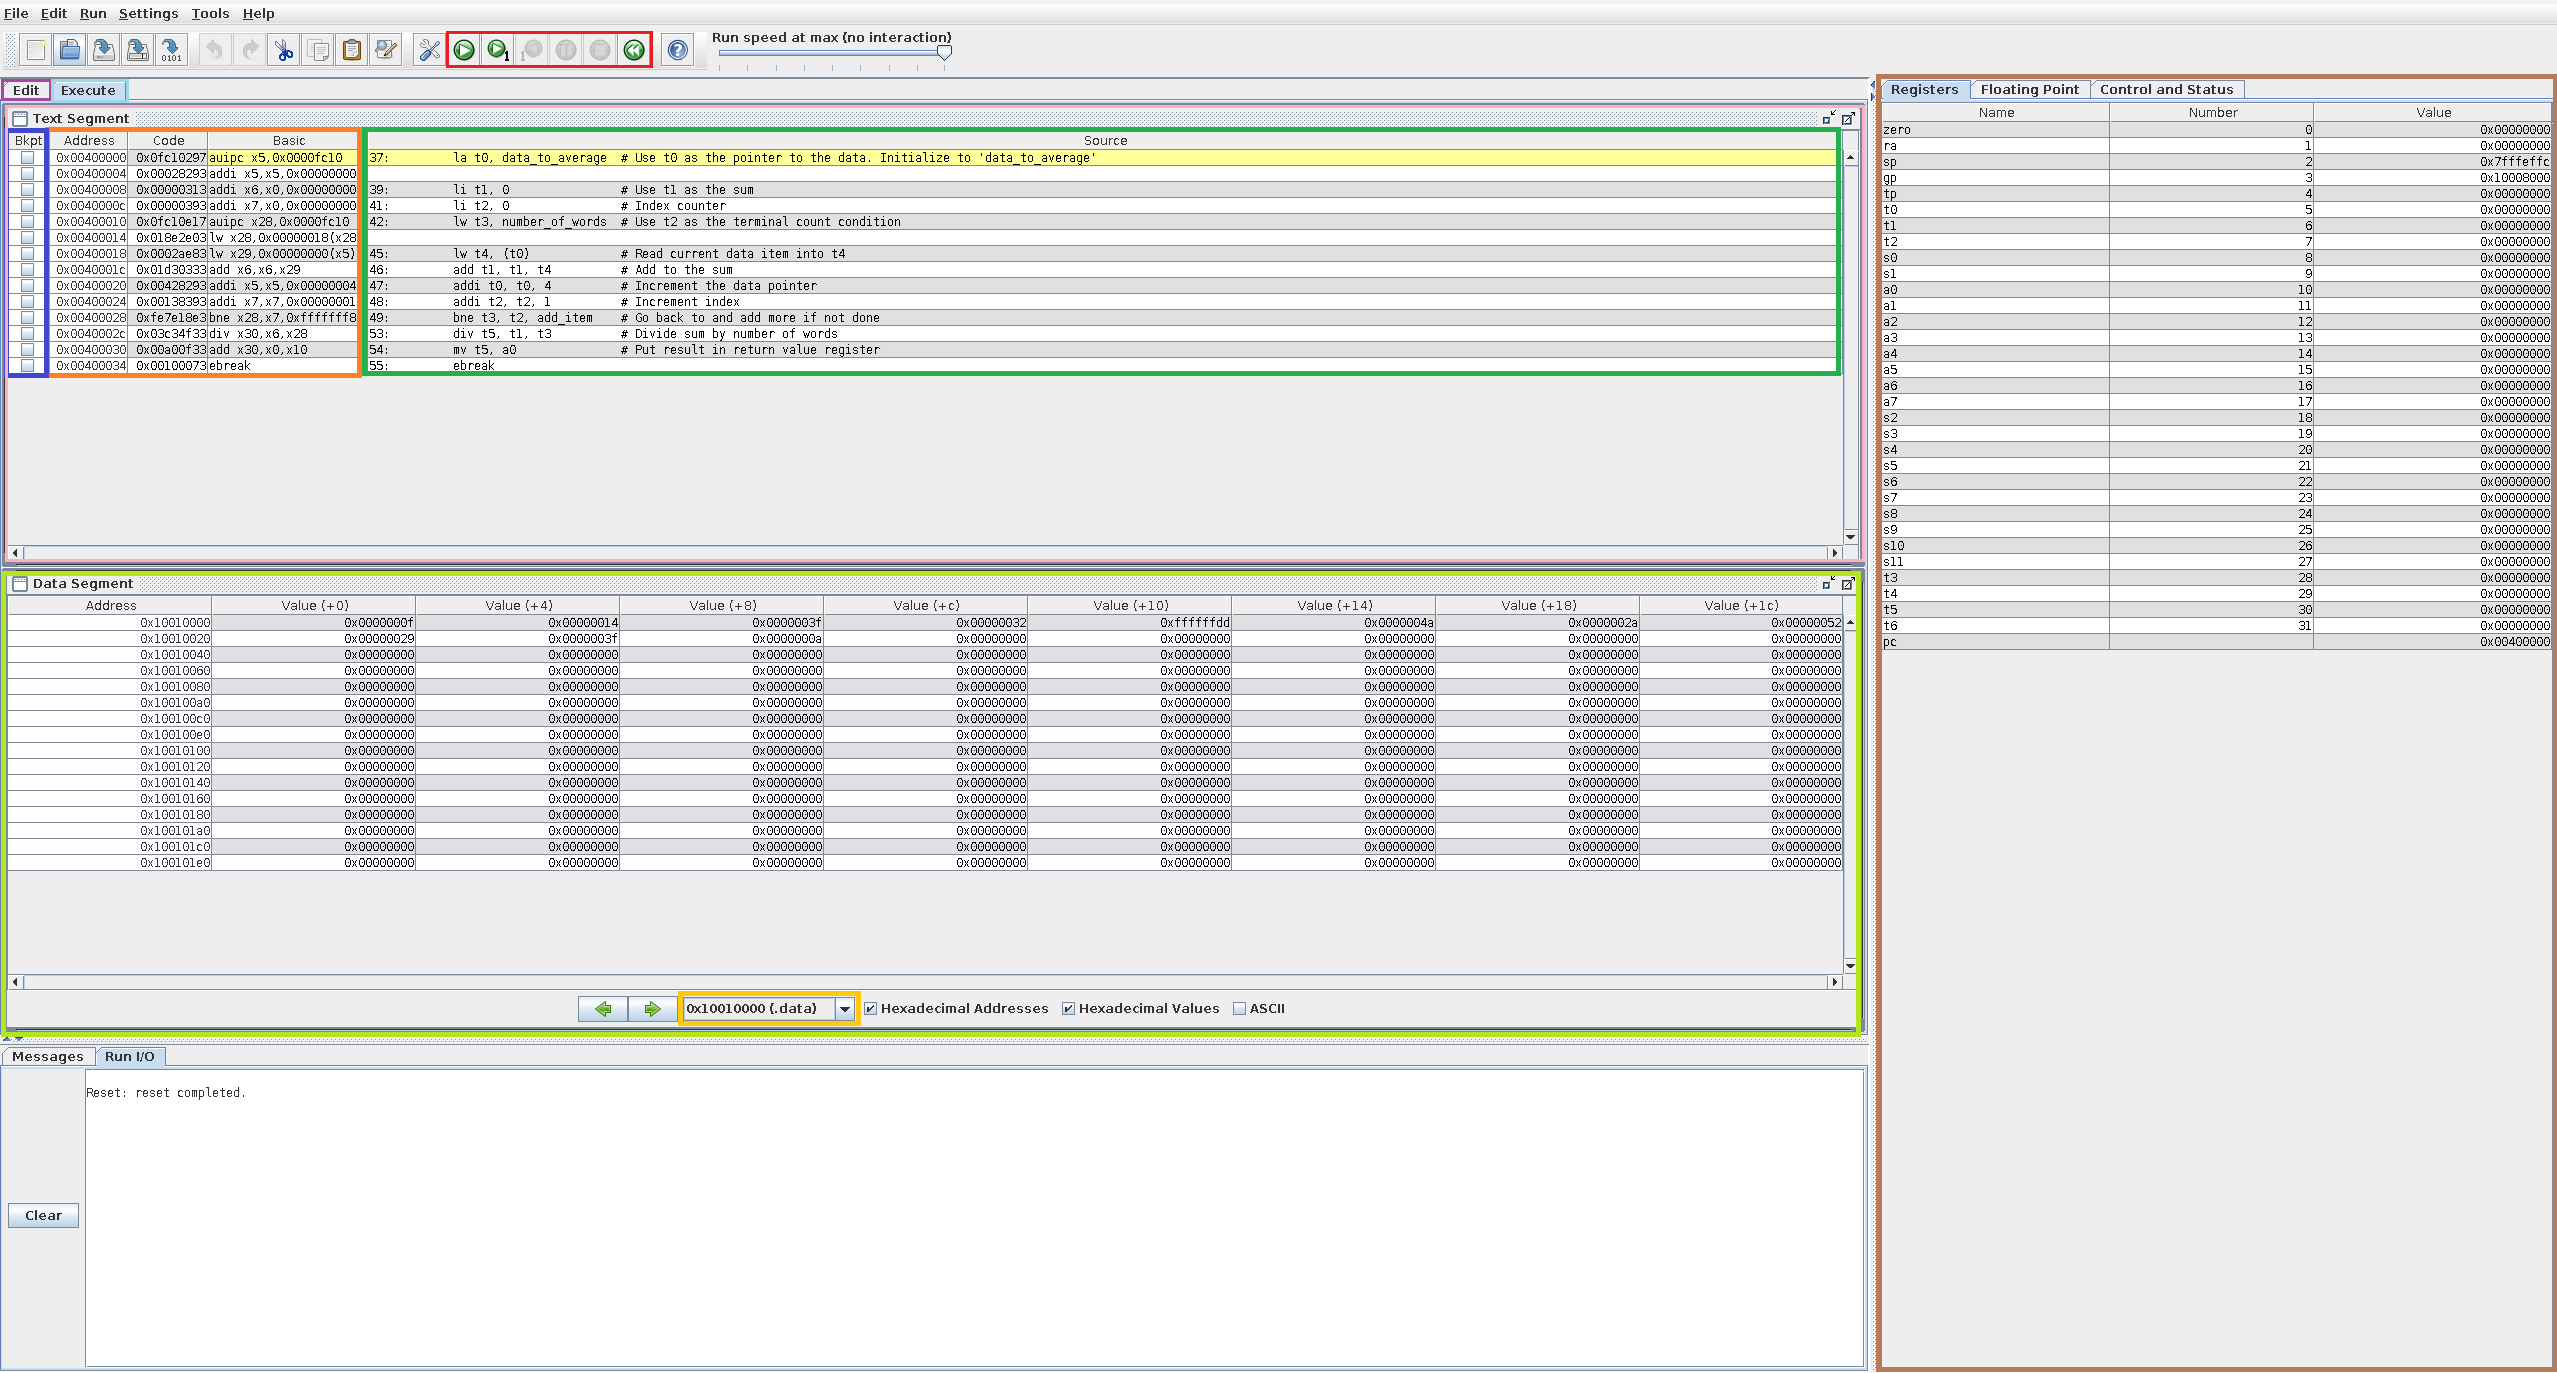
As mentioned previously, running the assembler will open the Execute window if the assembler ran without any errors. Another annotated image is shown below but with RARS Execute window when the assembler is run on the average assembly code example. The highlighted pink box displays the assembled instruction and shows the current instruction the processor is halted at (highlighted in yellow, not an added annotation). The highlighted blue box allows breakpoints to be set at any instruction which will halt the processor once the instruction with a breakpoint is reached. The highlighted orange box displays where in memory the instruction is stored, the machine code of the instruction and the assembly version of the instruction. The green box will display the instructions of the program as seen from the Editor window (notice that the highlighted orange and green boxes don’t always match due to pseudo instructions). The red highlighted box controls the program execution by allowing the program to run, running one instruction and then halting, going back a single instruction then halting, pausing the execution if running, completely stopping the program and starting the program from the first instruction. The highlighted brown box has the same functionality discussed previously and displays the current state of the registers. The lime highlighted box displays the contents in memory and the gold highlighted box selects the section of memory that will be shown.
The features listed above are only the most basic functions that RARS is capable of. There are more advanced features and tools such as timers, instruction statistics, machine code dumping, bitmap display and more. Although these tools are interesting and useful in certain situations, they are not required for finishing this lab.
For those who would like more details on using RARS, the video linked below provides a live demonstration and additional background on the simulation.
In addition to understanding the RARS GUI, it’s recommended to feel comfortable with the material from Chapter 2 of the textbook as well as having access to online The RISC-V Instruction Set Manual to complete this lab. We will be using the 32-bit (RV32I) instructions. RISC-V instructions for the RV32I used by this simulator can be found in pages 13-29 (pdf pages 31-47) and 35-37. Pages 129-136 (pdf pages 147-154) provide a reference for RISC-V assembly language instructions.
Command Line
The RARS assembler can be used in command line mode for both assembly and execution. The following examples demonstrate common command line approaches using RARS.
Assembly and Execution
In this mode, RARS will assemble a list of files and then execute the files. This will be done outside the GUI and use the terminal with any input or output.
java -jar ../resources/rars1_6.jar <list of .s files>
Assembly and Execution with GUI
In this mode, you can open a set of .s files in the GUI so you don’t have to manually open them using the menus.
Note the g flag.
java -jar ../resources/rars1_6.jar <list of .s files> g
Generate MEM Files
In some labs you will be required to generate .mem files that contain the contents of the program in binary.
These .mem files are used within the logic simulator to simulate actual programs and with the synthesis tool to integrate programs into your implemented bitstream.
The following example demonstrates how to assemble the .s file and generate the contents of the ‘text’ segment.
The mc CompactDataAtZero flag indicates the memory model to use (this one indicates that the data segment starts at 0).
The a dump .text HexText <filename.mem> indicates that the assembler should only assemble (not simulate) and to dump the text segment in ‘HexText’ format to the specified filename.
java -jar ../resources/rars1_6.jar <list of .s files> mc CompactDataAtZero a dump .text HexText <filename_text.mem>
The .data segment can also be generated using the .data argument as follows:
java -jar ../resources/rars1_6.jar <list of .s files> mc CompactDataAtZero a dump .data HexText <filename_data.mem>
Generate Debug Files
The assembler can also generate a “debug” file that lists the assembled program in ASCII along with the original assembly source. This is helpful when debugging programs in the simulator (you can see which instruction is at which PC and see any comments you may have). The “SegmentWindow” flag is used to indicate this type of file (instead of HexText).
java -jar ../resources/rars1_6.jar <list of .s files> mc CompactDataAtZero a dump .text SegmentWindow <filename.txt>