You will use GitHub for all labs in ECEN 323. You will create a GitHub repository that will serve two purposes: first, it will provide the files for you that are necessary for completing the lab and second, you will use your repository to submit your files for the laboratory passoff. Because we will use GitHub extensively for the course, it is necessary for you to create a GitHub account and become familiar with how git works. This tutorial page will describe how to setup your class GitHub repository.
Before proceeding with this page, make sure you have a GitHub account and can log in to the GitHub page.
You will need to create a GitHub classroom repository (called a ‘repo’ for short) for your ECEN 323 labs. A GitHub repository is a cloud storage that contains all of your class files and file revision history. This section describes how to create this repository. You will only need to create this repository once during the semester.
1. Add a ssh key to GitHub
Before creating your respository, you need to setup a SSH key on your computer and register this key with your GitHub repository. This will allow you to access your GitHub repository from the command line on your computer. You should perform this step while running on computers in the digital lab so that you can access the your GitHub repository from any computer in the lab. Note that if you complete your labs on another computer, you will need to perform this step on that computer as well.
Create a ssh key by running the following command:
$ ssh-keygen
Press enter to save the key pair into the default .ssh/ subdirectory in your home directory. You should see the following prompt:
Enter passphrase (empty for no passphrase):
It is easier (but less secure) to leave the passphrase empty by pressing enter for the default “no passphrase”. You should then see the following output:
Your identification has been saved in /your_home/.ssh/id_rsa.
Your public key has been saved in /your_home/.ssh/id_rsa.pub.
The key fingerprint is:
a9:49:2e:2a:5e:33:3e:a9:de:4e:77:11:58:b6:90:26 username@remote_host
The key's randomart image is:
+--[ RSA 2048]----+
|     ..o         |
|   E o= .        |
|    o. o         |
|        ..       |
|      ..S        |
|     o o.        |
|   =o.+.         |
|. =++..          |
|o=++.            |
+-----------------+
At this point you have a public and private key that you can use to authenticate. This key is stored in your CAEDEM file space and should be able to access this key on any of the digital lab computers. More details on how to do this can be found at the following tutorial.
After creating a ssh key, you will need to add your public key to your GitHub account. This will authorize you to access your remote GitHub repositories on your computer without authentication. You can manually print your public key to the terminal by executing the following command:
$ cat ~/.ssh/id_rsa.pub
You will need to copy this key and paste it into a web page as described below. Go to https://github.com/settings/keys, and add your key to your Github account using the New SSH key button. You can view your newly created key using cat ~/.ssh/id_rsa.pub, then simply copy and paste into Github as described above. The following GitHub tutorial provides more details on how to do this.
2. Create an empty class repository
Create a repository for this class by accessing the following link: https://classroom.github.com/a/3Xcviyca.
You must create your repository using this link for the TAs to see and grade your submissions. This link will create an empty private repository on GitHub that is linked to the ECEN 323 course. After clicking the link, you should see something like the image below (note that you will see something slightly different to reflect a different semester and your unique github id):
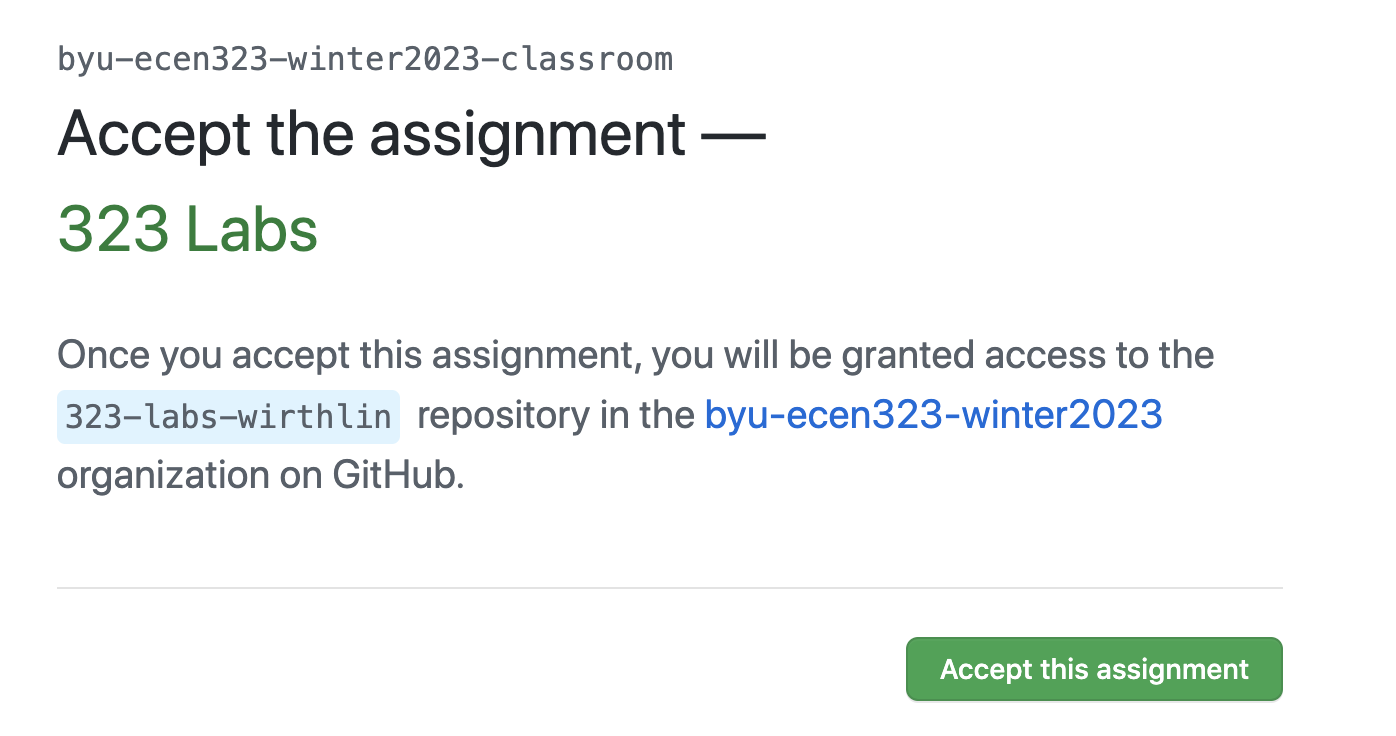
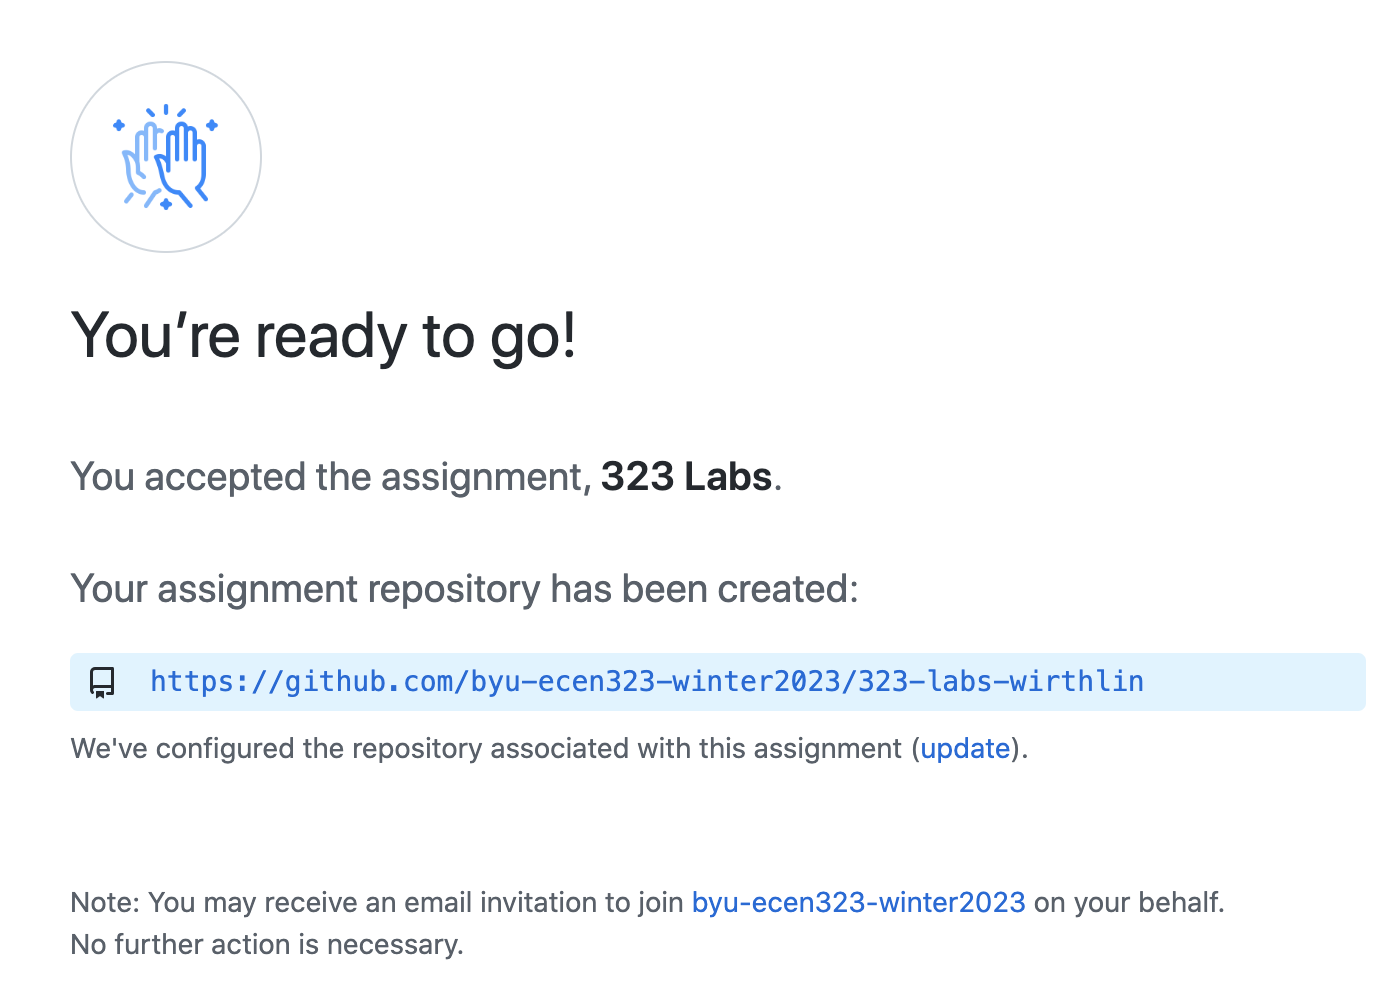
Click the “Accept this assignment” button to create your repository. After accepting your repo, your repository will be created (you should see somethling like the image shown below).

After waiting a bit, refresh the page to see if the repository has successfully been created. If it has not been created, wait a bit more and refresh again. When the repository has been successfully created you should see something like the following:
3. Populate your repository with starter code
Your repository will begin empty, but you will need to import the class starter code. Execute the following commands on the command line to populate your repository with the starter code (you will need to change the name of the repository to match your repository name in the third command). You can run these commands in any directory you want.
git clone --bare git@github.com:byu-cpe/ecen323_student.git
cd ecen323_student.git/
git push --mirror git@github.com:byu-ecen323-winter2024/323-labs-wirthlin.git
cd ..
rm -rf ecen323_student.git
These commands perform the following steps:
- Clone the starter code repository to your local computer (this will only be used temporarily)
- Change into the cloned repository
- Push the cloned repository into your class repository (using the name of your class repository)
- Change out of the cloned repository
- Delete the cloned repository
4. Cloning Your Repository
Now that you have a class repository with the starter code imported, the next step is to clone the repository onto your host computer. This means that you will have two copies of the repository: a local copy on your host computer and a remote copy on GitHub. In fact, you can clone your repository into as many locations as you like. For example, you will almost certainly want to clone your repo onto your CAEDM file system that is used in the digital lab. You may also want to clone your repo onto your personal computer so that you can work on your labs at home. The following image demonstrates the relationship of these repositories:
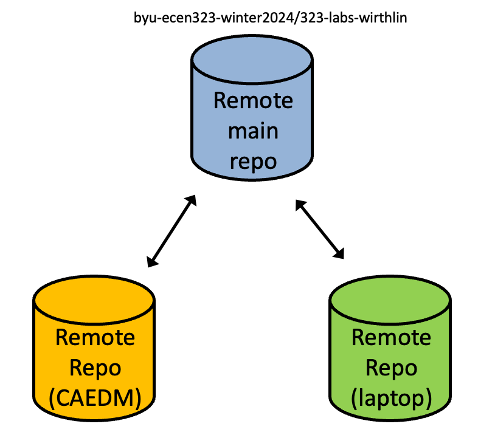
One of your tasks throughout the semester is to keep these repositories synchronized. Instructions on how to do this are described in the GitHub Basic Tutorial. The instructions below describe how to create your cloned respository. You can clone the repository on as many computers as you like. The following example demonstrates how to clone your repository into a directory named ‘ecen-323’ (you can use a different directory destination if you like).
git clone git@github.com:byu-ecen323-winter2024/323-labs-<your_id>.git ~/ecen-323
Note that you will need to change the repository name to match your GitHub id. You can change the name of the destination directory to whatever you like or you can leave the destination directory empty to clone the repository into a new directory with the same name as the repository.
At this point you should have a new directory named ~/ecen-323 where your repository exists (you can name it whatever you want).
Change into this directory to execute the next set of commands.
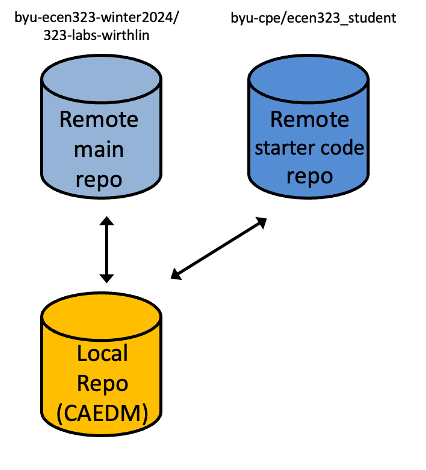
5. Add ‘remote’ to starter code repository
When you cloned your repo, Git creates a link, called a ‘remote’, to your GitHub repository. This remote is named ‘origin’ and points to your private class repository. You will need to add a second remote (called ‘startercode’) to your repository that points to the class starter code repository. This secondary ‘remote’ will allow you to retrieve any updates to the laboratory assignment code throughout the semester. The following image demonstrates the relationship between your local repository, your remote main repository, and the class starter code repository:
To create this secondary remote, you will need to execute the following command:
cd ~/ecen-323
git remote add startercode https://github.com/byu-cpe/ecen323_student
Adding this remote is a one time task that you should complete every time you clone your repository on a new computer.
You can view your remotes to verify both remotes (a remote to your private repo and a remote to the class starter code) by executing the git remote -v command:
$ git remote -v
origin	git@github.com:byu-ecen323-classroom/323-labs-wirthlin.git (fetch)
origin	git@github.com:byu-ecen323-classroom/323-labs-wirthlin.git (push)
startercode	https://github.com/byu-cpe/ecen323_student (fetch)
startercode	https://github.com/byu-cpe/ecen323_student (push)
Finally, configure your github repository to include your name and email. These settings will be used in the commit history of your repository.
git config --global user.name "Your Name"
git config --global user.email your_email@example.com
Congratulations! You have a working github repository for the class and are ready to start adding content as you complete the labs. You may want to refer to the Git Submission page to learn how labs are submitted using Git (you will be directed to this page at the end of each lab).