Table of Contents
Lab 4 - RISC-V Simulator
In this laboratory, you will learn more about assembly language programming and learn how to use the RARS RISC-V simulator. This RISC-V instruction set simulator will allow you to simulate the execution of individual instructions operating on the RISC-V processor. Instruction set simulators are helpful for a number of purposes including understanding the details of an instruction set, improving low-level processor performance, and understanding execution time.
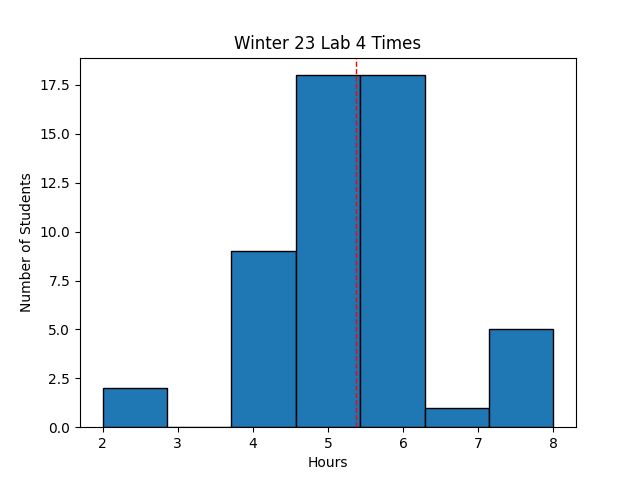 Avg Hours: 5.4, 5.4, 5.5 (Winter 2023, 2022, 2021)
Learning Outcomes
- Learn how to write RISC-V assembly language programs
- Learn how to use the RARS RISC-V simulator
- Create programs in assembly language and simulate them
Preliminary
In this laboratory you will be reviewing and writing a number of RISC-V assembly language programs. It will be important for you to understand assembly language programs and write functioning assembly language programs for this lab. Although the textbook provides some simple examples of RISC-V assembly language instructions and code segments, it does not provide an adequate description for writing full assembly language programs. Read and review the following Assembly Language Tutorial to learn more about assembly language programming for the RISC-V. After reading this tutorial, answer the following questions. Answers to these questions will be found in the tutorial and Chapter 2 of the textbook.
Match each of the following with its purpose: binary machine language, assembly language, and high-level source files like C.
Match the function of each of the following: compiler, assembler, and linker
Match the purpose of each of the following: stack, text segment, data segment, and heap.
Determine the order of the following memory segments in memory (see Figure 2.13): Heap, Stack, Static data, and text segment
Match the register with its purpose
What is a ‘pseudo instruction’?
Identify the ‘pseudo instruction’s in the instruction list
Identify the actual instruction sequence associated with the following pseudo Instruction: li ti, 0
Exercises
Before proceeding with your laboratory exercises, update your repository with the latest lab starter code.
Exercise #1 - Introduction to RARS
In this exercise, you will review three different assembly language programs and will execute these programs on the RARS simulator.
This exercise will help you become more familiar with RISC-V assembly programming language and become more familiar with the RARs simulator.
This exercise will use the RARS Java RISC-V simulator.
This Java JAR file has been included in the lab starter code at /resources/rars1_4.jar.
You can execute the simulator from the /lab04/ directory by executing the following command:
java -jar ../resources/rars1_4.jar
An annotated image of the RARS GUI is shown below that highlights features required to complete this lab. When launching RARS, the RARS GUI will display a light blue background since no RISCV assembly source code has been opened yet. A file containing RISCV assembly source code can be opened by clicking the button circled in orange. After opening a file, the file’s content will display in the Editor window which is the highlighted gold box. Here, RISCV assembly instructions can be added to create RISCV assembly source code. A file that is currently opened in the Editor window can be saved by clicking the button circled in red.
Once the assembly source code is finished, the assembly source code must be translated into machine code for the RISCV simulator to run the assembly program. This can be done by clicking the button circled in green. If the assembler runs successfully, the RARS GUI will switch automatically to the Execute window which will be discussed later. To switch back to the Editor window, click the tab highlighted in purple. In the Editor window, the highlighted blue box displays any info or error messages that may occur when assembling the RISCV assembly source code. The highlighted brown box will display the current value of the registers (for this lab, we are only concerned with the Registers tab and not the Floating Point tab but will use the control and status tab for the cycle register). Finally, the Settings menu highlighted in yellow will be used to view the memory layout of the simulator/program using the “Memory Configuration…” option within the Settings drop down menu.

As mentioned previously, running the assembler will open the Execute window if the assembler ran without any errors. Another annotated image is shown below but with RARS Execute window when the assembler is ran on the average assembly code example. The highlighted pink box displays the assembled instruction and shows the current instruction the processor is halted at (highlighted in yellow, not an added annotation). The highlighted blue box allows breakpoints to be set at any instruction which will halt the processor once the instruction with a breakpoint is reached. The highlighted orange box displays where in memory the instruction is stored, the machine code of the instruction and the assembly version of the instruction. The green box will display the instructions of the program as seen from the Editor window (notice that the highlighted orange and green boxes don’t always match due to pseudo instructions). The red highlighted box controls the program execution by allowing the program to run, running one instruction and then halting, going back a single instruction then halting, pausing the execution if running, completely stopping the program and starting the program from the first instruction. The highlighted brown box has the same functionality discussed previously and displays the current state of the registers. The lime highlighted box displays the contents in memory and the gold highlighted box selects the section of memory that will be shown.
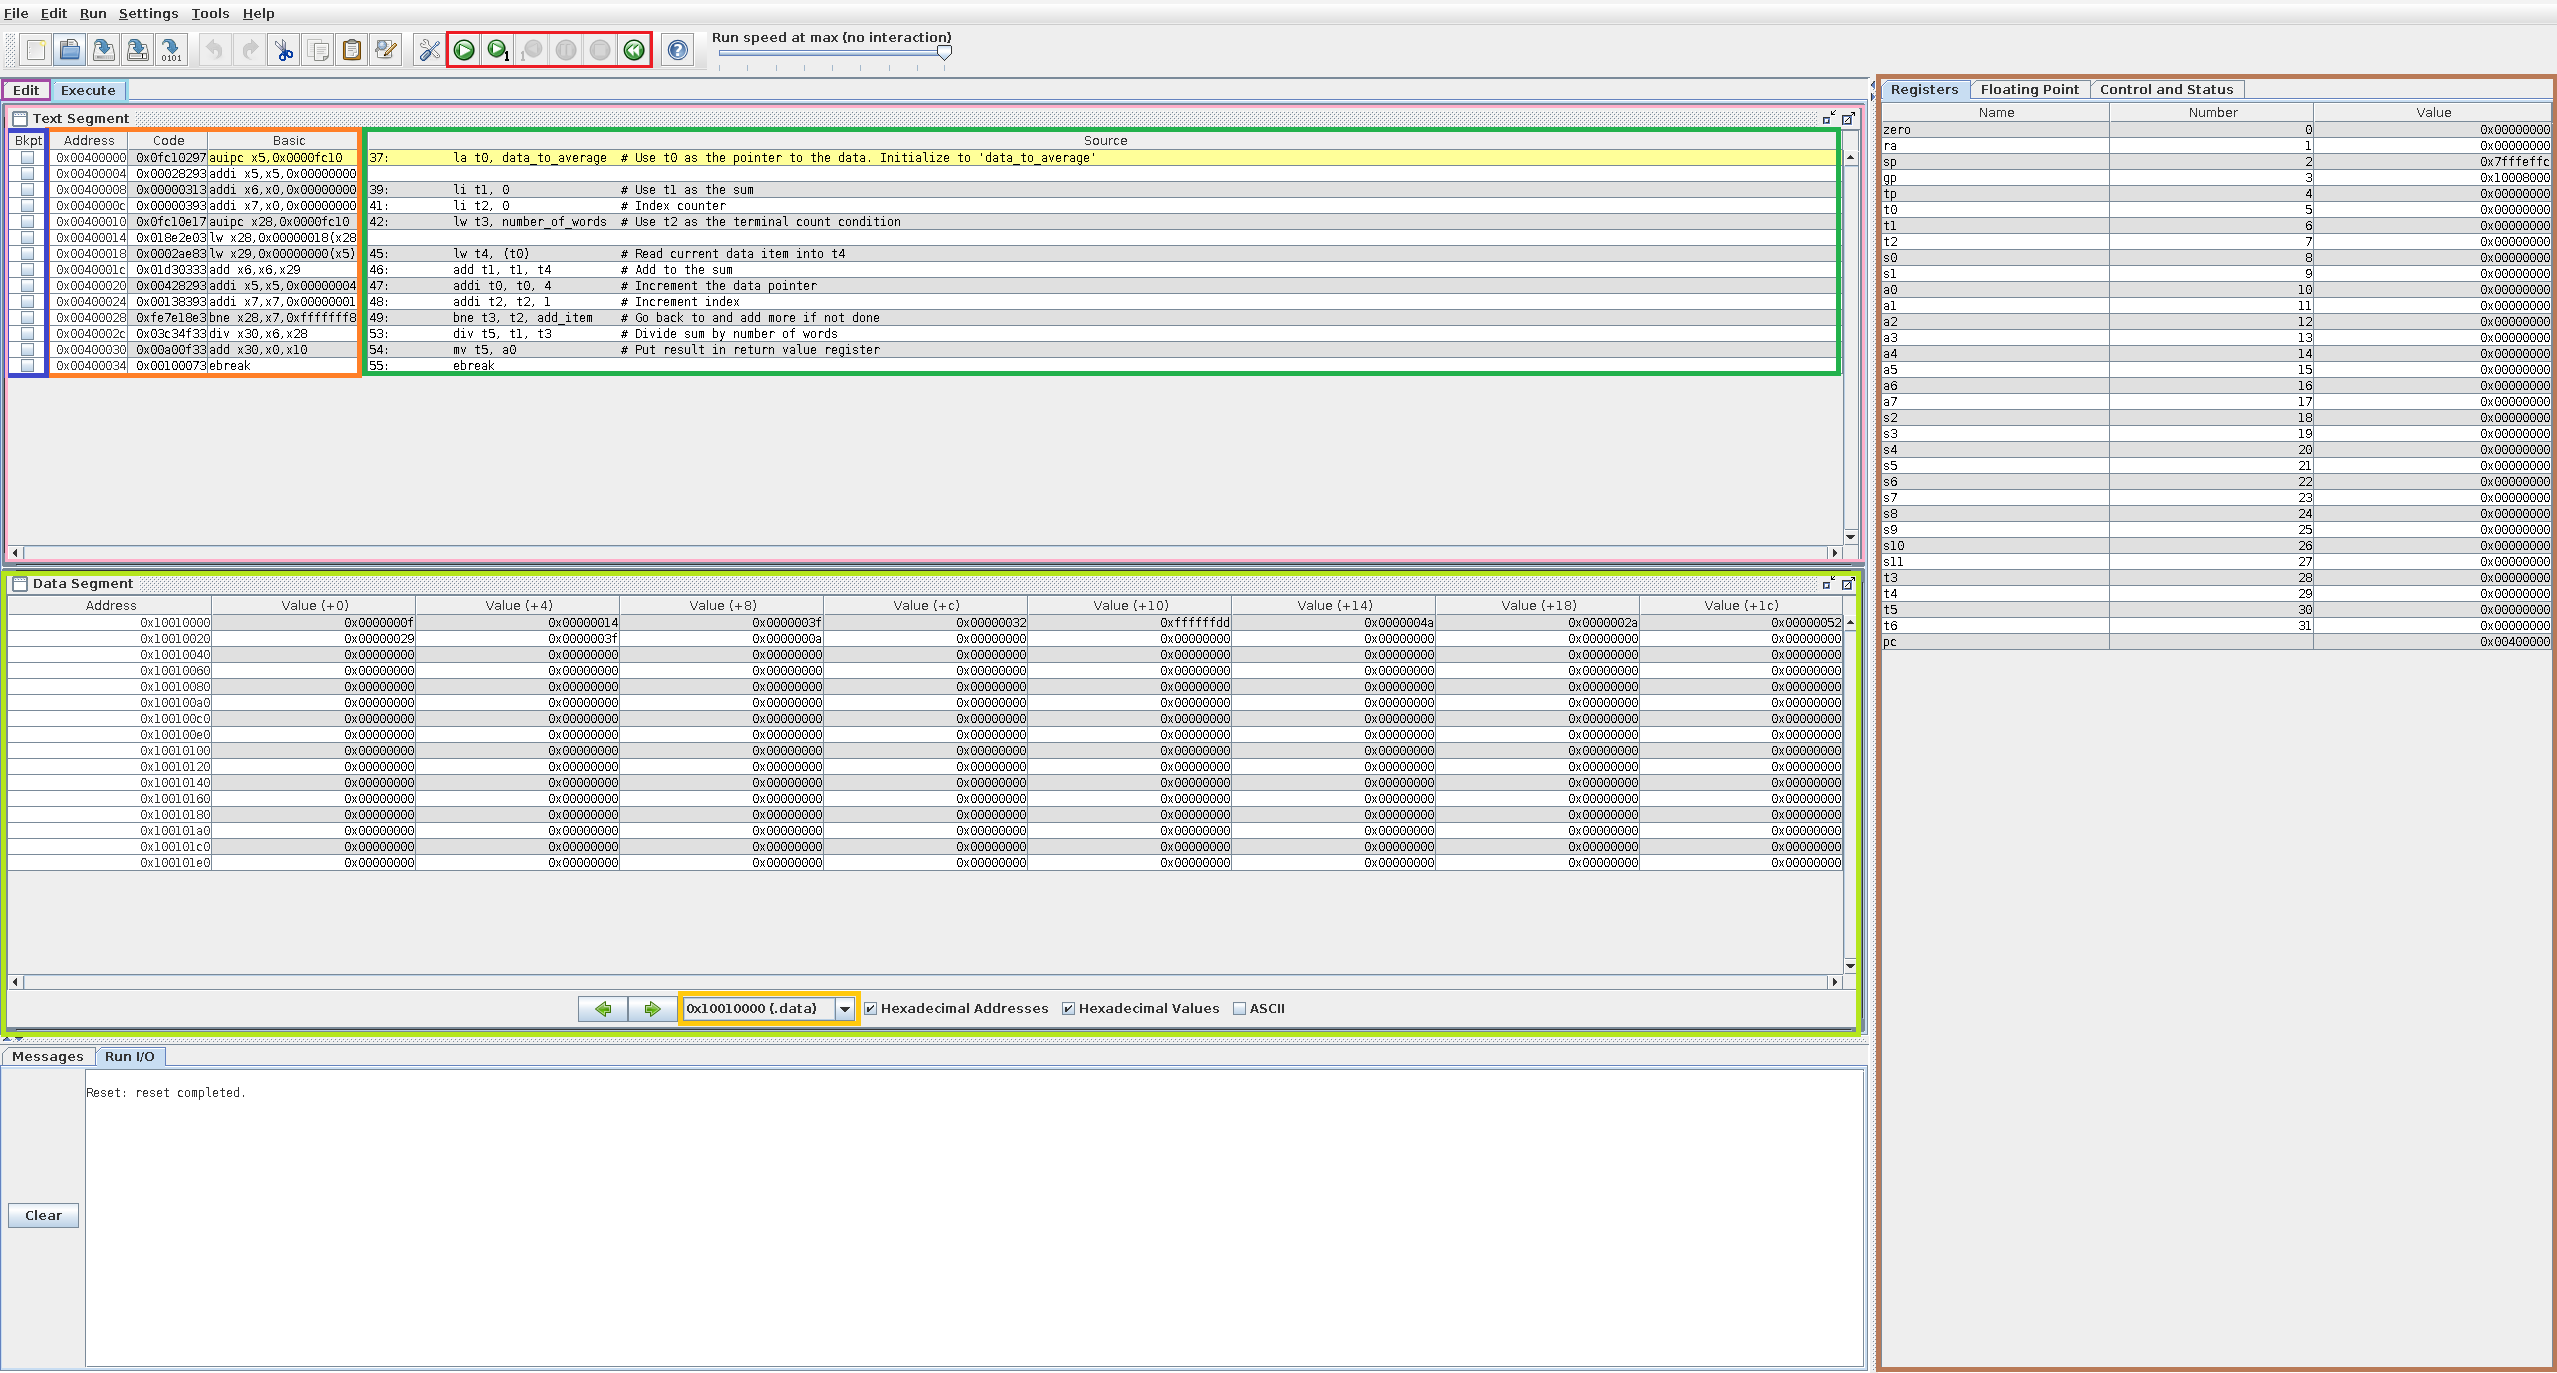
The features listed above are only the most basic functions that RARS is capable of. There are more advanced features and tools such as timers, instruction statistics, machine code dumping, bitmap display and more. Although these tools are interesting and useful in certain situations, they are not required for finishing this lab.
For those who would like more details on using RARS, the video linked below provides a live demonstration and additional background on the simulation.
In addition to understanding the RARS GUI, it’s recommended to feel comfortable with the material from Chapter 2 of the textbook as well as having access to the online The RISC-V Instruction Set Manual to complete this lab. We will be using the 32-bit (RV32I) instructions. RISC-V instructions for the RV32I used by this simulator can be found in pages 13-29 (pdf pages 31-47) and 35-37. Pages 129-136 (pdf pages 147-154) provide a reference for RISC-V assembly language instructions.
Use the RARs simulator to answer the following questions. For memory location responses, provide your response as 8-digit hex values using lower case letters (i.e., ffffffff)
What is the default memory address of the start of the text segment for the simulator? (GUI: Settings: Memory Configurations)
What is the memory address of the start of the static data in the data segment for the simulator (GUI: Settings: Memory Configurations)
What is the memory address of the start of the dynamic data (heap) in the data segment for the simulator? (GUI:Settings: Memory Configurations)
What is the memory location of the stack segment for the simulator? (GUI: Settings: Memory Configurations)
Example #1
The first assembly example computes the factorial of an input value and writes the result to the output memory location.
This file is located in the repository starter code at /lab04/example_1.s.
The program provides a basic example of branches, loads, saves, and arithmetic.
Step through the program to understand how it works.
The program will not stop but will loop at the end.
How many extended (pseudo) instructions are there in this example? (note that using ‘lw’ with a label is a pseudo instruction)
What does the last instruction do?
What is the cycle count when the simulator gets to the first j exit_loop? (step through the program). Note that the cycle count can be found in the simulator under the ‘control and status’ tab (see ‘cycle’)
What is the actual instruction sequence represented by the pseudo instruction lw a0,input?
Example #2
The second example builds upon the first factorial example by adding system calls and placing the factorial function in a basic subroutine.
This file is located in the repository starter code at /lab04/example_2.s.
The system calls provide basic printout features and a program exit.
What is the printout when the program is executed?
What is the cycle count when the program finishes?
Which system calls are used in this example?
In what register does the jal fact_func instruction store the return address?
What is the 32-bit value located at address 0x10010008 of the data segment?
Example #3
The third example adds a complete calling convention to the factorial subroutine using the stack to help you see how the stack works.
This file is located in the repository starter code at /lab04/example_3.s.
This program will take more cycles to execute but it performs the same function.
The stack allows you to call sub routines within your main function without messing up the data in the calling function.
You will need to write a function in a later exercise that uses the stack.
What is the cycle count when the program finishes?
What is the smallest value that the stack pointer (sp) reaches during the execution of the program?
Which registers are saved on the stack at the start of the ‘fast_func’ procedure?
Exercise #2 - Factorial Example
The C code shown below is a recursive function to compute the factorial of a value.
This exercise presents the assembly version of this C code and provides an example of how the stack is used in a recursive function.
The assembly code for this example is found at /lab04/fact_rec.s in the starter code.
Carefully review it to understand how the stack frame is used to implement recursion.
Load it into the RARS simulator and execute it to see how it operates.
int fact_func(int n) {
    if (n>=1)
        return n*fact_func(n-1);
    else
        return 1;
}
Answer the following questions regarding this assembly language program:
Determine the address of the ‘fact_func’ procedure within the .text segment
What is the address where the ascii string “! = “ is stored?
What is the value of the stack pointer before the program executes?
Change the code to compute a factorial of 10. Step through the execution of this program to see the program being executed and answer the following questions:
How many instructions were executed to compute the factorial of 10?
What is the smallest value of the stack pointer during the execution when finding the factorial of 10?
Exercise #3 - Fibonacci Number
For this exercise, you will create two different RISC-V assembly language programs that output the n’th Fibonacci Number. Your program will receive as input an integer value, n, and must compute the Fibonacci value of n. The Fibonacci numbers are defined with recursion as follows:
- F(0) = 0
- F(1) = 1
- F(n) = F(n-1) + F(n-2) (for n>=2)
For example, if the input is n=3, your program should return “2” (F(3) = 2). The first version of the Fibonacci Number will be done using an iterative method and the second version will be done using recursion.
We have provided a template for you to use to create your Fibonacci functions: /lab04/fib_template.s.
You will need to modify the function call to your Fibonacci function.
You will have two different files when you are done: one for the iterative version and one for the recursive version.
Copy the template into two different files - one for the iterative version (name this file fib_iterative.s) and one for the recursive version (name this file fib_recursive.s).
Note that you will need to follow the Assembly language coding standards when you write your code.
Modify each file by changing the “netid” string to display your BYU net ID.
Iterative
Implement the first version of this function using an “iterative” approach and name your file fib_iterative.s.
Sample C code for computing Fibonacci numbers iteratively is shown below:
int fib_iterative(int a) {
  if (a==0) return 0;
  if (a==1) return 1;
  int fib_2 = 0;
  int fib_1 = 1;
  int fib = 0;
  for (int i=2;i<=a;i++) {
    fib = fib_1 + fib_2;
    fib_2 = fib_1;
    fib_1 = fib;
  }
  return fib;
}
Note that this code is given only as an example to help you get started. You don’t have to implement your iterative Fibonacci exactly as shown. You can modify the approach however you like so long that it provides the correct result and does not use recursion.
Creating Loops in Assembly
There are no built in “loops” in assembly language and you will need to implement the loop in your assembly code for the ‘iterative’ version. The loop syntax contains the following four distinct segments of code:
- Loop variable initialization: This code is executed just once before executing the loop. This is where the loop variables are initialized.
- Check loop condition: This code is executed at the start of the loop body. If the loop condition is not true, the loop body is skipped and the code exits the loop.
- Post Loop Update: This is the code that is executed after the execution of a single loop body and is used to update the loop variables.
- Loop Body: This is the main body of the loop that is executed if the loop conditions are true.
The code example below demonstrates each of these four segments are located:
for (<initialize loop variables>,<check loop condition>,<post loop update>)
  <body of loop>
The following example below demonstrates how these four segments of code can be implemented in assembly language
loop_init:           # Label for the start of the loop code
# 1. Initialize the loop variables (executes once for loop)
   addi t0, x0, x0   # t0 is the loop variable (initialized to 0)
   addi t1, x0, 5    # t1 is the loop limit constant

loop_body_start:     # Label for start of loop
# 2. Check loop condition (branch out of loop if false)
   bge t0, t1, loop_end  # branch out of loop if the index is >= 5

# 3. Loop body. Put the instructions for the body of the loop here

# 4. Post Loop Update.
   addi t0, t0, 1    # Increment loop index t0
   beq x0, x0, loop_body_start # Unconditional branch back to the start of the loop

# A label after the loop (for exiting the loop)
loop_end:       # Label for code after loop
How many iterations of the loop will be executed for fib_iterative(5)?
How many clock cycles did it take for your code to process fib_iterative(10)?
You will need to include the iterative Fibonacci sequence code (fib_iterative.s) in your GitHub repository.
Recursive
Implement the second version of this function using a “recursive” approach and name your file fib_recursive.s.
C code for computing Fibonacci numbers recursively is shown below:
int fib_recursive(int a) {
  if (a==0) return 0;
  if (a==1) return 1;
  return fib_recursive(a-1) + fib_recursive(a-2);
}
The recursive version looks simpler than the iterative code but the recursive version will make multiple, repetitive calls for the same Fibonacci number.
Determine the number of times the function fib_recursive is called when calling the function with an input of 5 (i.e, fib_recursive(5)). Include the first call to the function in our count. You may want to write out the recursive call history to determine this number.
How many clock cycles did it take for your code to process fib_iterative(10)?
You will need to include the recursive Fibonacci sequence code (fib_recursive.s) in your Git repository.
Pass Off
To create your submission, make sure the following files are submitted in your ‘lab04’ directory:
- fib_iterative.s
- fib_recursive.s
Make sure you do not add unnecessary files to your repository.
Test your submission by running the lab04_passoff.py pass-off script found in the starter code.
Review the instructions for submitting and passing off labs to make sure you have completed the lab properly.
How many hours did you work on the lab?
Provide any suggestions for improving this lab in the future