Table of Contents
PuTTY is a serial console, a computer program that can listen for and display characters sent over a serial link.
This is used in the UART labs so the Basys 3 and the computer can communicate with each other over USB serial communication.
Find Serial Port
First you must find out which serial port the USB Serial port is using on your lab computer. Complete the following to do this:
Windows
- Plug in your FPGA board and power it on - this is required for there to be a voltage on the serial port on your computer so the steps below will work.
- Open your computer’s Device Manager.
- Open the Start menu, type in Device Manager to find it.
- When it says “You are logged on as a standard user…” click OK.
-
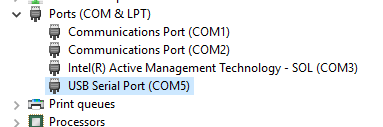
Find and open the “Ports (COM & LPT)” section.

-
Read the COM number for the “USB Serial Port.” In this case it’s COM5. Remember this number for later.
Linux
From a command terminal, run: “sudo dmesg | grep tty”. This will print out a list of system messages related to active TTY (serial line) ports. Usually you will see entries for ttyUSB0 and ttyUSB1. Port ttyUSB1 usually seems to be the one that the board is connected to - if that fails to work then try ttyUSB0. If it fails you will get a failed to connect error when you first open it. Remember, if you have not been added to the dialout group, you have to run PuTTY as sudo putty or you will get a permissions error.
PuTTY Configuration
-
Open PuTTY

- If you are on windows, there should be a shortcut for it on your desktop. If you are on Linux, execute “putty” from a command line.
-
Open the “Serial” window under “Category->Connection” on the left side of the screen at the very bottom.
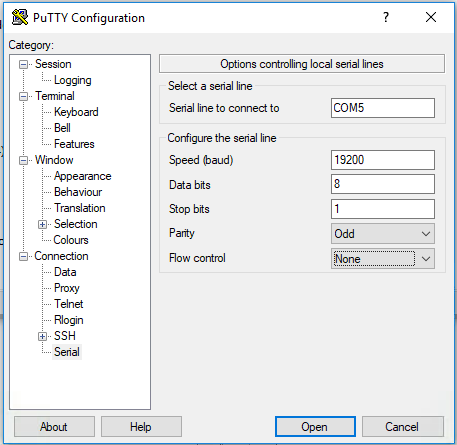
- Set “Serial line to connect to” to the serial port from earlier in this tutorial. In this example it is COM5 but it may be other ports on Windows. For Linux it will be of the form: /dev/ttyUSB1 (the /dev part is important).
- Set “Speed (baud)” to “19200”
- Set “Data bits” to 8
- Set “Stop bits” to 1
- Set “Parity” to “Odd”
- Set Flow Control to “None”
-
Go to the “Session” window.
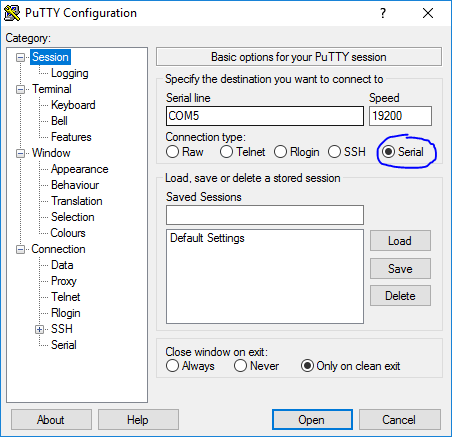
- Select “Serial” under “Connection type”
- Your earlier saved values should now be visible.
- You can save your configuration for future use by entering a name in the Saved Sessions box and clicking Save.
-
Click Open