Table of Contents
- Intro to Accessing Vivado Without Being in the Lab
- Option #1: Run Vivado in Citrix, use Adept2 to Program Your Board (Windows only)
- Option #2: Run Vivado in Citrix, use OpenOCD to Program Your Board (Mac only)
- Option #3: Install and Run Vivado Locally On Your Own Computer (Windows only) - {:.} Instructions
Intro to Accessing Vivado Without Being in the Lab
In this course, you will use the Xilinx Vivado design software to design digital circuits and then test those designs on the circuit board. This is a very large, commercial software package that is being provided free of charge for your use.
This software is installed in two places on campus: (1) on the lab machines in the digital lab (EB 423) and (2) on University machines accessible via https://cloudapps.byu.edu. Note: it is NOT available through the CAEDM Citrix service (what, if anything, you find there is an old, non-updated copy of the software).
You can always use the software in the digital lab (EB 423). However, some students may need or want the flexibility of working when away from the lab. And note that it is possible to mix the two: sometimes working in the lab and sometimes working on your own machine remotely. It is not an either-or choice.
Here are your options on how to access the tools. Before introducing them, however, you need to understand that there are TWO different activities you will do in every one of your lab assignments.
First Activity: Doing Circuit Design Using Vivado
The first activity is to actually design the circuit in a Computer-Aided-Design (CAD) tool on a computer. This tool is called Vivado. The design process involves typing in code to describe the circuit elements and how they are connected, and then running simulation and analysis programs to verify that the design should function as desired. This can be done anywhere you have access to Vivado (since it is just a computer program you run).
Second Activity: Physically Testing Your Design on Your FPGA Board
In the second activity you will take your finished design data and download it into your FPGA board so you can actually test your design in hardware. It is here you will flip switches and see lights blink on your FPGA board’s hardware to demonstrate that your design is working correctly.
This requires your FPGA board to be plugged into a computer with the required software installed for downloading to the board. This computer could be either your own computer or a computer in EB 423. But, those are the only two locations where you can do this second activity.
These two activities can be done independently, meaning you may choose to do them either in the lab or at home. Your choice of options below will reflect that.
Option #1: Run Vivado in Citrix, use Adept2 to Program Your Board (Windows only)
BYU maintains a set of cloud-based computing applications at https://cloudapps.byu.edu.
You will NOT use the J drive if you use this option, you will use Box instead. So, any time a tutorial tells you to save something to the J drive you would save to Box instead (it will show up in the File Choose Dialog in Vivado when it comes time to save files).
NOTES:
- Uses CITRIX – has been very reliable.
- Does not use the J Drive – if you have J Drive problems this solves that.
- Uses Box – your files are easily accessible from other machines anywhere.
Instructions
There are two basic ways to use Citrix. In the first you install nothing and just run from your browser:
- Once you log into https://cloudapps.byu.edu (use your BYU netid) then Vivado will show up as an option (or you can search for it).
- Before running Vivado, however, start up Box (all BYU students have a Box account). You may have to search for it as well.
- Then, when you start up and do your work in Vivado you can store your files in Box. This is important in that it will allow you to access them when you return. It will also allow you to get your files from other machines.
In the second option, you install a Citrix Viewer which will display Vivado’s windows instead of your browser. This has the advantage that it will work in all cases since it is a Citrix-provided viewer program instead of a browser. Use this method if the browser method isn’t working. To set this up do this:
- Download and Install the Citrix Workspace app (https://www.citrix.com/downloads/workspace-app/) Note: Do not enable single sign-on
- In the Add Account field, enter the following address: https://byuapps.cloud.com
- Enter your NetID@byu.edu and associated password.
- Run Vivado by selecting Apps –>All Apps –> Vivado.
- As above, you may need to run Box once first to authenticate to it (but try first without doing so – it may be automatic).
Download to Your Board Using Adept 2 (Windows only)
Since you are running Citrix (and it is remote) you must copy your .bit file to your local computer (where you have your board plugged in) to program it. To do the programming, you will install Digilent Adept 2, a small piece of software, on your machine to control the circuit board. You then use that to program your FPGA board so you can test your design.
NOTES:
- Every time you go to do something with the board you will have to copy the .bit file you have created to your local machine to program the board with its contents.
Instructions:
- Go to https://store.digilentinc.com/digilent-adept-2-download-only/
- Scroll down and click “Download Here”.
- Under “System – Latest Downloads”, click “Windows – v2.21.2”.
- Fill out the form with first and last name, email, etc. and click “Submit”.
- This should begin the download (22.8 MB).
- Run the installer, when prompted, the defaults for the most part are OK.
- Once you have the application running, you should be able to plug in your FPGA and it will automatically connect.
Once you have a design completed you will have to copy the circuit configuration file (.bit) from the lab computers to your local machine and then use the Digilent Adept 2 software you just downloaded above to actually program the circuit board to test your circuits.
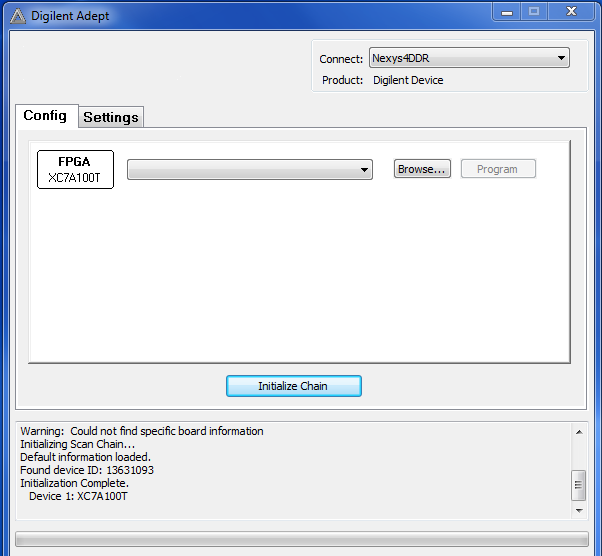
Connecting to a Board with Adept
Run the Adept application you just installed to connect to the board. The first time you run Adept, Windows might take a while trying to update the Digilent drivers. In my testing on a Win7 machine (old) I figured it would never finish so I told it to cancel. It installed the standard drivers and everything worked just fine.
When you fire up Adept, if the board is plugged in and powered on, it should auto-detect as shown in the figure below. Any time the tutorials in the lab tell you to run the Xilinx Hardware Manager, you would run Adept on your local computer instead.
Option #2: Run Vivado in Citrix, use OpenOCD to Program Your Board (Mac only)
Follow the instructions above to access Vivado using Citrix from your machine. That is how you will do design from your web browser.
Download to Your Board Using OpenOCD (Mac Only)
Follow the instructions at: https://github.com/byu-cpe/BYU-Computing-Tutorials/wiki/Program-7-Series-FPGA-from-a-Mac-or-Linux-Without-Xilinx. It will show you how to program the board directly from your Mac (or any other machine that will run ‘openocd’). You would use this to program your board from your Mac after doing the Vivado design remotely on some other machine.
When following the instructions at the link above, you won’t actually have a bitfile. However, if you run the command to program the board: openocd -f 7series.txt, it will still recognize the board but will then later fail to actually program it. All you need initially is to confirm that it can see your FPGA board. Here is a transcript of a successful run of openocd, showing that it recognized an FPGA board, but then later failed to program it due to a missing bitfile (and this will be adequate to demonstrate that it sees the board):
Open On-Chip Debugger 0.10.0
Licensed under GNU GPL v2
For bug reports, read
	http://openocd.org/doc/doxygen/bugs.html
none separate
adapter speed: 10000 kHz
Info : auto-selecting first available session transport "jtag". To override use 'transport select <transport>'.
Info : ftdi: if you experience problems at higher adapter clocks, try the command "ftdi_tdo_sample_edge falling"
Info : clock speed 10000 kHz
Info : JTAG tap: xc7.tap tap/device found: 0x0362d093 (mfg: 0x049 (Xilinx), part: 0x362d, ver: 0x0)

0362D093
Programming FPGA...
Error: couldn't stat() stopwatch_top.bit: No such file or directory
failed loading file stopwatch_top.bit to pld device 0
The key line in the transcript above is the one that starts with Info : JTAG tap: .... Note that it says that a device was found. The hex value for the found device may differ from yours but this shows it did find a device.
Option #3: Install and Run Vivado Locally On Your Own Computer (Windows only)
You will go to the Xilinx website and download and install a copy of Vivado to run.
If you choose this option, YOU WILL NOT use the J: drive to hold all your files. You will have them all local to your machine, presumably on your C: drive.
NOTES:
- Your usage will represent the most common way the Xilinx software is run by others.
- The tools run fastest locally.
- Vivado also provides a way to program your FPGA board so you need not download anything else – it is self-contained and matches what is done in the labs.
- But, it may take a couple of hours to set up and will take up to 20-40 GB of disk space on your machine.
- The Xilinx web page changes regularly — the instructions here may be slightly different from what you see. But, the differences are usually just cosmetic.
Instructions
Xilinx provides a “free” version of the Vivado tools for student use called “WebPack”. This is a limited version of the tool that only works with a few of the FPGAs that Xilinx manufactures. Fortunately, it supports the FPGA we are using for our class. If you have access to a computer/laptop with plenty of hard drive space (the compressed image is about 10 GB and expands to about 25 GB) and a decent processor, you may want to pursue this route. Make sure you download version 2019.2.
- Go to www.xilinx.com (note that their website changes regularly so the instructions may be a bit out of date within weeks of being written)
- Click Products (up top), then Hardware Development (left side), then Vivado Design Suite (left side), then Download Vivado (mid-right of screen), then Vivado Archive (left side), then 2019.2.
- Scroll down and find “Vivado Design Suite – HLx Editions – 2019.2 Full Product Installation” and then below it find “Vivado HLx 2019.2: WebPACK and Editions – Windows Self Extracting Web Installer (EXE – 64.62 MB)”. Just be aware there are lots of versions, and they are adding new ones regularly –
.
- Click on it.
- This will then require you to create an account at Xilinx in order to download. You can use BYU’s address for your address if you would like (EB450, Dept of Electrical and Computer Engineering, Brigham Young University, Provo, UT 84602).
- If it asks for your research you can just put “digital design”. Once you have an account it will ask you to log in again and you will likely have to re-navigate to the download button. Then, click Download.
- And, you will need your Xilinx login and password later in the install process so keep it handy.
- Double-click the downloaded file (it should be around 60-70MB in size).
- When prompted, be sure to select “Vivado HL WebPACK version”. The defaults for the most part are OK for the rest. As shown here, you can minimize the install size by de-selecting a number of things (like SDK, UltraScale, and UltraScale+ devices). Also, be SURE that the box for installing cable drivers is selected.
That should do it.
With Vivado on your machine, you can do EVERYTHING on your local machine (both run Vivado to do designs as well as download to your board).
ONE VERY IMPORTANT THING: after you install, you should have two icons on the desktop. One is “Vivado” and one is “Vivado HLS” (which is a different program than Vivado). You want to run the first one – delete the shortcut to the second one.