Table of Contents
Welcome to the 320 Lab!!!
This is where you put into action all the design techniques and knowledge you have acquired in class.
There are many moving parts to the lab, so read everything below during the course of your working this lab.
The average time to complete this lab is 1 hour.
Orientation to Lab Policies
Lab Attendance
We will meet in-person at your appointed 3-hour lab time block. You are expected to be in attendance for the entire block of time (or until you complete the lab).
Completing Labs Outside the Lab Block
If you don’t succeed in completing your lab during the 3 hour period you may complete it on your own afterwards. Just be aware that there will be more limited TA help after the lab session is over (we just don’t have enough TA hours to have all day coverage). Here are three things you can do to help you complete the lab in the 3 hour block: (1) pre-read the entire lab assignment and make a list of questions you have that you can ask when the lab session starts, (2) pre-read the entire lab assignment and make a list of questions you have that you can ask when the lab session starts, (3) pre-read the entire lab assignment and make a list of questions you have that you can ask when the lab session starts. Enough said?
Lab Due Date Policies
The lab is usually due before the new lab starts. For example, if your lab starts on Tuesday at 12:00 PM, then it will be due on the following Tuesday at 12:00 PM. If your lab is on Wednesday at 3:00 PM, then it will be due the following Wednesday at 3:00 PM. In some cases a lab is due 2 weeks following the introduction.
No late labs will be accepted. That is, Learning Suite will not accept labs submitted after the due date and time.
Plan ahead. The purpose of the scheduled lab time is for you to complete most, if not all, of the assigned lab during the 3 hour session. But, since each lab may take a different amount of time due to unforeseen mistakes you make, it can be hard to predict how long each lab will take. Waiting until the day before it is due to get seriouis about completing it is a recipe for disaster.
Completing Labs
The labs are broken up into Exercises. For each exercise there will be questions in red. Go into Learning Suite where you will find assignments with names like “Lab Getting Started - Report”. You go into that assignment and there will be places for you to enter the information you were asked to collect/compute/tabulate in the lab’s red text. That will give you credit for the “Lab Report” assignments.
In addition, each lab has one or more things marked in green that will constitute the “Lab Passoff” credit in the gradebook. It will usually ask you to attach files to Learning Suite to complete the lab passoff. Demonstrating the proper operation of your design can be done in one of two ways: 1) You can show your work to a TA and enter their name in response to the question on Learning Suite, or 2) make a video and submit a link to Learning Suite. Submitting a video link is useful when you are not able to find a TA to pass off your work before the deadline. To complete this, do the following:
- Make a video where you demonstrate your design working on your board.
- Your video should be long enough to fully show your design is working but not excessively long. Two to three minutes should be more than enough for most labs.
- Post your video somewhere. This could be YouTube, Box, or Dropbox. Make sure it is publicly accessible to those who have the link. The TA will click this link to go view your video and assign you a grade.
- Attach a link to the video (NOT the video itself) to Learning Suite.
- It is recommended that after you submit, you go in and click the link yourself to ensure it is correct. The TA may or may not be lenient in the case of your posting a link that cannot be viewed.
In response to some questions, you will be asked to attach screenshots of what you have done. You can do this on your Linux lab machine with the following key combinations which will save a screenshot to the “Pictures” directory:
Alt+PrtSc– Save the current window.Shift+PrtSc– Save a specific region.PrtSc– Save the entire screen.
Also, in the labs you may be instructed to check or pass off something with a TA as part of an intermediate step. These are not in any color but are just part of the black text. These are not recorded nor graded. The purpose of these is to help ensure that you are on the right track before you proceed any further and waste a lot of your time doing the wrong thing. Ignore these intermediate pass offs at your own peril.
Exercise #1 - Introduction to the BYU Digital Lab
Introductory Video
Watch the following video to learn about physical lab policies.
Managing Files and Disk Space
The computers in the digital lab are managed by CAEDM, the College of Engineering and Technology computer support team. All users of these computers must conform to the CAEDM user policy including the food and drink policy. Review this policy to understand the appropriate uses of the facilities in this room.
Get a CAEDM Account
Now, go to the CAEDM link above and click the “Create an account” link on the left side of the page and create yourself a CAEDM account. Make careful note of your username and password.
Locate Your J Drive
You will generate a large number of files as you complete the lab exercises and it will be important to properly manage your files throughout the semester. Specifically, you will have a number of files that you will want to save throughout the semester (primarily your source files).
With a CAEDM account (which you are able to keep as long as you are a student) you are also given disk space to store your class files. This disk space will show up as the “J drive” on essentially all department or college lab computers (but not University computers). In addition, you can access the J Drive from home to get files off it or put files there. It is the one consistent place you will always have access to while you are a student in the college.
On a Linux lab machine, the J Drive is your home directory when you login.
Read the Using CAEDM Storage (J Drive) tutorial to learn more about this disk space and how to set it up on your personal computer.
Now, open a file browser on your lab machine. Take a screenshot showing the contents of your home directory (J Drive).
Exercise #1 Questions
Now answer the following questions:
Indicate your CAEDM user ID.
When (what day(s) and what hours) is your scheduled lab session?
Is attendance at lab sessions required?
How many days after a lab session is the lab usually due for full credit (number of days and time)?
Capture a screenshot showing the contents of your home directory (J drive).
Exercise #2 - Design Tool Workflow
There are TWO different steps you will do in most of your lab assignments.
First Step: Doing Circuit Design Using Vivado
The first step is to actually design the circuit in a Computer-Aided-Design (CAD) tool on a computer. This tool is called Vivado. The design process involves typing in code to describe the circuit elements and how they are connected, and then running simulation and analysis programs to verify that the design should function as desired.
Second Step: Physically Download Your Design onto Your FPGA Board
In the second step you will take your finished design data and download it onto your FPGA board from a host computer so you can actually test your design in hardware. This requires your FPGA board is plugged into a host computer that has the required software to download to the board. It is here you will flip switches and see lights blink on your FPGA board’s hardware to demonstrate that your design is working correctly.
To learn about the various ways of working with the computer tools in the lab, read instructions for accessing course CAD tools here.
What are the two steps or phases to the lab work you need to do this semester? What is each called?
Exercise #3 - Connect the Basys 3 FPGA Board to a Host Computer
The Basys 3 boards have always come from the supplier ready to go but, there is a chance the jumpers are set incorrectly. Before you plug in your board, follow this tutorial on Basys 3 jumpers to make sure the board came set up properly.
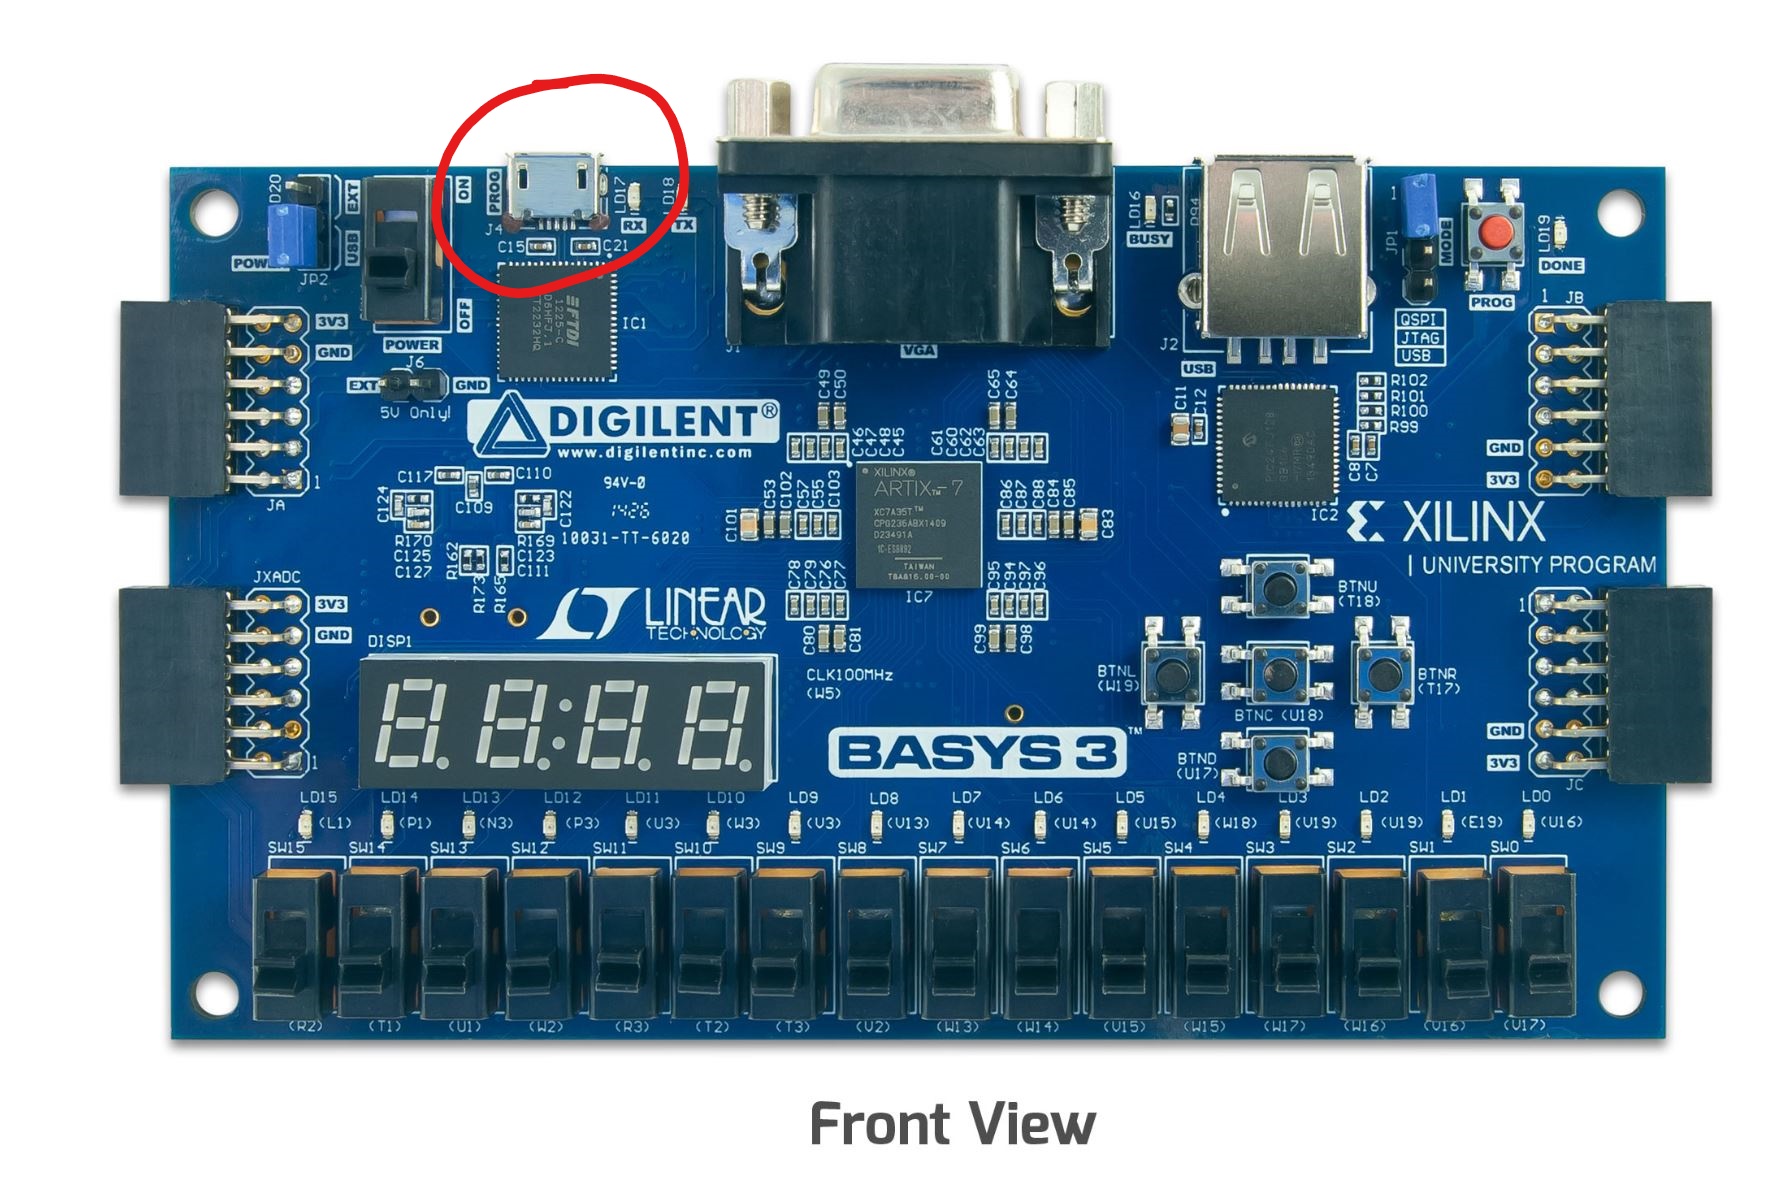
Connect your FPGA board to a host computer. This should either be a computer in the lab or your own computer if you have downloaded and installed software locally. Use a micro-USB cable.
In this picture, the place to plug in the “micro” end of the cable is circled. BE SURE to orient the plug in the right way to avoid damaging the connector on your board. Plug the other end into a USB port on the host computer.
Turn on the board using the slide switch marked “Power” that is just to the left of where the USB cable plugs into the board. LED lights on the board should come on now.
Setup Xilinx Design Tool Environment
The environment needed to run the Xilinx design tools is not setup by default. Let’s walk through creating a shell script that will simplify setting this up when you need to run Vivado.
Type or copy the following command into a terminal window and execute the command.
echo source /tools/Xilinx/Vivado/2019.2/settings64.sh > myenv.sh
It will create a file called myenv.sh with the path to the Xilinx setup script.
Source the script you created to set up the Vivado environment. When you open a terminal window to run Vivado, you only need to source this script once to setup the environment.
source myenv.sh
Check to see if the environment was setup properly by typing the env command at the terminal prompt. The PATH environment variable should now contain directory paths to the Xilinx tools.
Launch Vivado
- Now, start up the Vivado program. Type
vivadoat the terminal prompt. - Select “Open Hardware Manager” (center of this screen).
- In the window that appears, click “Open Target” (upper middle) and then “Auto Connect”.
Take a screen shot to show that it is running (it will open a large GUI when it starts up).
Next, find the console log and prove to yourself that your board is recognized. Here is an example of what it looks like in the Vivado console log:
Connect_hw_server
INFO: [Labtools 27-2285] Connecting to hw_server url TCP:localhost:3121
open_hw_target
INFO: [Labtoolstcl 44-466] Opening hw_target localhost:3121/xilinx_tcf/Digilent/210183ACB338A
open_hw_target: Time (s): cpu = 00:00:03 ; elapsed = 00:00:10 . Memory (MB): peak = 7156.113 ; gain = 778.625 ; free physical = 139 ; free virtual = 1032
current_hw_device [get_hw_devices xc7a35t_0]
refresh_hw_device -update_hw_probes false [lindex [get_hw_devices xc7a35t_0] 0]
INFO: [Labtools 27-1434] Device xc7a35t (JTAG device index = 0) is programmed with a design that has no supported debug core(s) in it.
You can see from the INFO lines that it found a hw_target and a device. Your board will differ from what is shown since it is for a slightly different board. However, it will be obvious it has detected a Xilinx board.
Note that you are not required to program the board, just show that your connection method recognizes the board. If it is unclear to you that it has definitely recognized your board, you should visit with a TA to help confirm that it has.
Troubleshooting
If you cannot get your board recognized on your host computer for Lab 0, here are the common things to try:
- Make sure it is turned on.
- Make sure you have a real USB cable (and not just a charging cable - this has been a common problem).
- Make sure the jumpers are set correctly.
- Try a different USB port on your host computer.
Attach a screenshot showing that you were able to successfully start up the Vivado program.
Enter the text from the console log showing that your board was recognized when connected to your host computer.
Final Questions
How many hours did it take you to do this lab?
List the problems you encountered in completing this lab. For each, give a short explanation of what went wrong and how you fixed it.