Table of Contents
Overview
In this lab, you will learn the basics of speakers and frequency generation. You will also learn how we store sound files and what a digital sample is. To conclude, you will explore some basic audio filters, and will have the chance to experiment with a few of these using your Y-Board.
Procedure
Getting the starter code
- Open vs code
- Click the “Source Control” button on the left toolbar
- Click “Clone Repository” Note: if you do not see the option to Clone Repository then you will need to open a new window of VisualStudios Code (VSCode)
- Enter the url: https://github.com/byu-ecen-192/y-board-mic-speakers.git and hit Enter
- A window will open and ask you to select the destination folder. Choose where to put it.
- Open the PlatformIO Project.
- Build and Upload the code in the main.c file to the Y-Board.
An important note to start with: sometimes, the code may appear to upload successfully, but nothing happens on the board. If this occurs, try pressing the reset button on the Y-Board (upper left corner).
If you encounter compilation errors, you may need to put the Y-Board into boot mode: · Turn off the badge. · While holding the boot button, switch the badge back on. · Upload the code. Once the upload starts, you can release the boot button.
If this doesn’t work, try again, it almost always works on the second attempt.
tone_gen_loop() – play tones
· Uncomment the tone_gen_loop() function · Upload the code. - (you may have to push the “reset” button on your board after you upload) · Once uploaded, the screen should display the currently selected frequency. · Pressing Button 1 will generate and play a tone at that frequency. · You can modify the frequency and its corresponding musical note by adjusting the potentiometer knob.
play_notes() – program notes to play
Now that you are able to play single notes, we can string them together to make a song.
· comment out the tone_gen_loop() function. (comment out code by putting two slashes (//) in front of it.) · Uncomment the play_notes() function. · We already have several songs that you can choose from. They are:
- star_spangled_banner
- mario
- star_wars
- fight_song
- If you are feeling adventurous, you can look at the code to see if there is another secret song programmed in. You might want to look at the tone_gen.h file. · Insert one of these between the parentheses, replacing the phrase “put something here” to have the Y-Board play this song when you press button 1. · Upload the code and try it.
- (you may have to push the “reset” button on your board after you upload) · To play your own song using tones, replace the variable name for the song with a string of note instructions, making sure to include the quotation marks, like this: “C4 E4 G4”. (The table below explain the notation more.)
| Command | Notation | Example |
|---|---|---|
| Play a note | Use the note name | "A B C" |
| Set the note duration | Use numbers to indicate the “fraction” of the note (4 - quarter, 8 - eighth, etc.). default is 4. | "A4 B8 C1" |
| Sharps / Flats | use a + for sharps, and a - for flats |
"C+ F- G+" |
| Set the tempo | Use T followed by a number (in units of BPM) |
“T80 A8 B8 C8 T120 A8 B8 C8” |
| Set the octave | Use O followed by a number between 4 - 7 |
“O4 C4 O5 C4” |
| Rest | Use the letter R followed by the length (same lengths as notes) |
“C4 R8 E4” |
| Dotted Rhythm | Place a . after a note to hold the note 50% longer |
“C4 D4. C4” |
filter_tone()
Have you noticed the knobs on stereos that adjust treble and bass? Filters are essential in audio processing to enhance sound quality. They can boost bass, remove high-pitched noise, or add reverb.
There are two main types of filters: · High-pass filters allow only high frequencies through. · Low-pass filters allow only low frequencies.
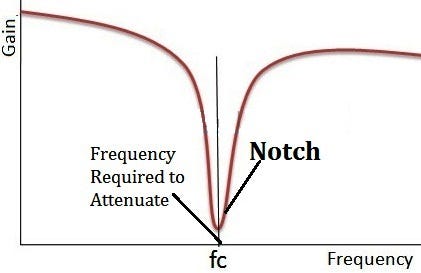
To remove high-pitched ringing, we use a low-pass filter. But we can refine this further. The recorded tone is 440 Hz (A4), and by combining high-pass and low-pass filters, we create a notch filter, which removes a specific frequency range while allowing others through.
The graph below shows this concept: the y-axis represents sound volume (gain), and the x-axis represents frequency.
- Comment out the last function you used.
- Uncomment the filter_tone() function.
- Upload the code
- This function gives you and example of a filtered signal. When you press button 1 You will hear a single tone and if you listen closely there is a quiet voice speaking at the same time.
- We want to use a filter to remove the tone and understand what is being said. Pressing button 2 applies a bandpass filter to this recorded signal and plays the filtered version to you.
record()
Now play with applying filters to sound you record yourself. You will record a sound, then apply a low pass, or band pass filter to it.
- Comment out the last function you used.
- Uncomment the record() function.
- Press and hold button 1 to record
- Use switch 1 and switch 2 control the filter settings
- Switch 1 down, switch 2 down = no filtering
- Switch 1 up, switch 2 down = low pass filter applied
- Switch 1 down, switch 2 up = band pass filter applied
- Press button 2 to hear the filtered sound
- Play around with different recordings (example, whistle, snap, low voice, etc.) and see how different filters affect this signal.
play_song()
To play any song on the Y board, use the play_song() function. Try this out with a prerecorded song first:
- Comment out the last function you used and then uncomment the play_song() function.
- Upload the code and you will hear your Y-Board play Ode to Joy when you press button 1.
You were able to play the .wav files we gave you. You can also add your own on the SD card and play them. All you have to do is change the SONG_FILENAME at the top of the code to the new filename. The Y-Board is only coded to play .wav files with a single channel and a sample rate of 16,000 Hz. Most online audio editing tools can set this (examples are TwistedWave, Bear Aduo Editor, and AudioMass)
Background
Speakers
Speakers work by converting electrical signals, called samples, into sound waves that we can hear. This is done through an electromagnet and a diaphragm. As the electromagnet pulls the diaphragm forwards and backwards, it creates pressure waves that are propagated through the air as sound.
An important concept to understand in the world of computer audio is sample rate. A sample is a number that tells the electromagnetic and diaphragm in the speaker what position to be in. By changing this number, we can cause the diagraph to move and create a pressure wave in the air. The sample rate is the rate at which we send these numbers to the speaker. The big question then becomes, how high or low should our sample rate be to create good quality audio.
Here is a graph of a wave that represents a tone with the frequency 440 Hz (A4 on the piano).
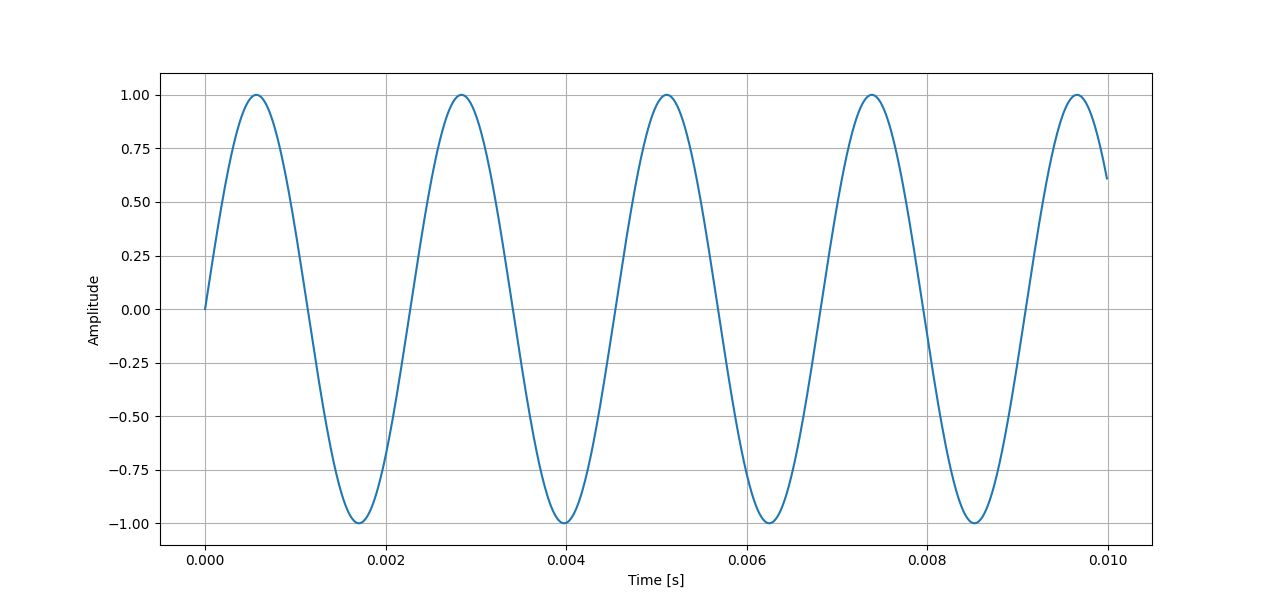
This wave is continuous, meaning it is defined at every point with no gaps. Computers, however, do not have infinite memory to store these samples, so we must choose when to take a sample. The more samples we take, the better the audio quality. However, there reaches a point where the human ear can’t tell the difference, so we don’t go overboard. Generally, we take 44,100 samples per second (44,100 Hz), though due to computational limitation so the Y-Board, we use slightly lower than that. Here is the same tone but how we could sample it.
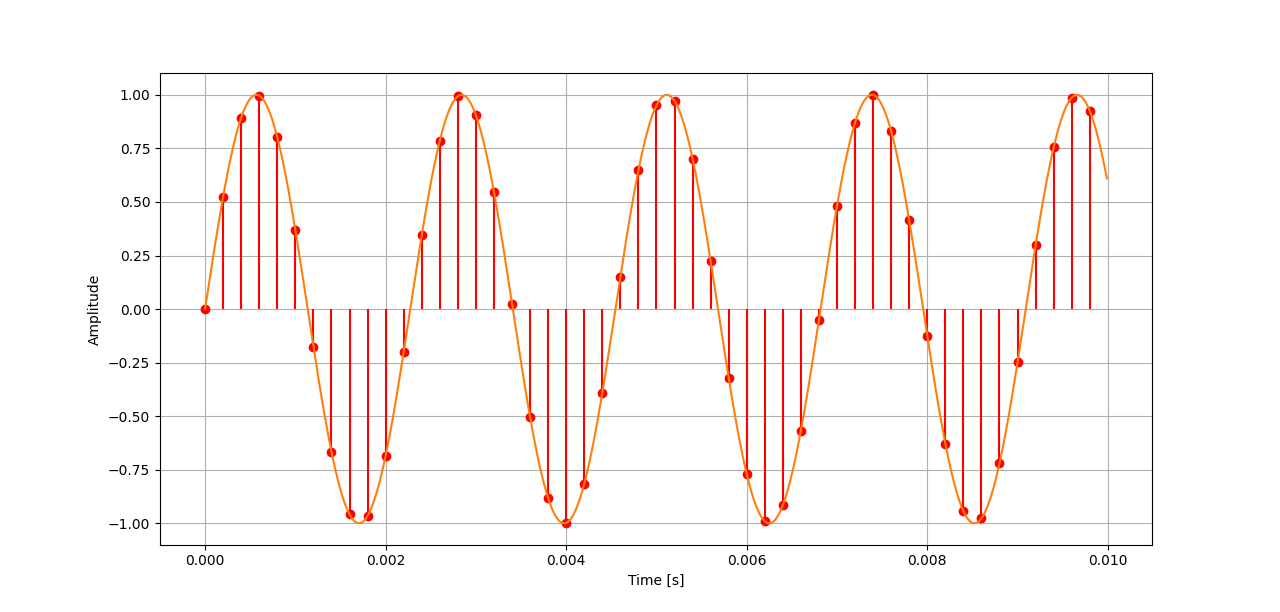
These samples are stored in an audio file. The most basic type of audio file is the wave (.wav) file which is what we will experiment with today.