Table of Contents
Overview
In this lab we will be using some tools you are likely already familiar with to measure DC voltage, DC current, and resistance. Now that you know how to create and operate circuits using breadboards, it’s time to learn how to use multimeters.
Background/Preparation
Introduction to Ohm’s Law:
Ohm’s Law is one of the most fundamental concepts in the theory of electronics. Ohm’s law is states:
The current (amount of electricity) flowing through a conductor (anthing that allows electricity to flow through it) at any two points is directly proportional to the voltage (energy difference) across the two points, and inversely proportional to the resistance (of current flow) between them. Ohm’s law is written:
$$ I = \frac{V}{R} ~~ or ~~ V = IR $$
The concepts of Ohm’s law are often compared to a water pipe: the voltage is the pressure of the water in the pipe - higher pressure pushes more water down the pipe. The resistance is the size of the pipe - a larger pipe allows for easier water flow through the pipe. Finally, the current of the pipe is the actual amount of water flowing through any given cross section of the pipe.
Pause and think - how would changing the height and width of the pipe affect how much water is flowing through it? How would pushing more water through the same pipe affect the pressure of the pipe? How can you relate these terms back to the concept of electricity flowing through wires?
Here is a simple circuit that depicts Ohm’s Law in action:
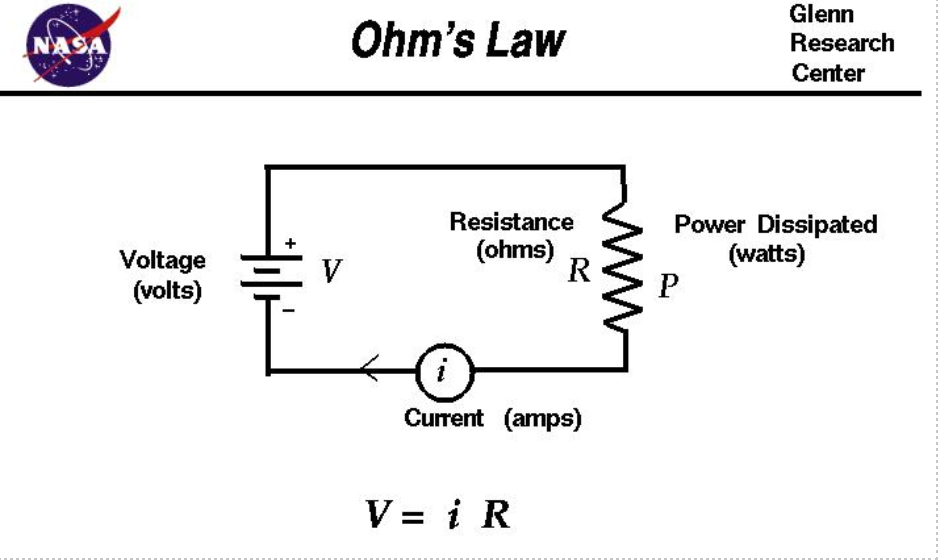
Image credit: Glenn Research Center, NASA
Here is a table to summarize everything:
| Variable | Unit | Symbol |
|---|---|---|
| Current | Ampere | A |
| Voltage | Volts | V |
| Resistance | Ohms | Ω |
Introduction to Multimeters:
To measure current, we’d need an Ammeter; to measure voltage we’d need voltmeter and to measure resistance we would need an ohmmeter. With so many different machines to measure so many properties it would be chaos in your labs, but luckily we have multimeters to save the day! Most multimeters can measure DC voltage, AC voltage, DC current, resistance, can perform diode tests, and can measure battery resistance. Here’s a diagram of the working parts of a multimeter:
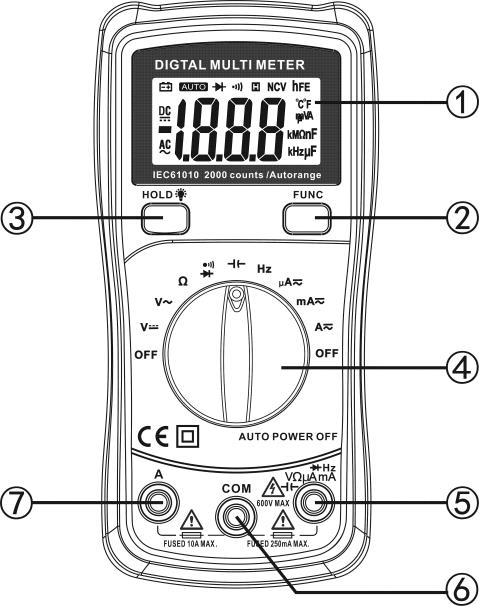
1. LCD display
2. “FUNC” Push button
3. “BACK LIGHT” push button and ‘HOLD” push button
4. Rotary Switch (Knob)
5. “V/Ω/HZ/uA/mA”Input terminal
6. “COM” input terminal
7. “10A” input terminal
Image credit: Neoteck User Manual
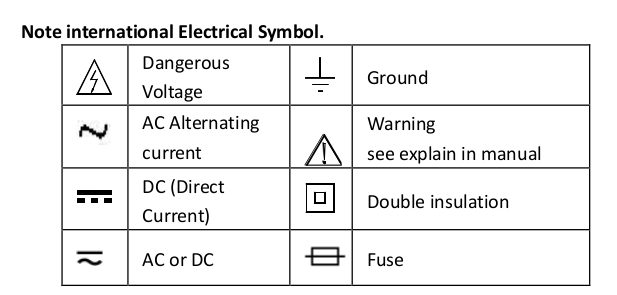
Image credit: Neoteck User Manual
Here are some things to keep in mind when you work with the multimeter:
- The COM pin, which stands for COMMON, is always connected to the ground and acts as a common reference point. It is almost always considered zero voltage, and it is usually represented by a black wire.
- The VΩmA port is connected to the positive. It is considered the point of high voltage, and is often represented by a red wire.
- By turning the knob, we can measure the quantity of our choice.
Notice that while there are only 3 types of measurements, V, A, and Ω, there are also several quantities available for each type of measurement. Becuase there is so much variety in electronic design, difference scales are available depending on the range of V, A, or Ω you expect to encounter.
Warning: Before you use a multimeter, you need to know what values you expect to encounter and select the appropriate scale. Failure to do so can overload the multimeter and may even cause a short circuit, which can be dangerous to you, and permanently damaging to both the circuit and the multimeter.
Equipment and Materials
-
Multimeter
-
Led (1) (Any color)
-
Potentiometer (1) (23 kΩ)
-
Resistors: 250 Ω, 360 Ω, 750 Ω, 10 kΩ, 5 kΩ, 68 kΩ,
-
Jumper Wires (10)
-
Breadboards (1)
-
9V battery (1) (6A)
-
Alligator clips (2)
-
Temperature Sensor (1)
-
Battery Screw Terminal (1)
Procedure
Resistance:
Remember: Make sure you have the multimeter to measure resistance (Ω symbol)
Read and Calculate Resistance:
Step 1: Calculate the resistance and tolerance: Choose a few resistors from your collection. We will be using the color code chart and this Resistance Calculator to calculate the resistance and the tolernace of each resistor you choose. Pay attention to the number of colored bands on each resistor to determine if it uses a 4-band or 5-band color code system.
Step 2: Measure the resistance: Set the multimeter to measure resistance (Ω symbol). Use the alligator clips to connect to one end of the resistor, connect Ground (COM, black wire) to one end of the resistor and Positive (VΩ mA, red wire) to the other end of the resistor.
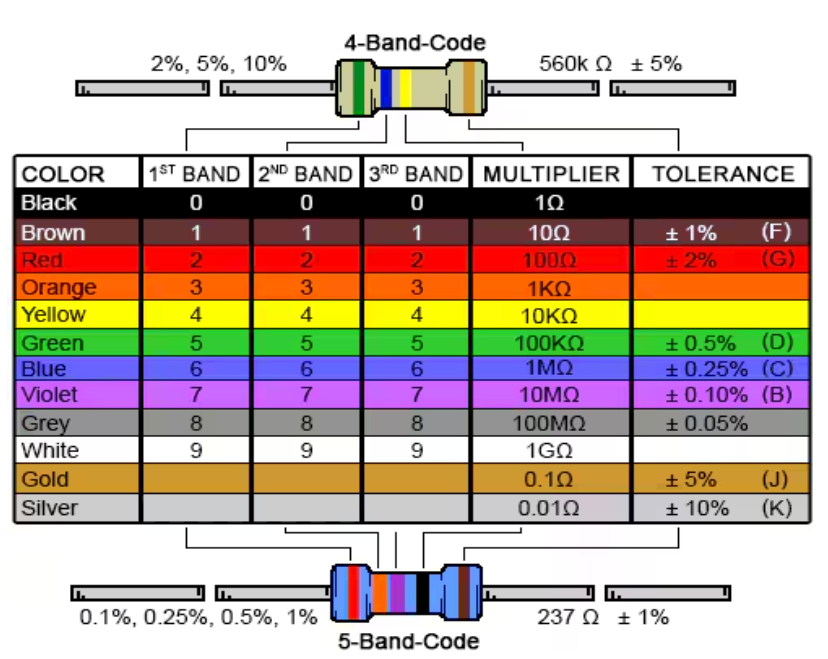
Image Credit: Digi-Key Electronics
Calculate Varying Resistance:
We will be using a potentiometer here to create a varying resistance. Here is simple GIF to show you how they work:
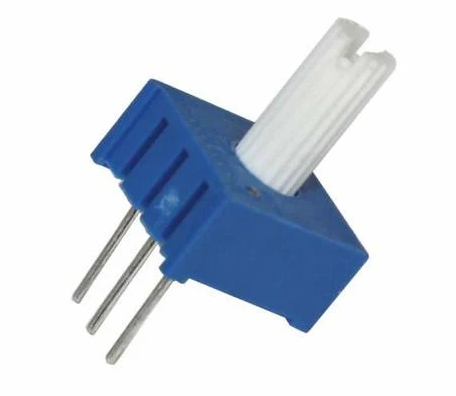
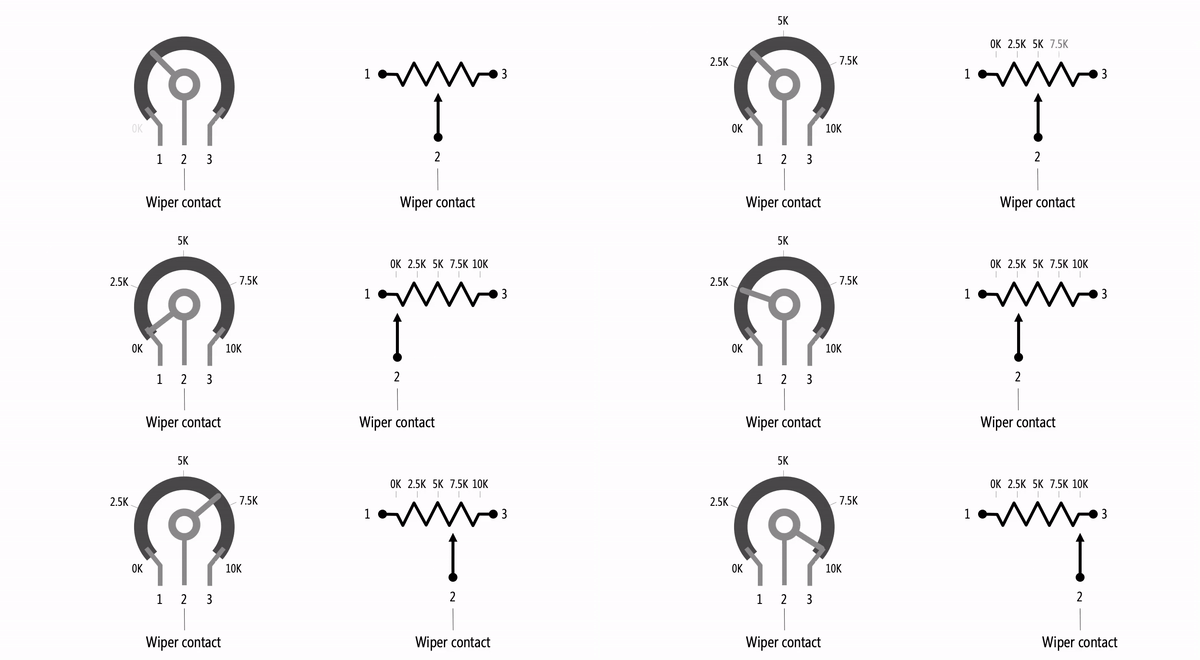
Image Credit:Electronix Express. (potentiometer) and Physical Computing and Craft Technologies, University of Washington. (potentiometer pinout)
If you remember our water pipe example, we can say that a potentiometer acts like a valve inside of the pipe - as we open the valve wider we allow more water to flow, and as we close the valve less water can flow. Remember that in our example less water is higher resistance, so closing the valve is equivalent to rotating the wiper to the right.
Summary: As you rotate the wiper (or knob) from left to right, the resistance increases. Let’s try it!
Step 1: Make connections: Put the potentiometer on a breadboard. Connect two wires to the outer two pins of the potentiometer. Then clip the alligator clips (red and black) on the multimeter to those wires. Observe the multimeter reading. As you rotate the wiper around, does your resistance change?
Step 2: Adjust connections: Move the red wire from the outer pin to the middle of the potentiometer. Now, rotate the wiper (knob). Does the resistance change?
Fun Fact: Have you ever adjusted the volume on a radio? By turning the knob, you control how loud the music plays. This is a potentiometer at work! When you turn the knob on an analog radio, it changes the resistance in the circuit, which in turn changes the amplitude of the signal traveling out to the speakers, which we know as the volume.
Voltage:
Note: Make sure you have set the multimeter in the right setting to measusre DC voltage (V symbol).
Measure Voltage:
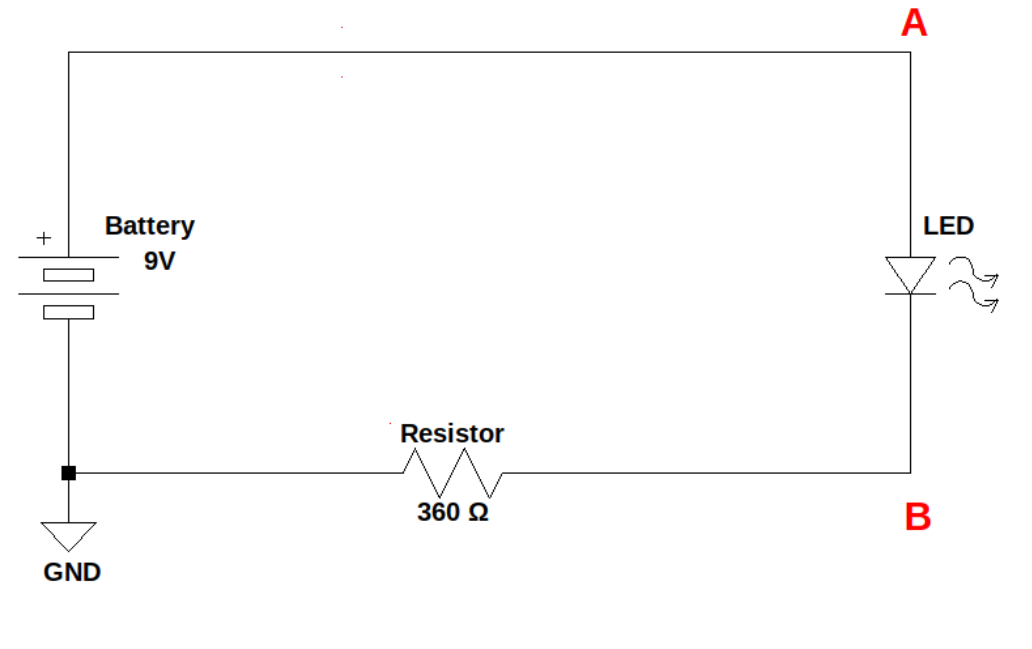
Step 1: Make connections: Follow the schematic to make the circuit shown above.
Step 2: Measure the voltage drop across the LED: You will be connecting your two aligator clips to the points A (Positive) and B of the schematic to measure the voltage drop across the LED.
Measure Varying Voltage:
We will be using a temperature sensor for this lab; a temperature sensor contains a resistor that changes its resistance with temperature. Refer to the image of the pinout for the temperature sensor to make sure you’re making the connections to the right pins on the breadboard.
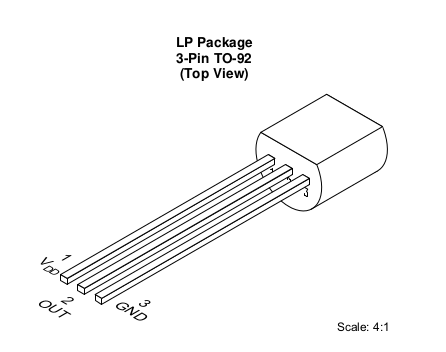
Image Credit: Texas Instruments.
Step 1: Make connections: Follow the schematic to make the circuit shown above.
Step 2: Measure the voltage: Begin by measuring the voltage of the temperature sensor at room temperature. Then, pinch the temperature sensor with your fingers (which will increase temperature) and observe the change in voltage.
Note: Connect your multimeter at points A (Positive) and B (Ground) on all schematics.
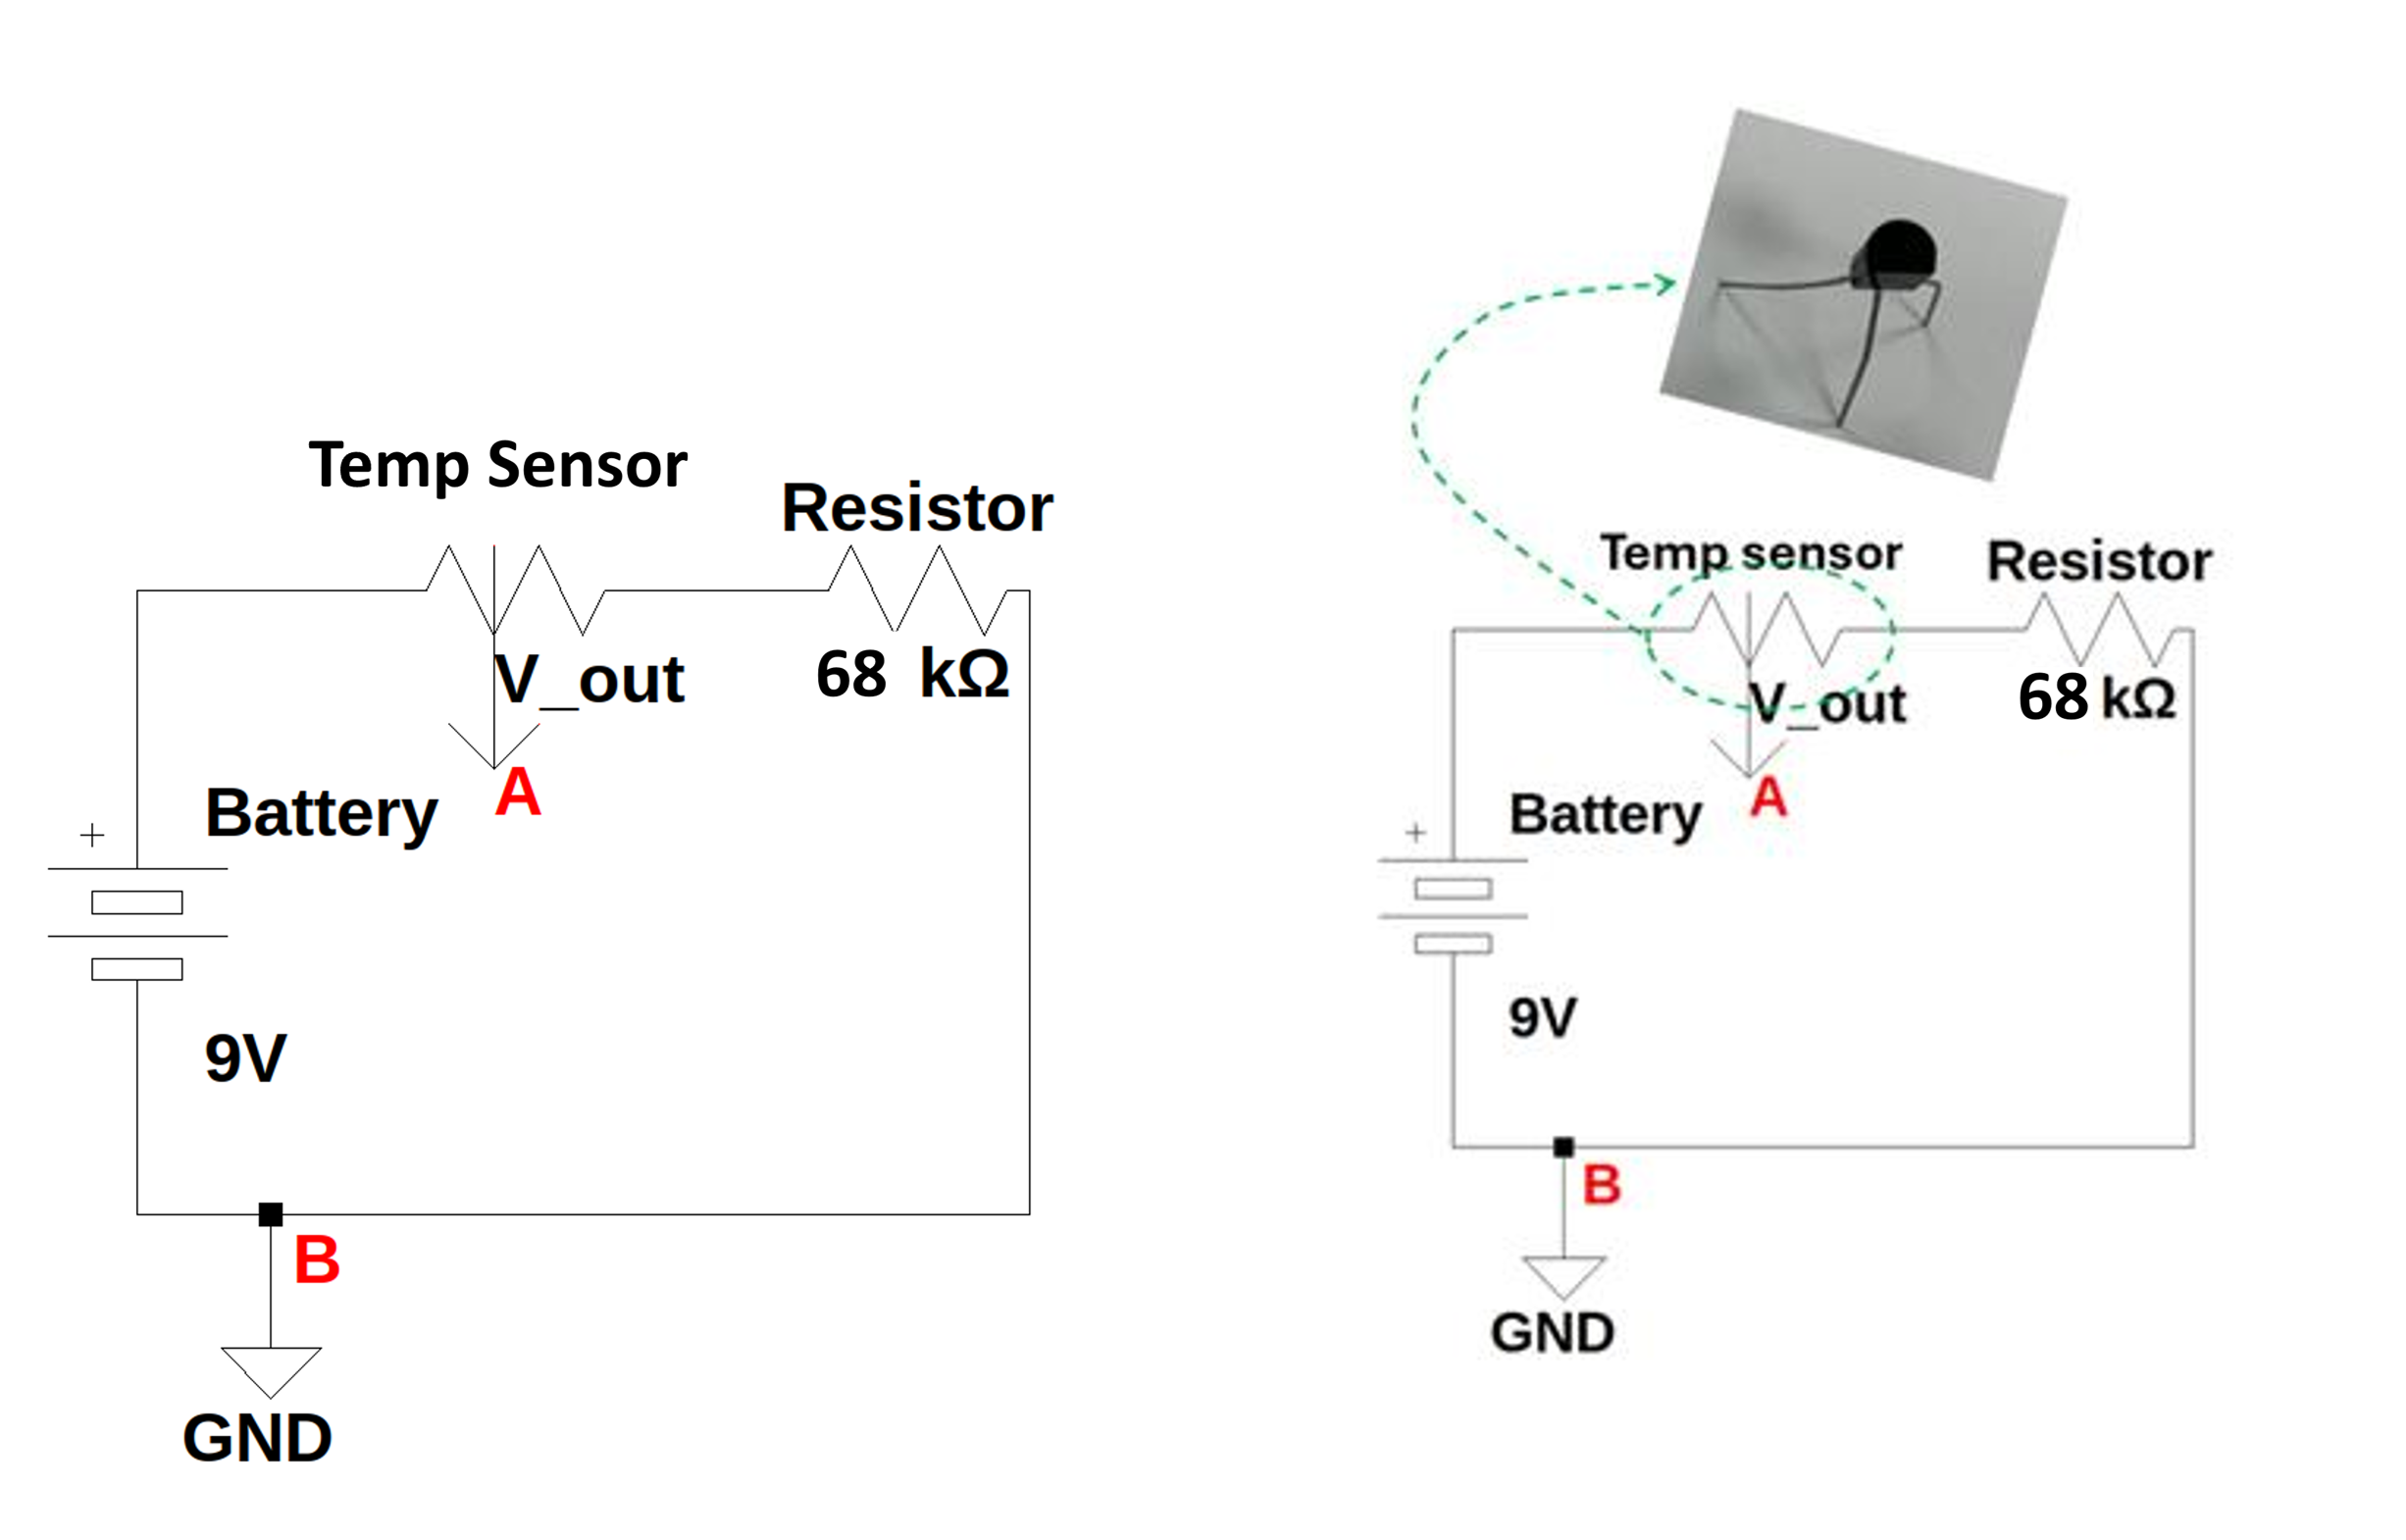
You’ll notice that the voltage increased as the thermister’s temperature did. Using your knowledge of Ohms Law: \(𝑉 = I𝑅\) - did the resistance of the therminster increase, or decrease? What do you think happened?
Explore Activity: You can use the voltage you measured to find the temperature. You can use this formula: \(T = 33.37 * V – 6.88\), where T is the calculated temperature in in Fahrenheit, and V is your measured voltage.
Current:
Note: Make sure you have set the multimeter in the right setting to measusre DC current (A symbol).
Calculate Current:
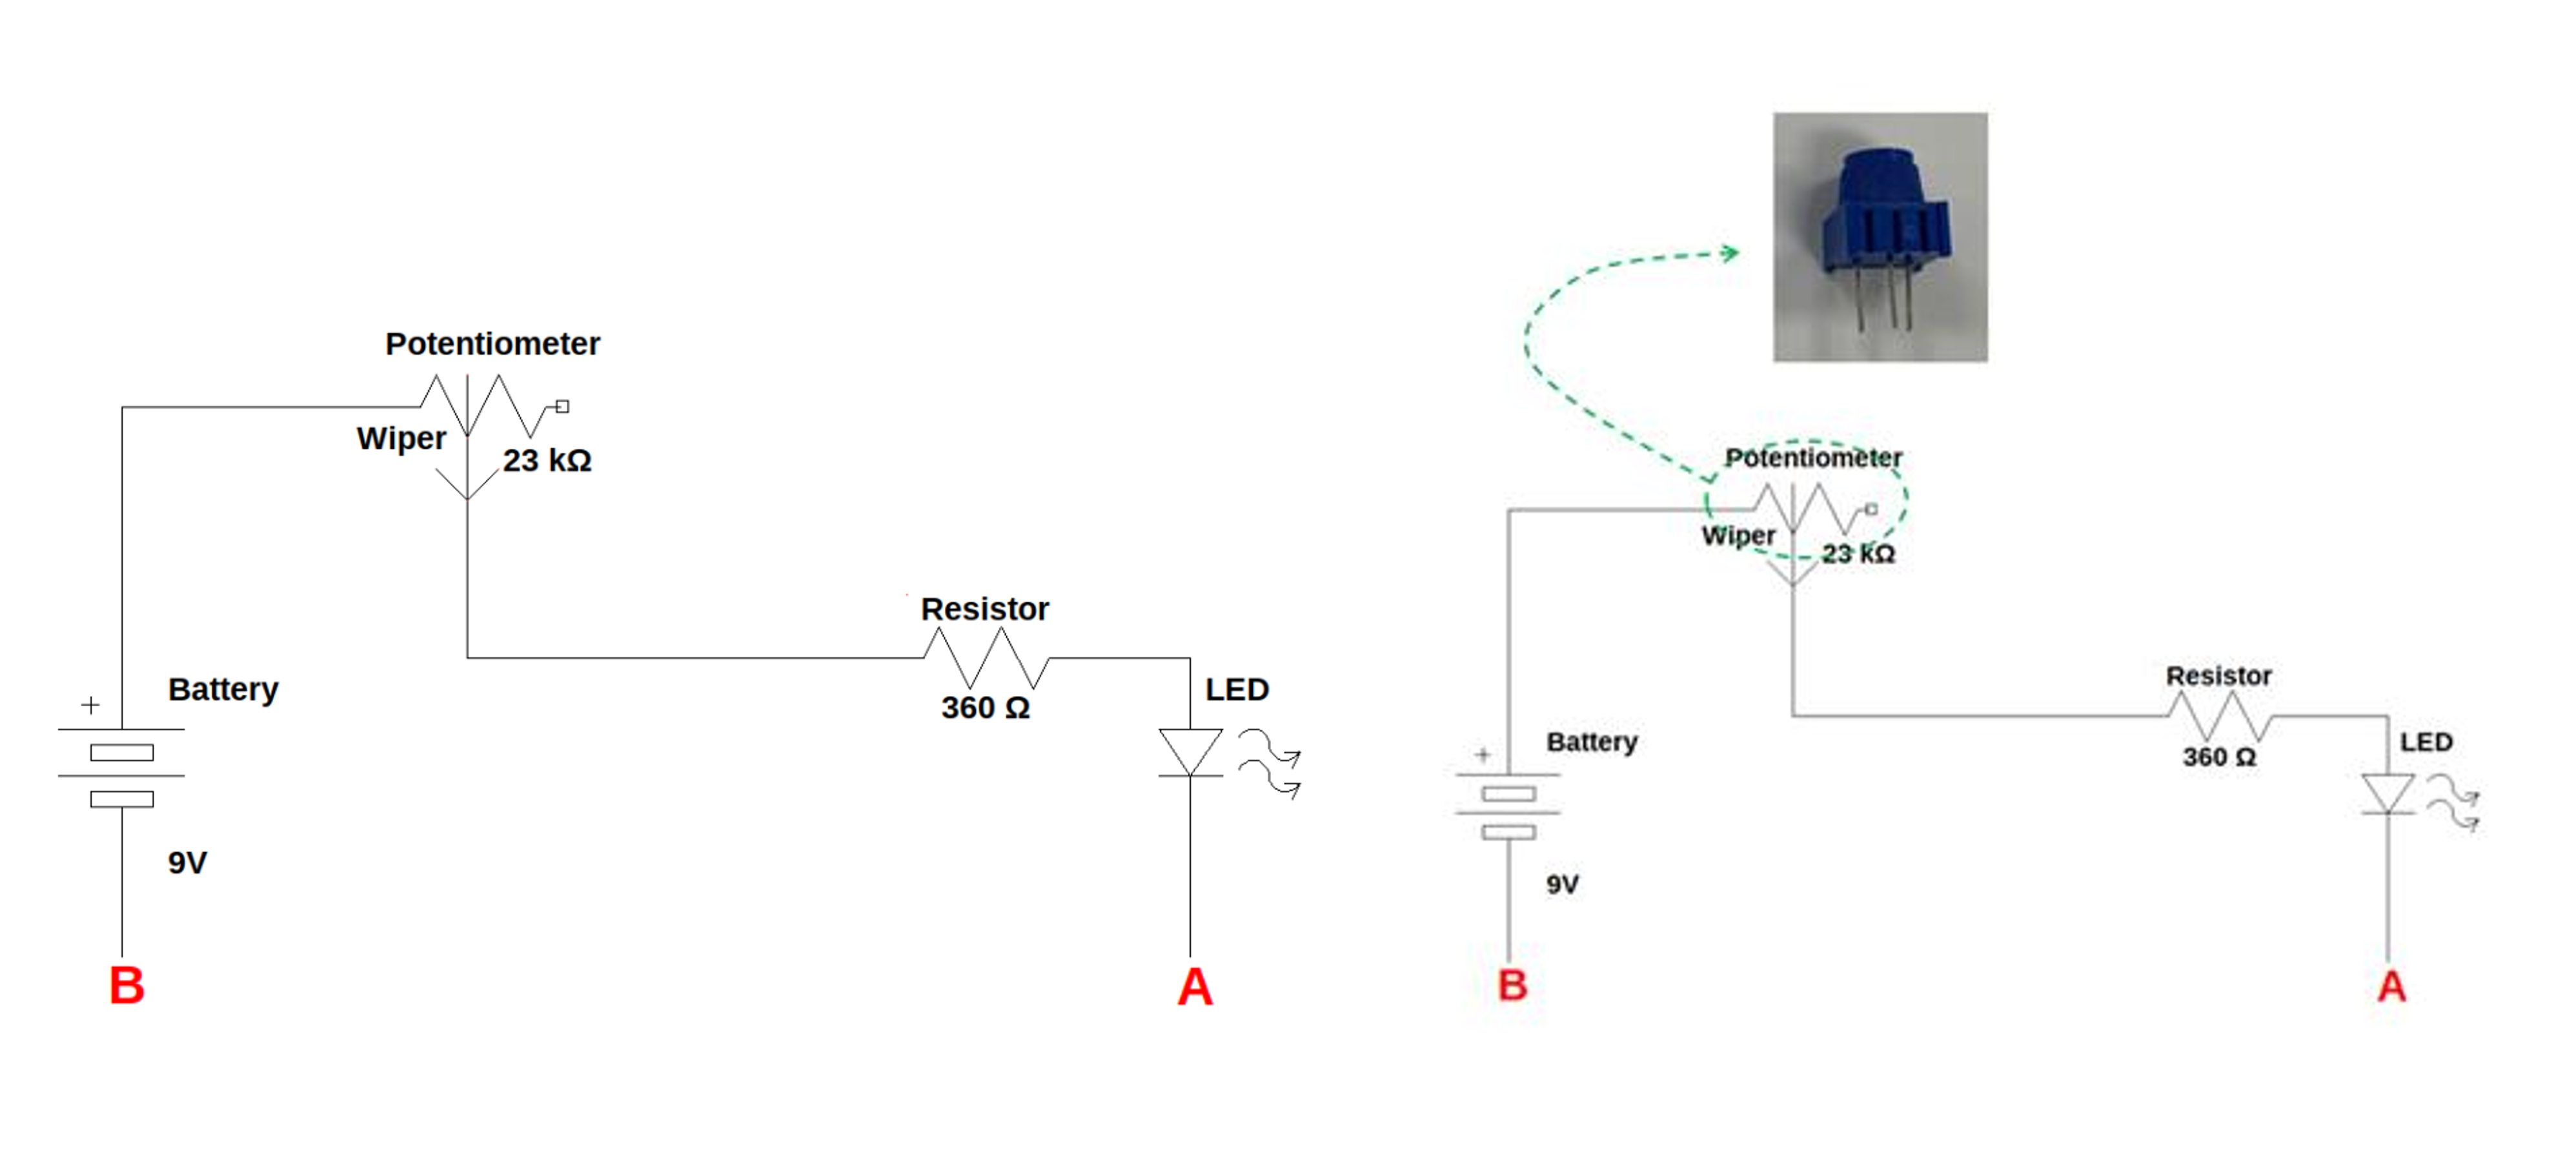
Step 1: Make connections: Follow the schematic to make the circuit shown in the schematic above.
Step 2: Adjust the setting: Connect your multimeter at points A (red lead) and B (black lead). Note that the multimeter acts as the final connection in the circuit. This is because it requires current to flow through it to measure it. Observe how the current changes while rotating the potentiometer’s wiper. How does the LED change when you do that?
Using the Ohm’s law \(I = \frac{V}{R}\), decide: what is happening to the LED when you change the current? What causes the change in brightness in the LED - voltage, or current? How do you know?